Introduction
Southend United concluded their National League season on Saturday after beating Wealdstone 2-1 at Roots Hall.
Second half goals from Wes Fonguck and Harry Cardwell either side of Nathan Ferguson’s red card for Wealdstone came after Charles Clayden had put the away side in front. The result meant that Southend finished the season in 8th place, just two points off of the play-off places.
In this article I will focus on how Wealdstone looked to build play from defence, how their ‘box midfield’ caused Southend problems, and how Southend managed to break Wealdstone down after they had been reduced to 10 men.
Starting Lineups
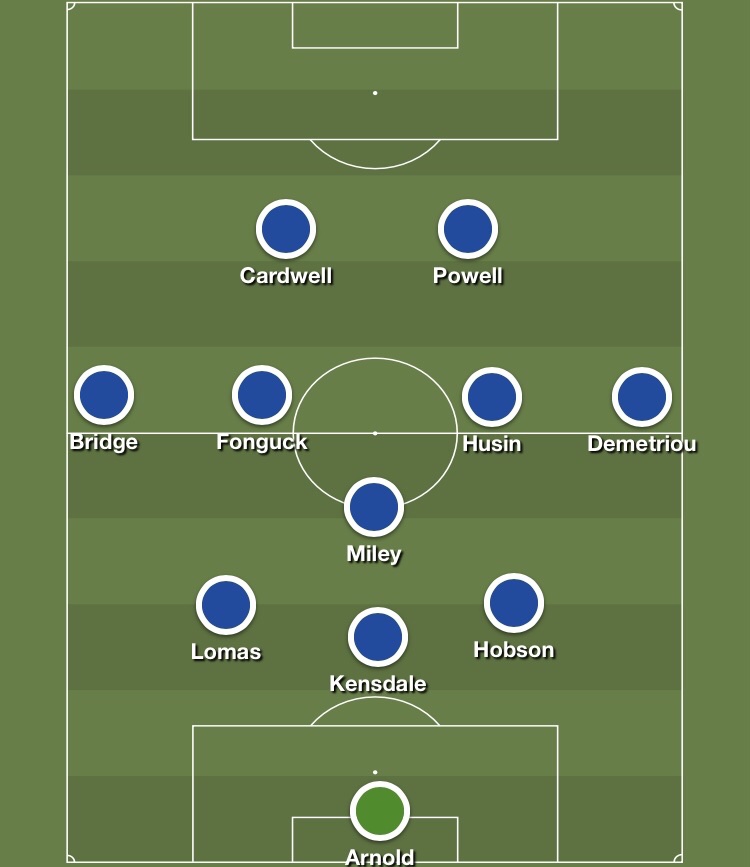
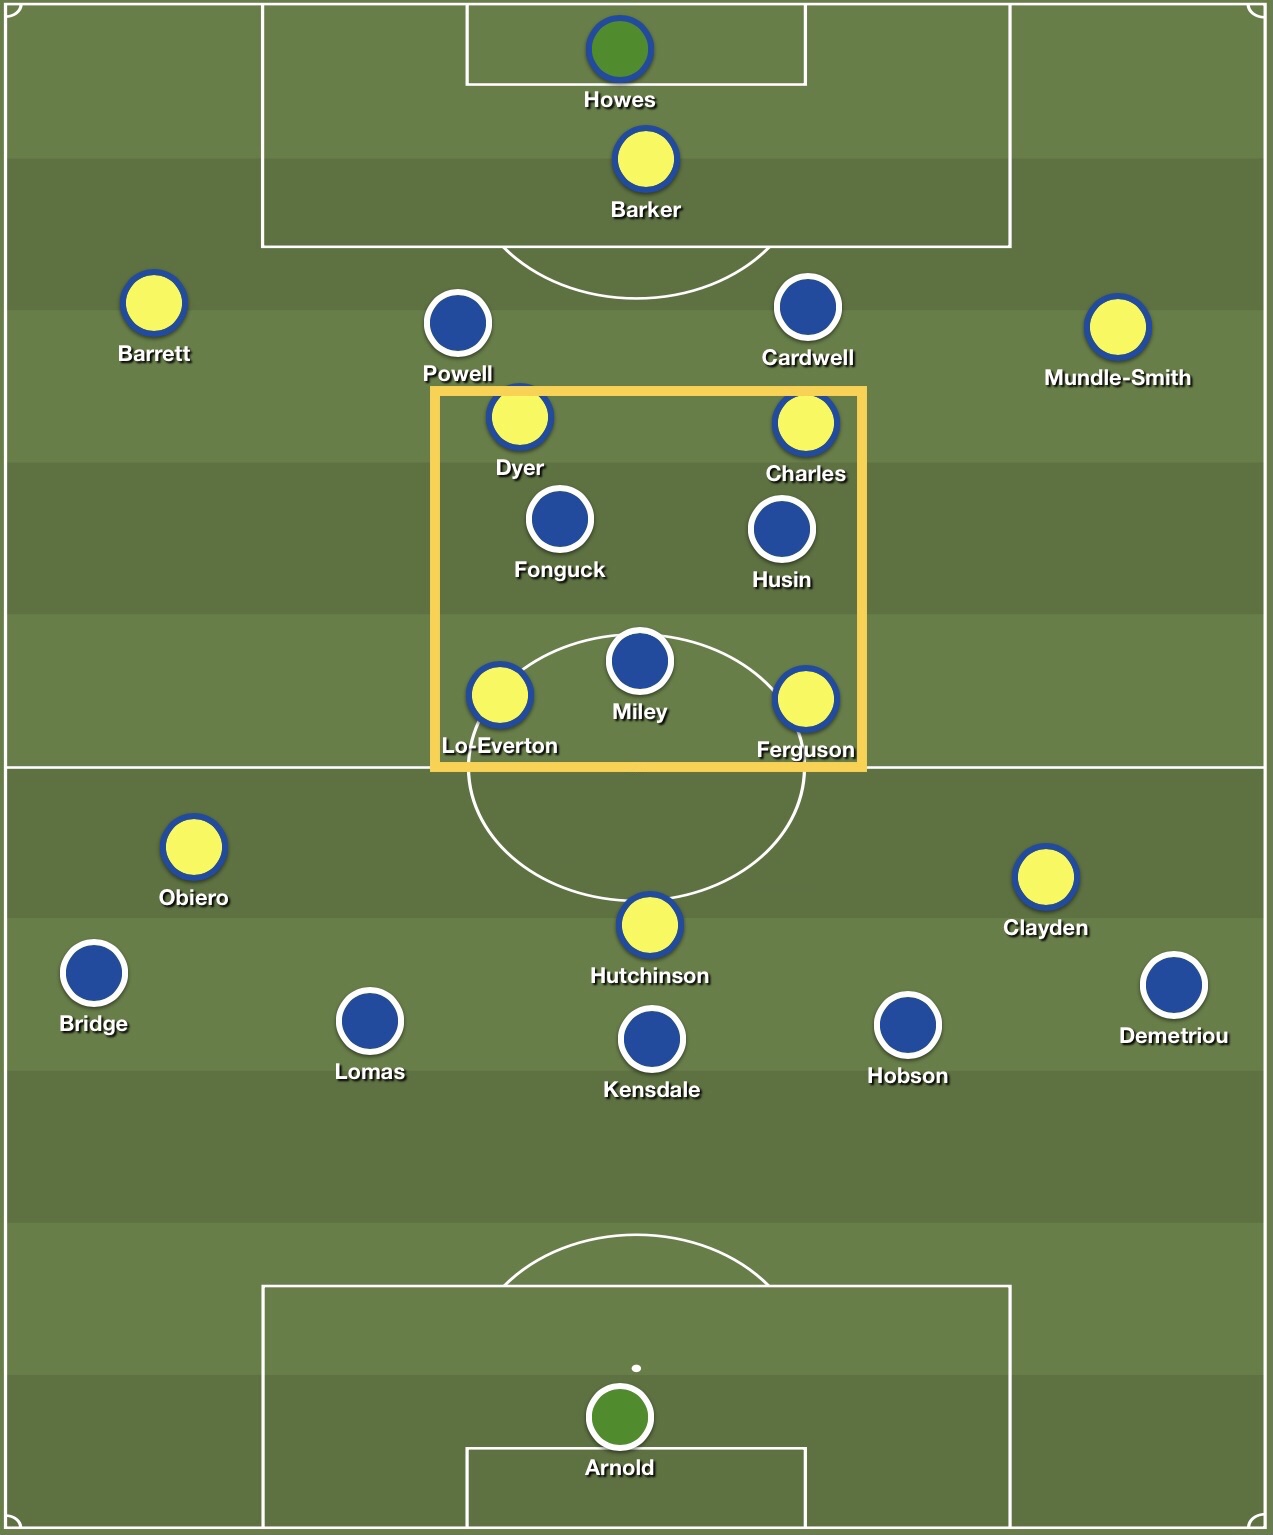
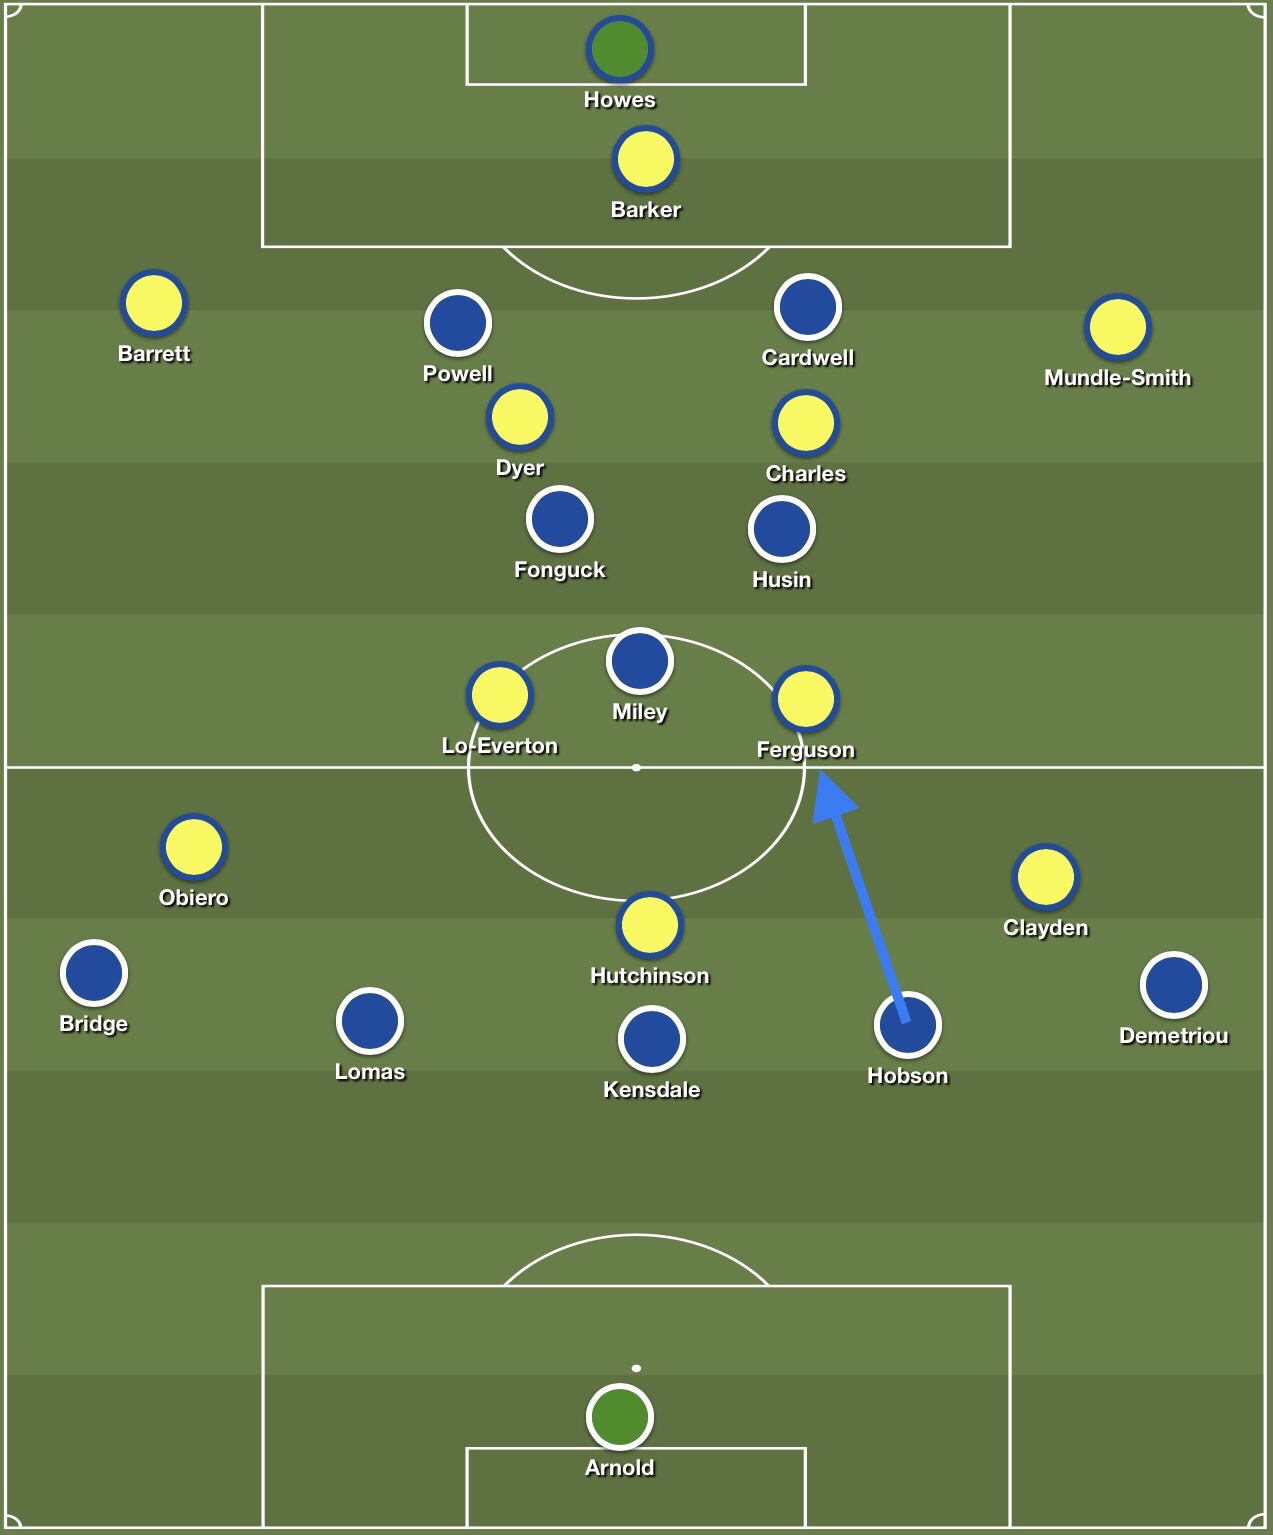
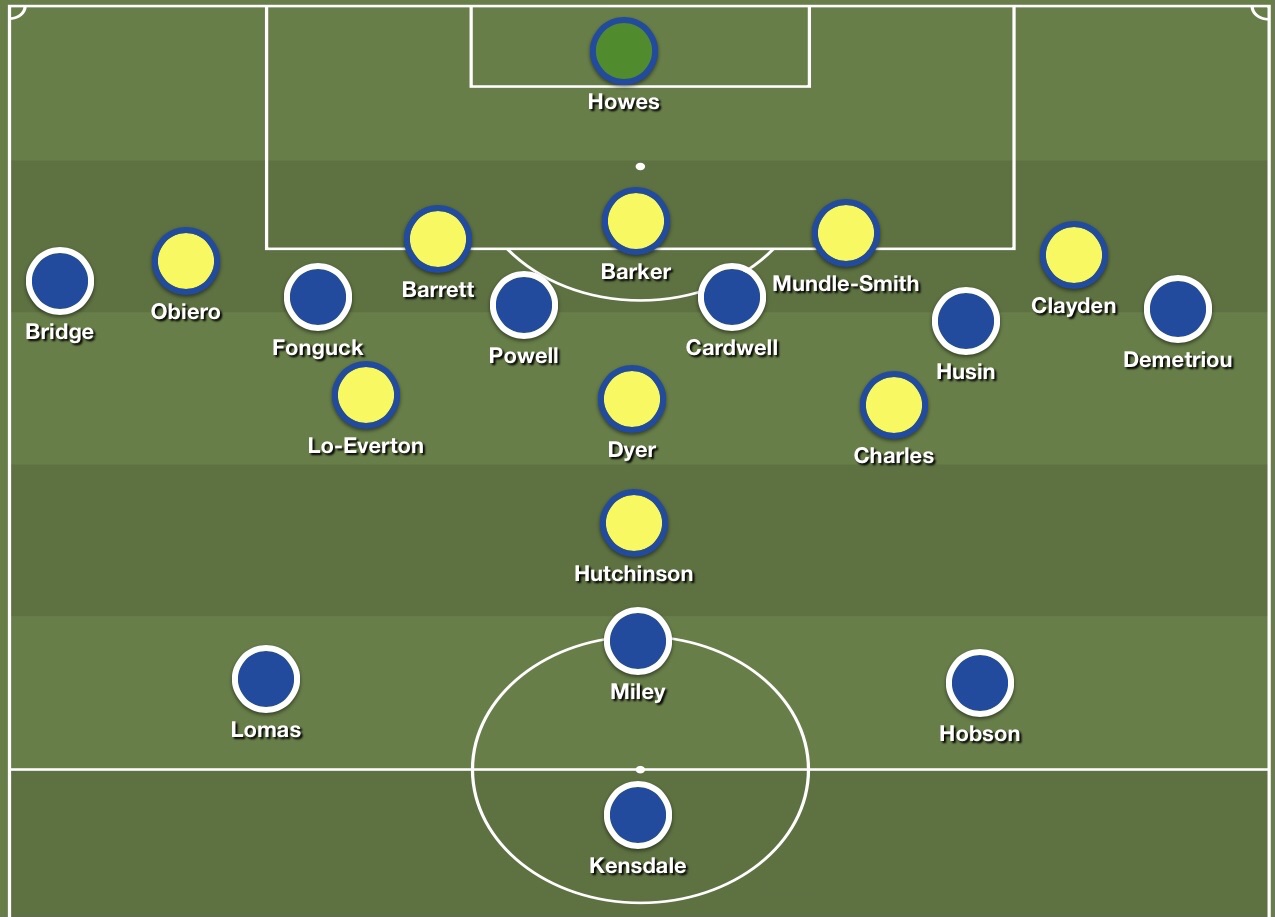
Southend lined up in a 3-1-4-2 formation. Steve Arnold was in goal behind a defence of Shaun Hobson, Ollie Kensdale and Louis Lomas. Cav Miley sat at the base of the midfield three, with Noor Husin and Wes Fonguck ahead of him. Jason Demetriou and Jack Bridge were the wing backs, with Callum Powell and Harry Cardwell up front.
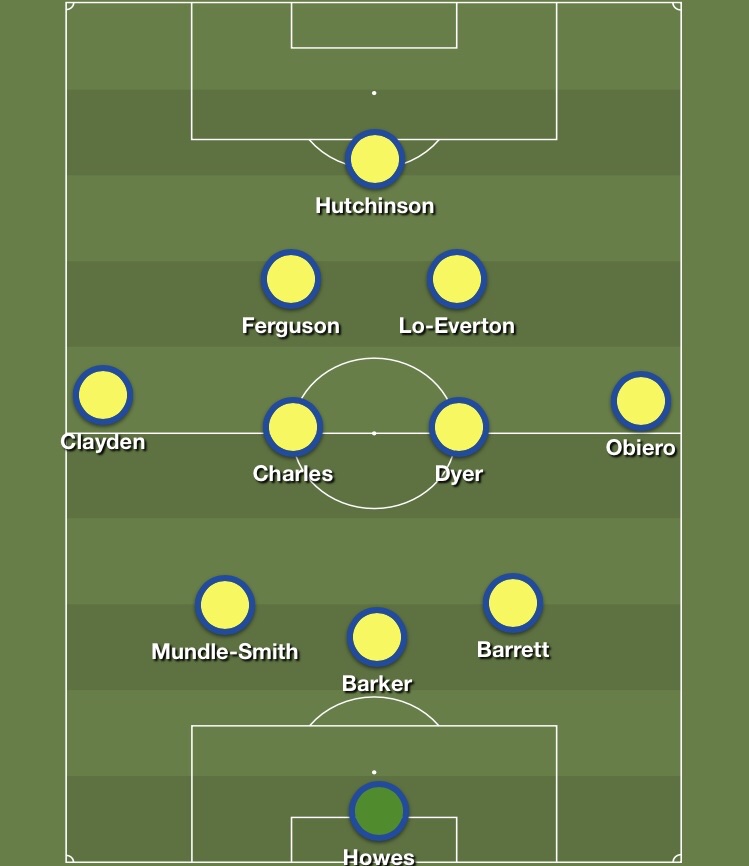
Wealdstone went with a 3-4-2-1 formation. Goalkeeper Sam Howes was between the posts behind a back three of Mason Barrett, Charlie Barker and Jaydn Mundle-Smith. Micah Obiero and Charles Clayden held the width, while Alex Dyer and Ashley Charles were the two central midfielders. Sonny Blu Lo-Everton and Nathan Ferguson played just ahead to form a ‘box midfield’ for Wealdstone, and Dominic Hutchinson was the centre forward.
Wealdstone Build-Up / Southend Pressing Structure
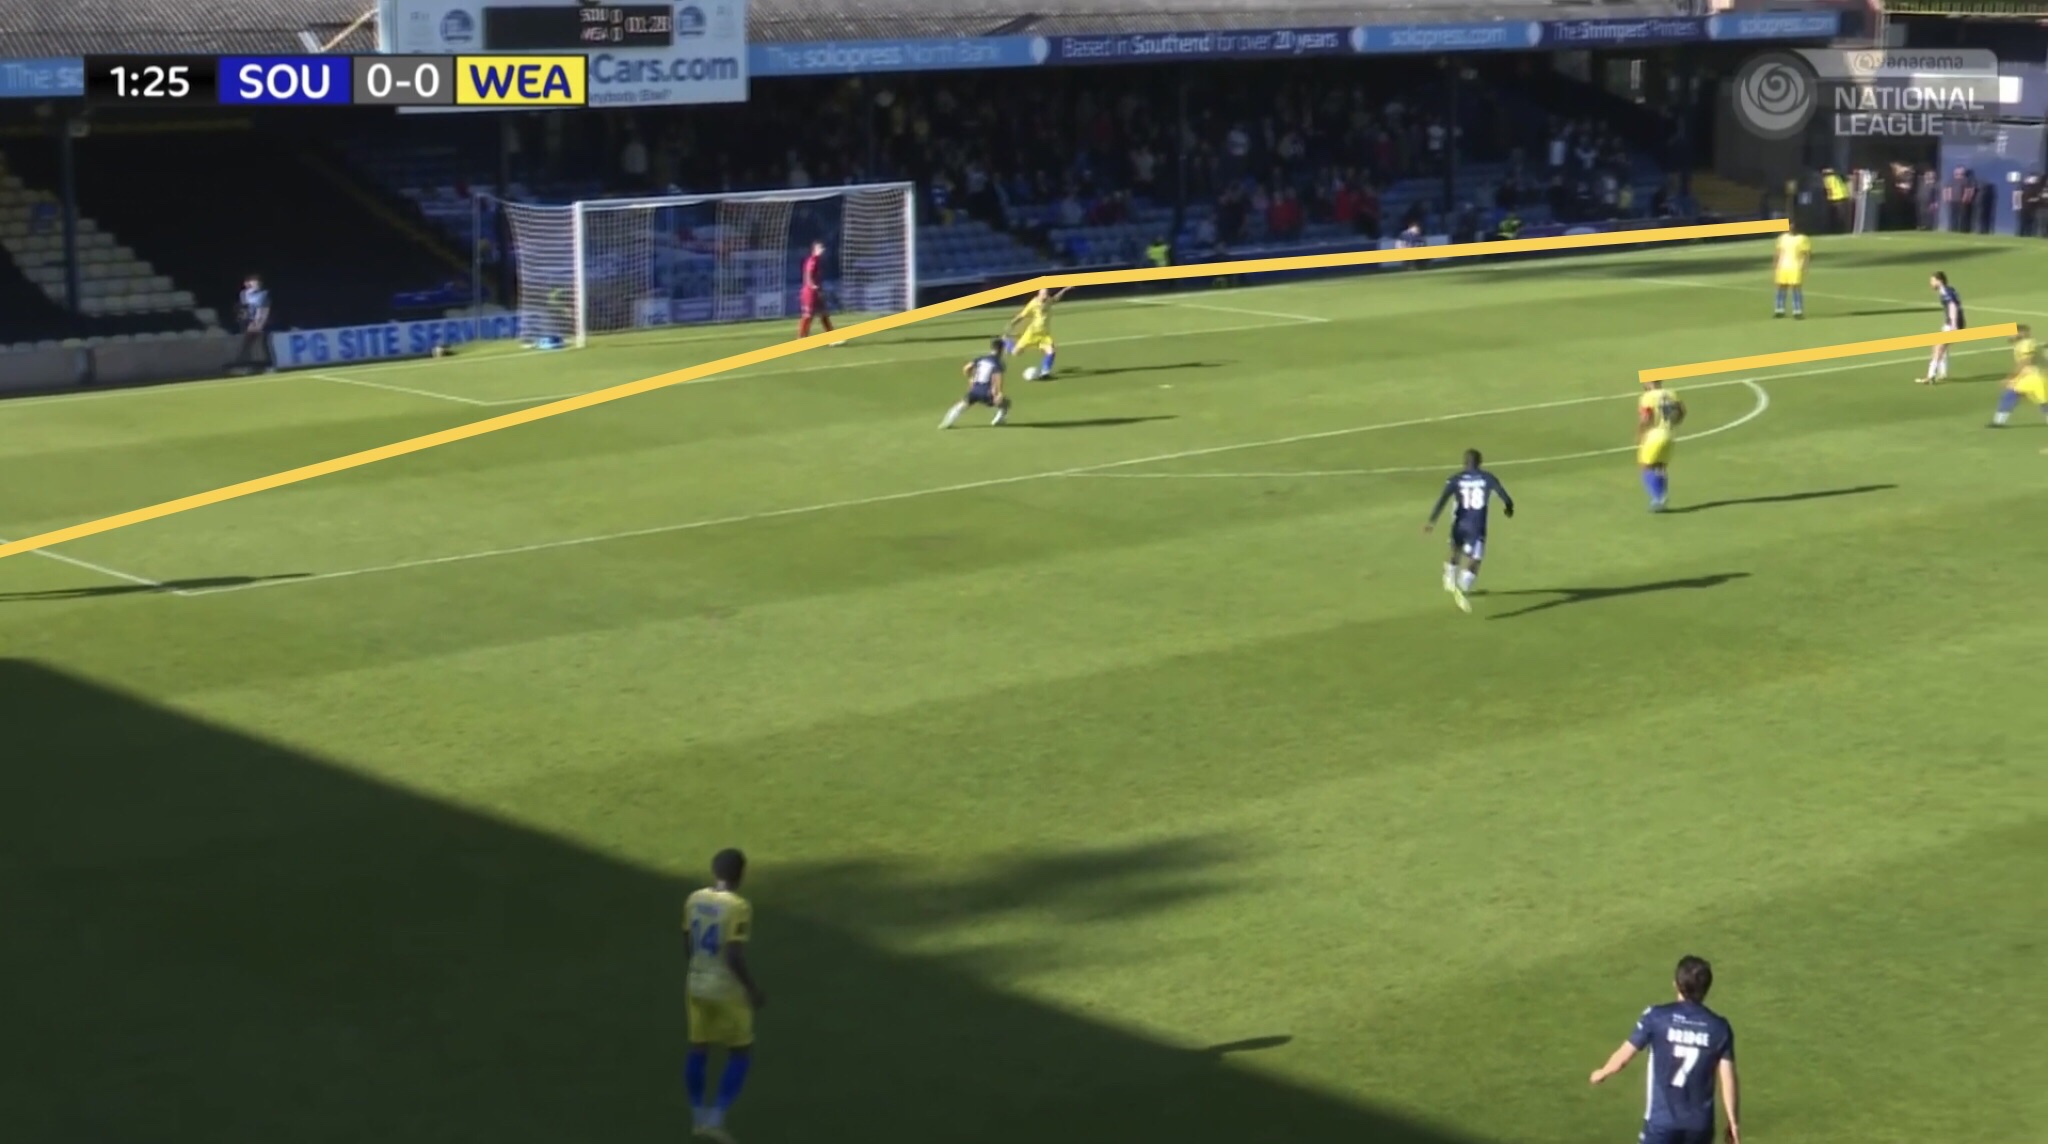
Wealdstone typically built play in a 3-2-2-3 shape, pushing their outside centre backs wider, whilst keeping their two central midfielders narrower. Wealdstone’s two advanced midfielders helped them form a ‘box midfield’ – the benefits of which I will explain in a moment.
To counter this, Southend positioned Husin and Fonguck on Wealdstone’s central midfielders, and used the strikers to press Wealdstone’s back three. The aim was for one of our strikers to make a bending run to block the passing lane out to one of the wide centre backs, either forcing Wealdstone onto the other side of the pitch where we looked to squeeze them, or play a long ball.
Wealdstone’s ‘Box Midfield’
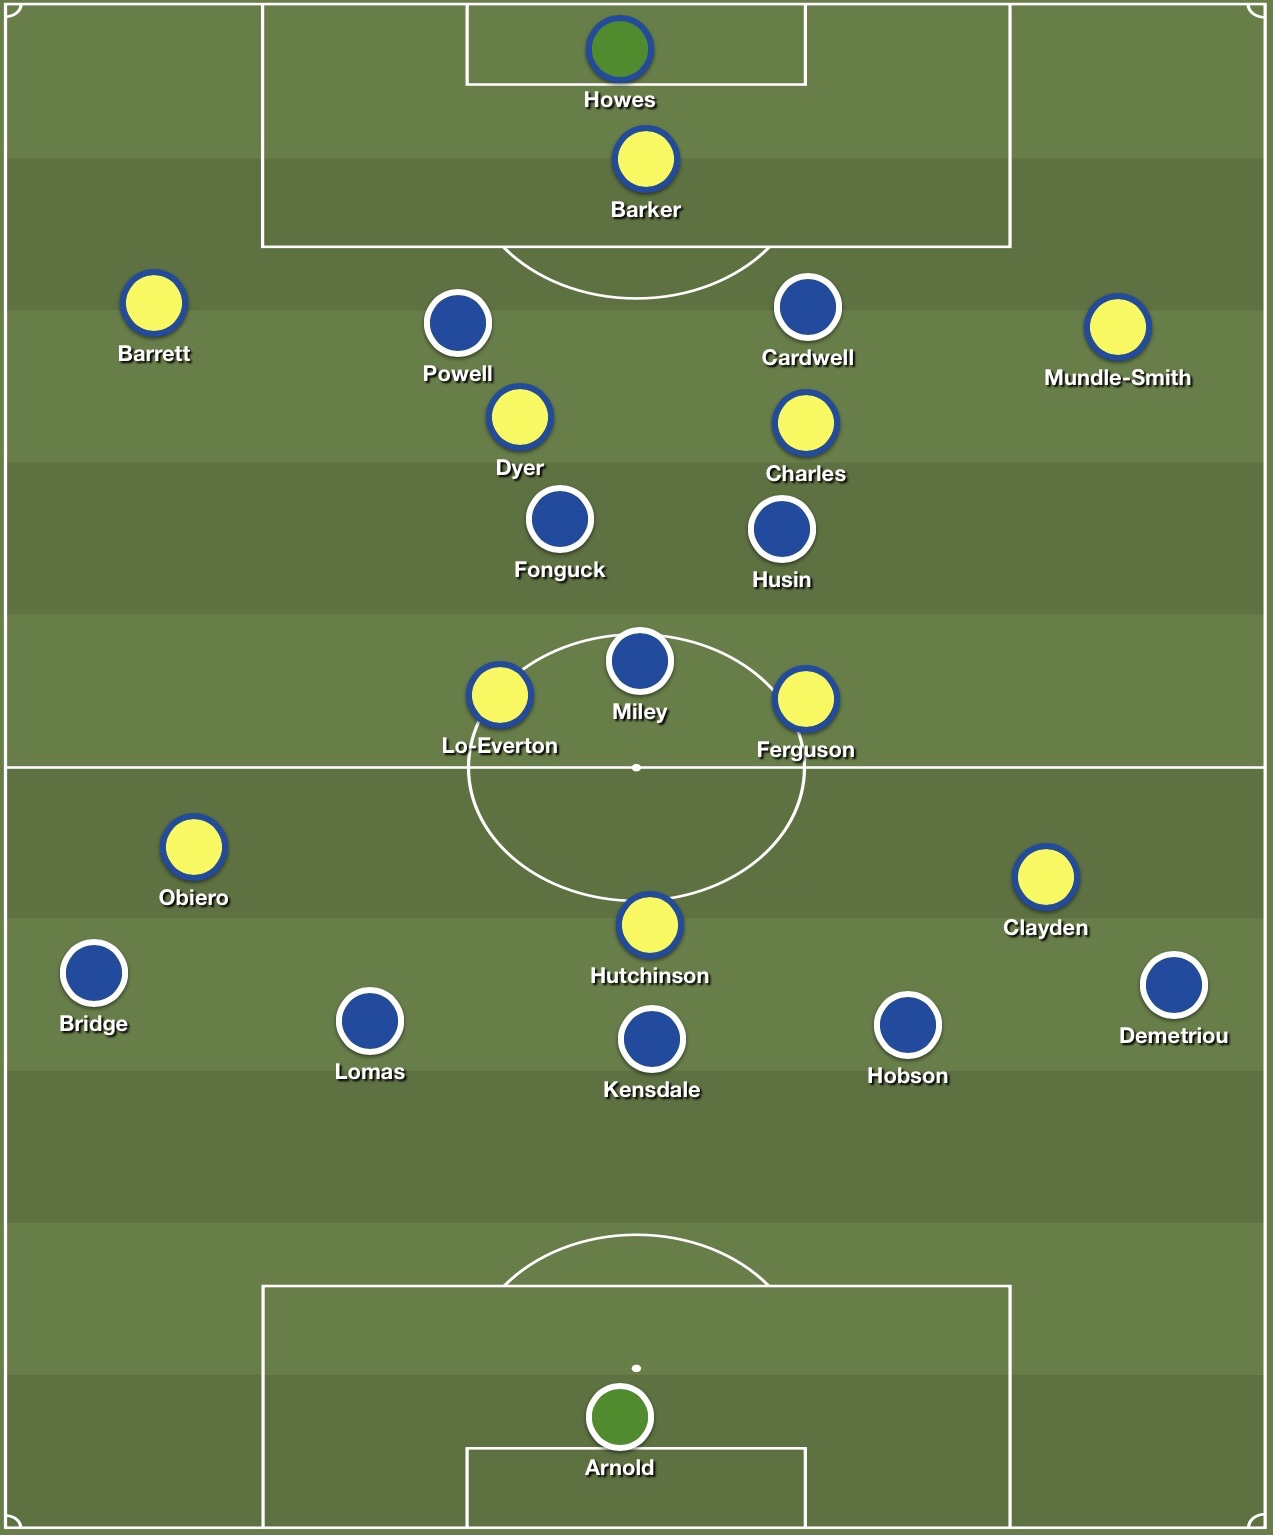
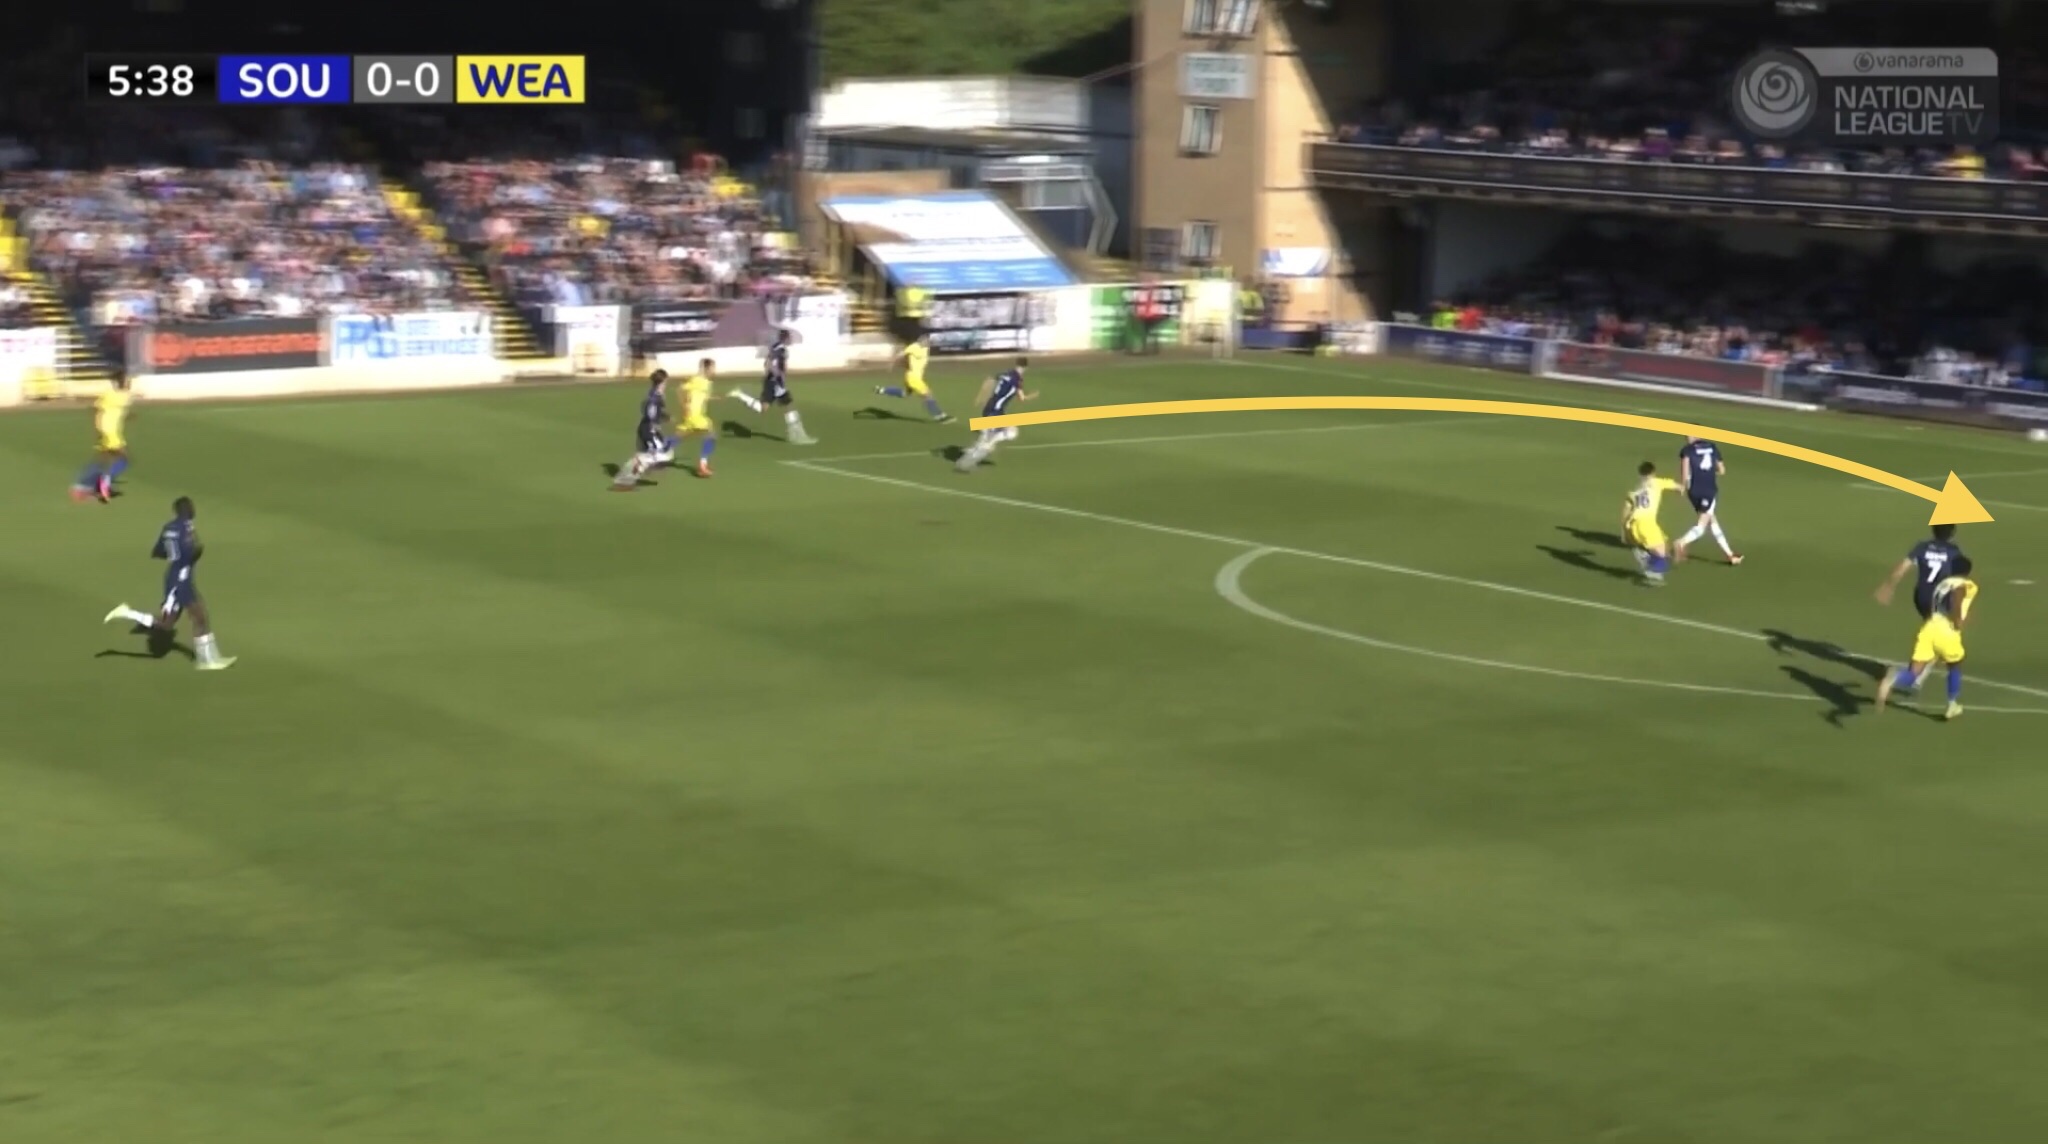
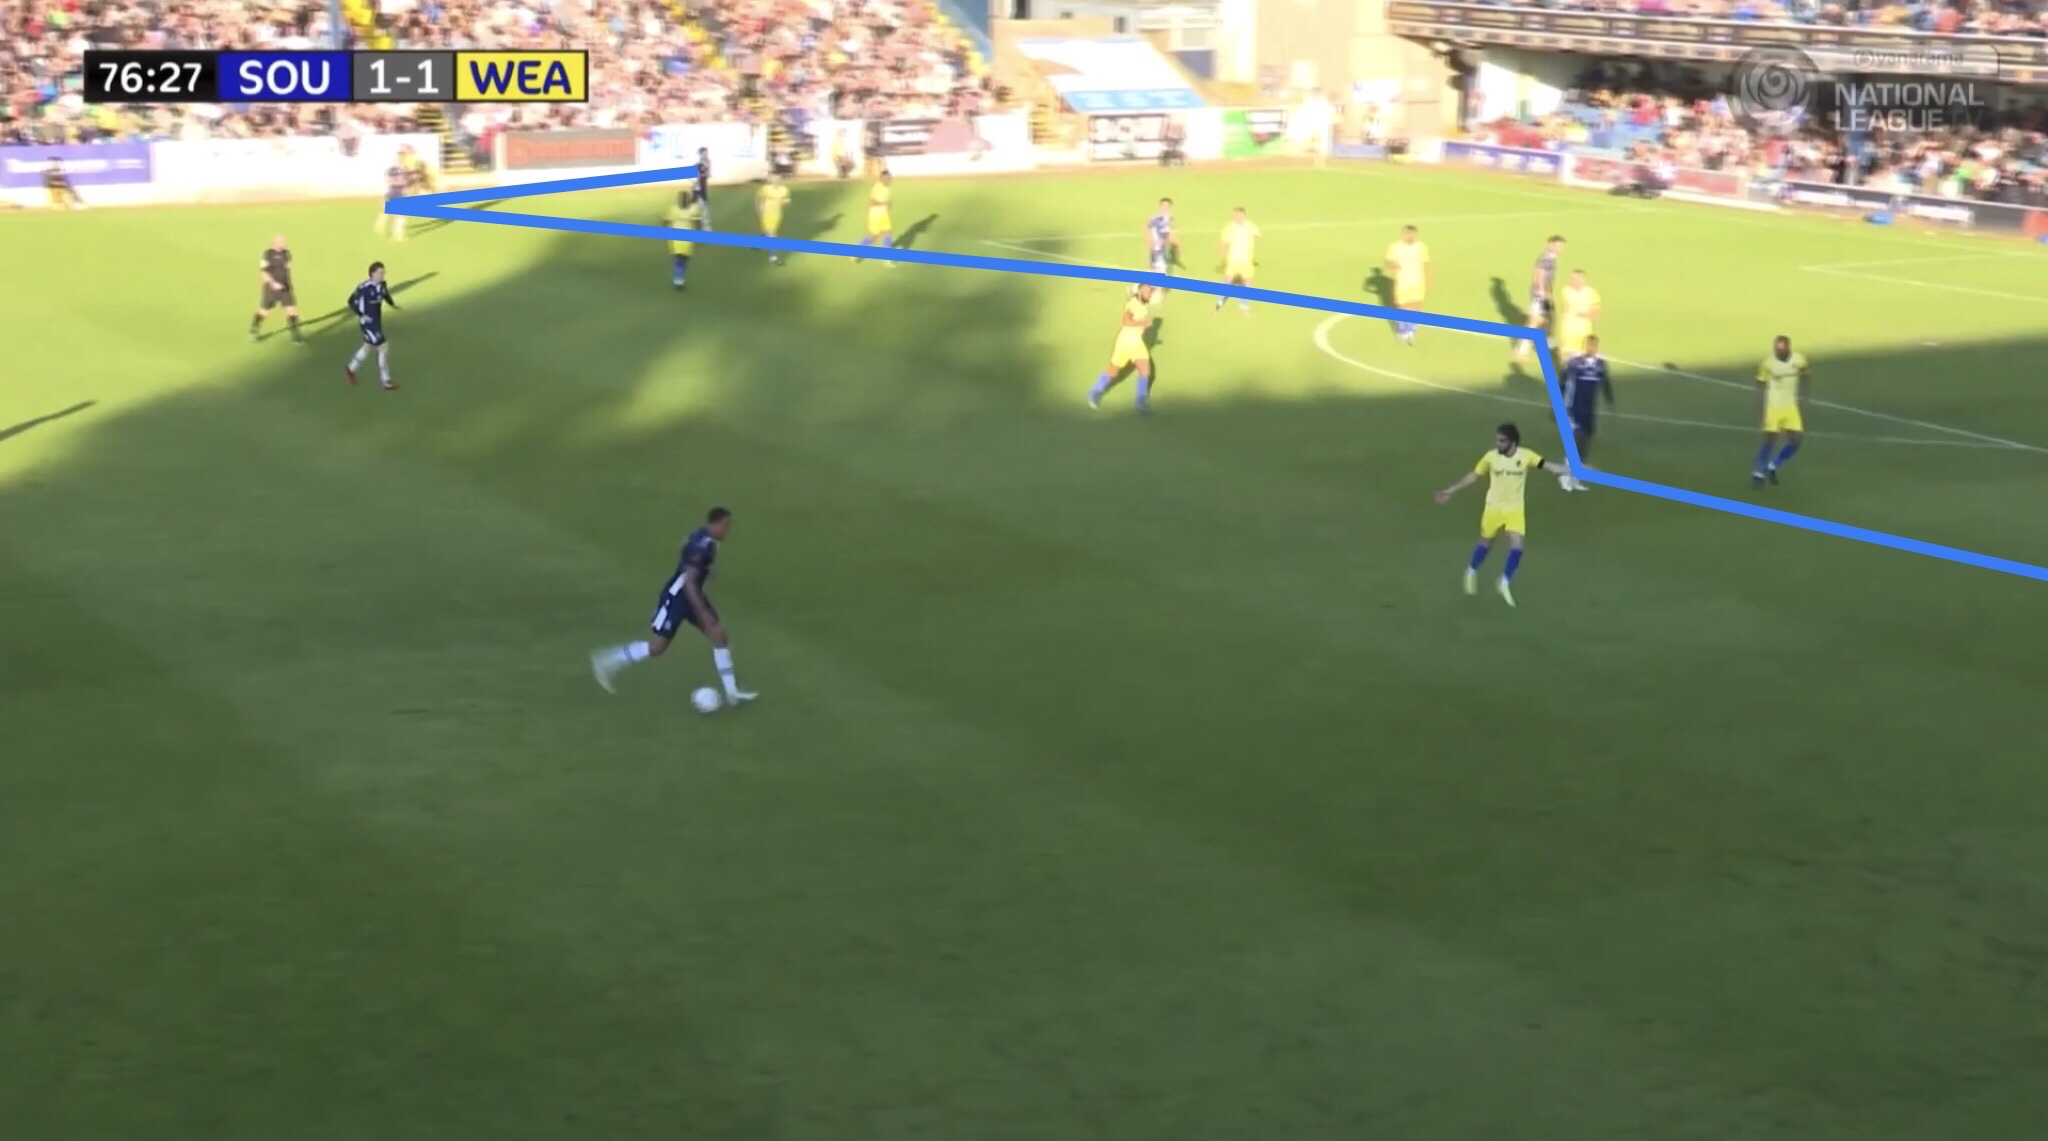
I felt that a lot of the problems Wealdstone caused us in the first half stemmed from their ‘box midfield’. From the below image you can see how this enabled them to outnumber our midfield trio in the centre of the pitch.
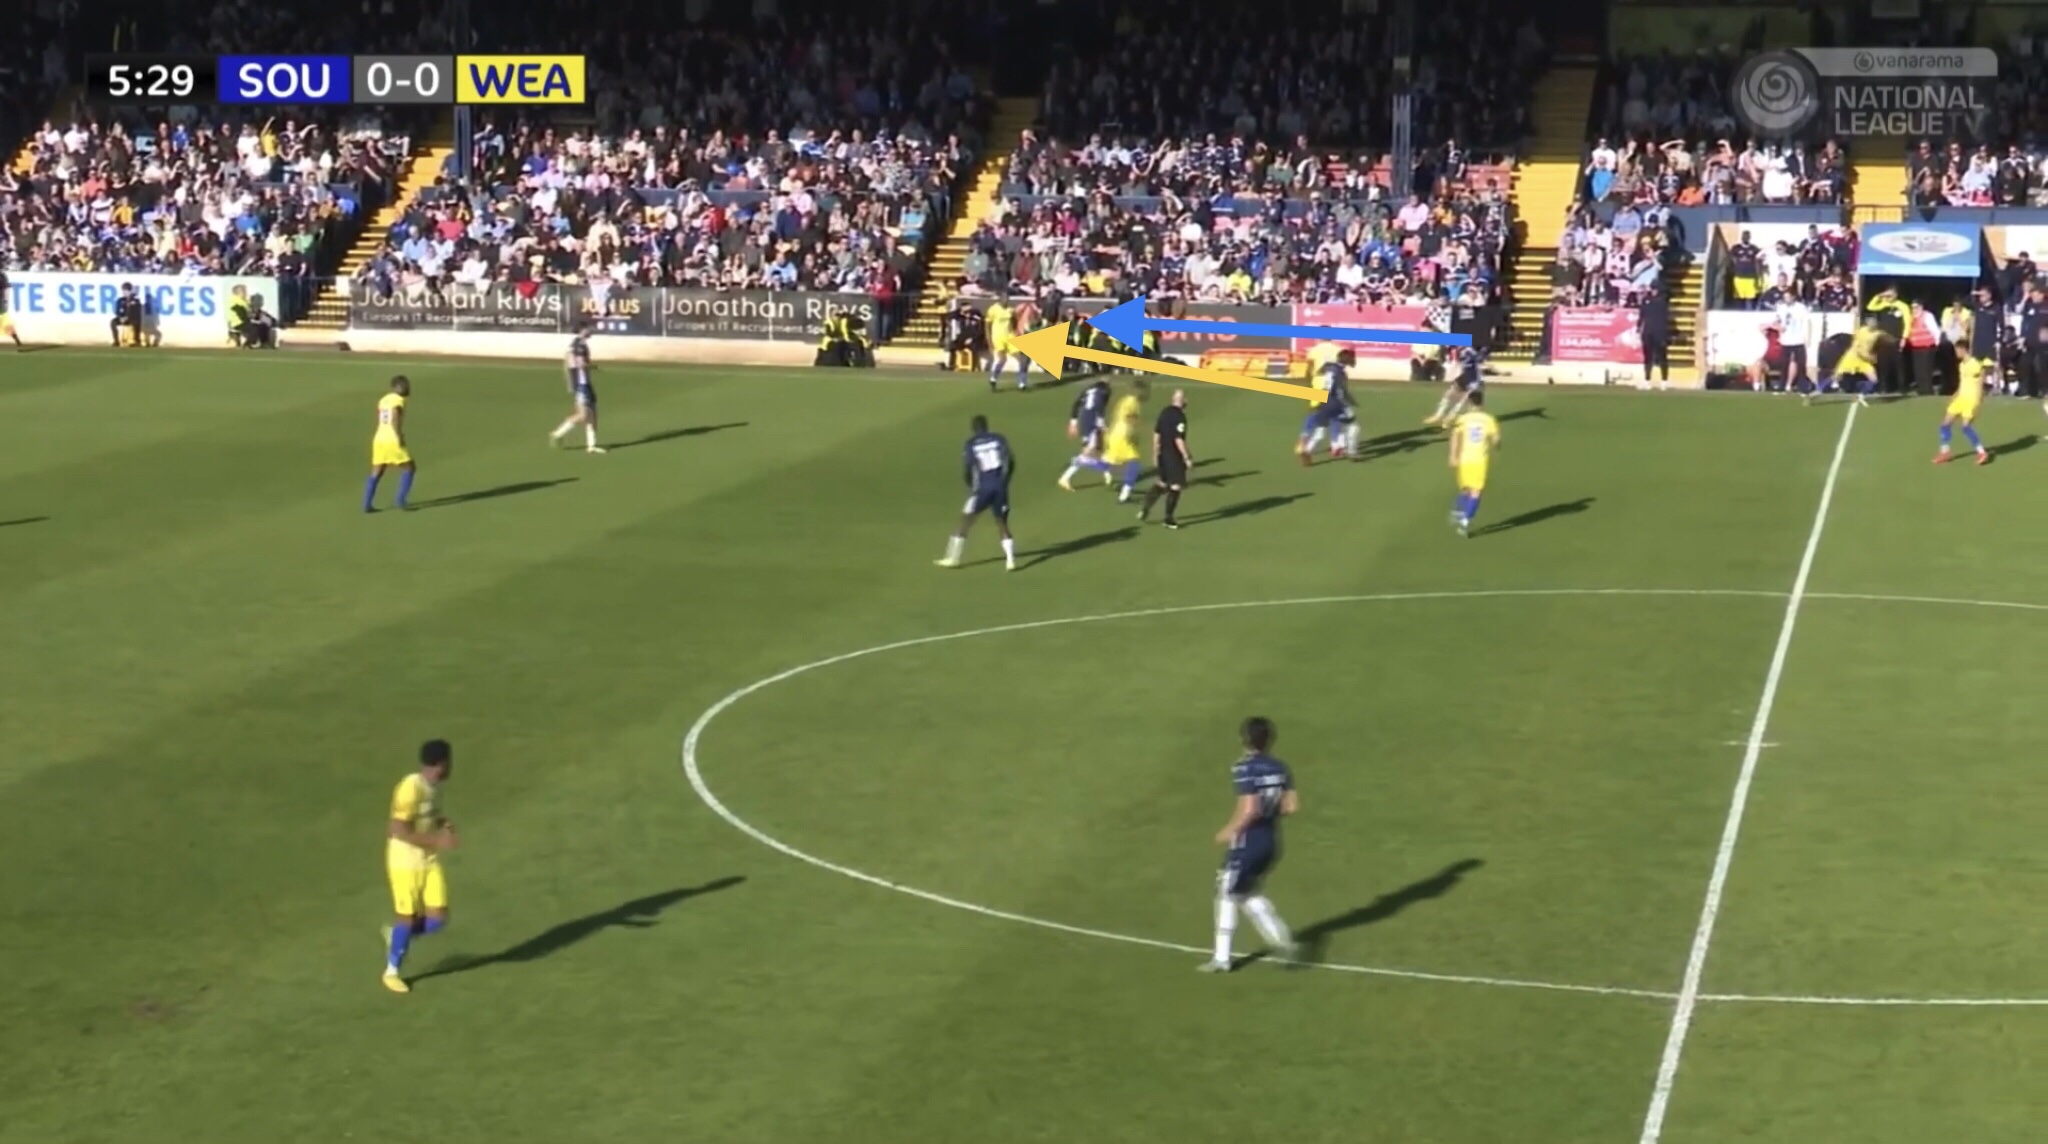
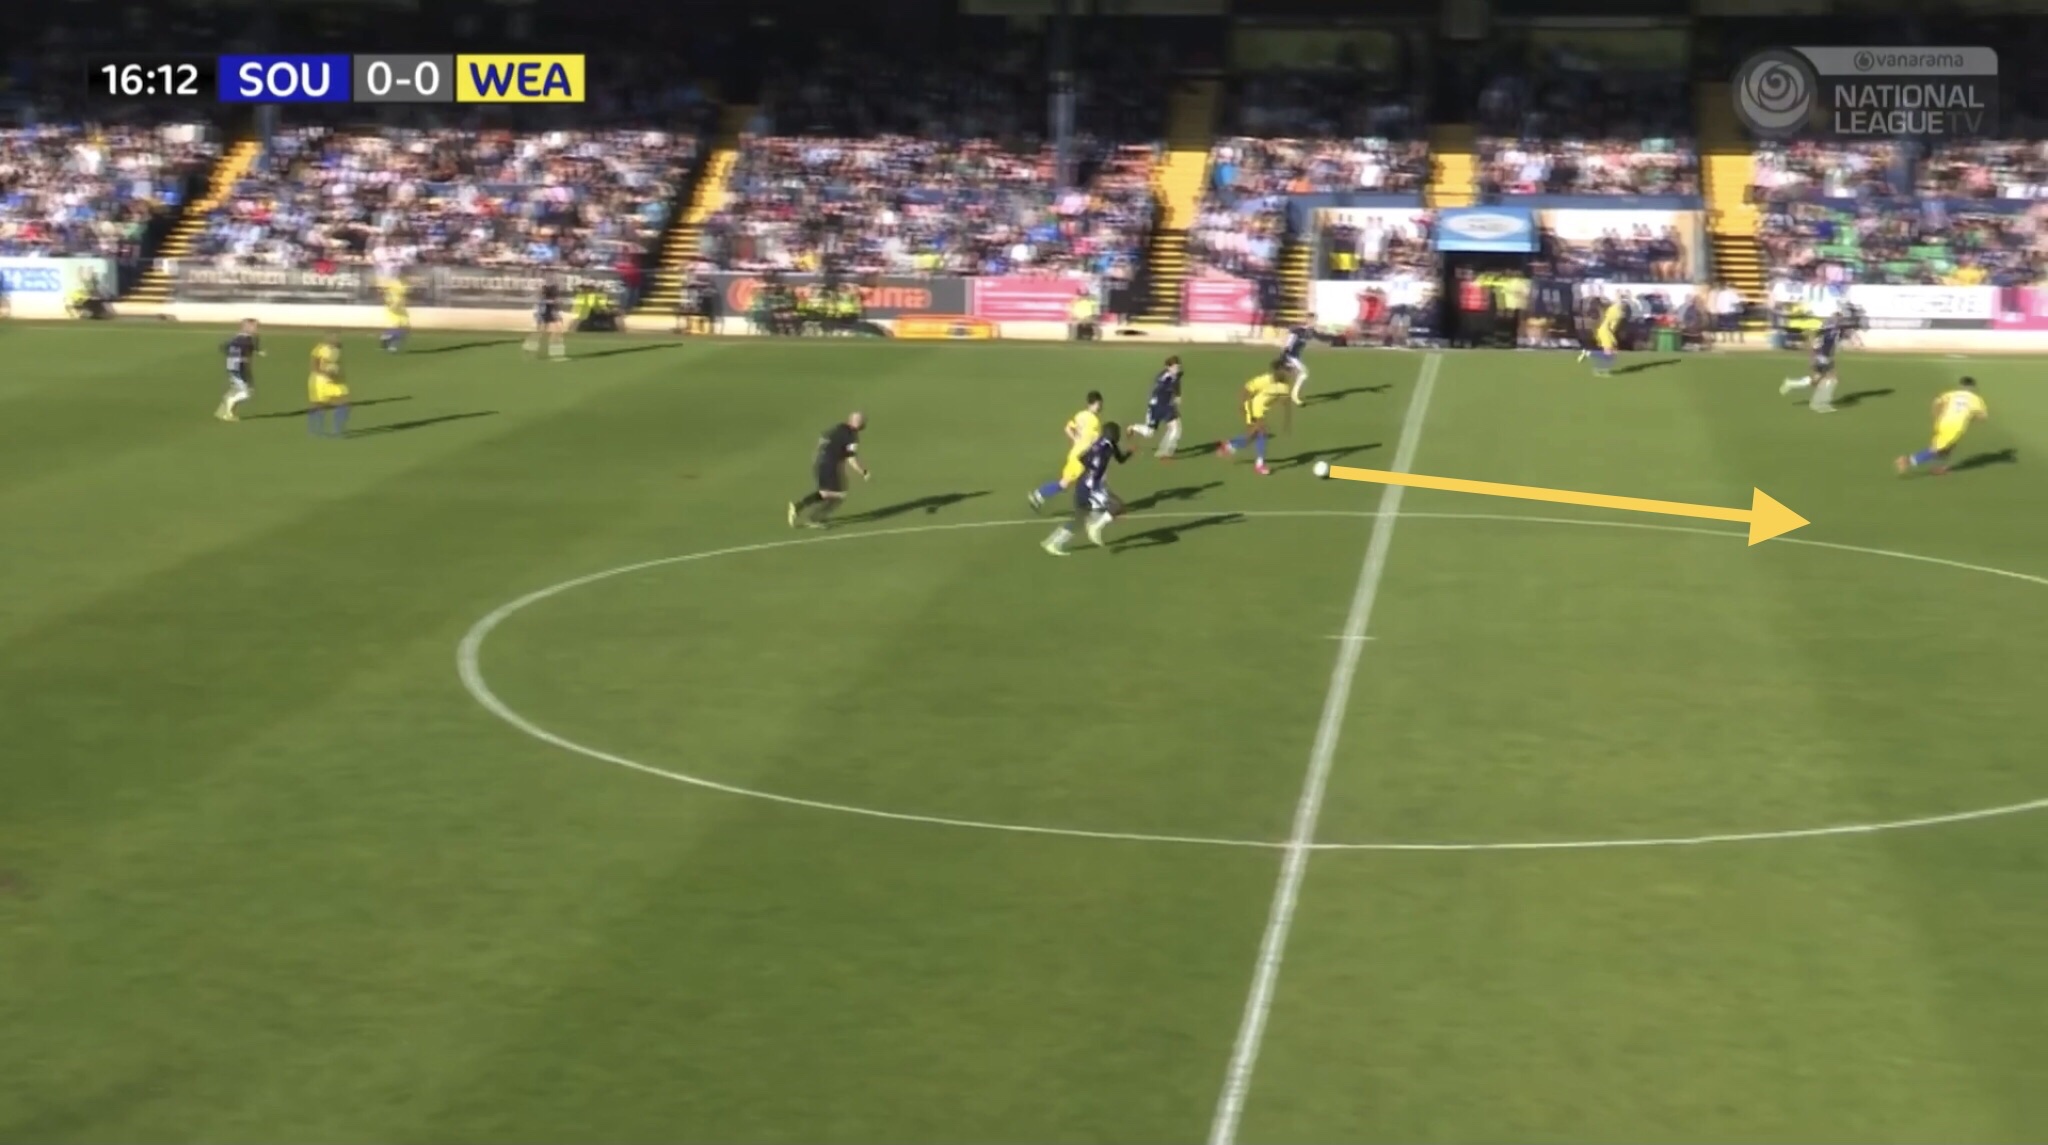
Below you can see how the ‘box midfield’ gives Wealdstone a numerical superiority (4v3) against Southend in the centre.

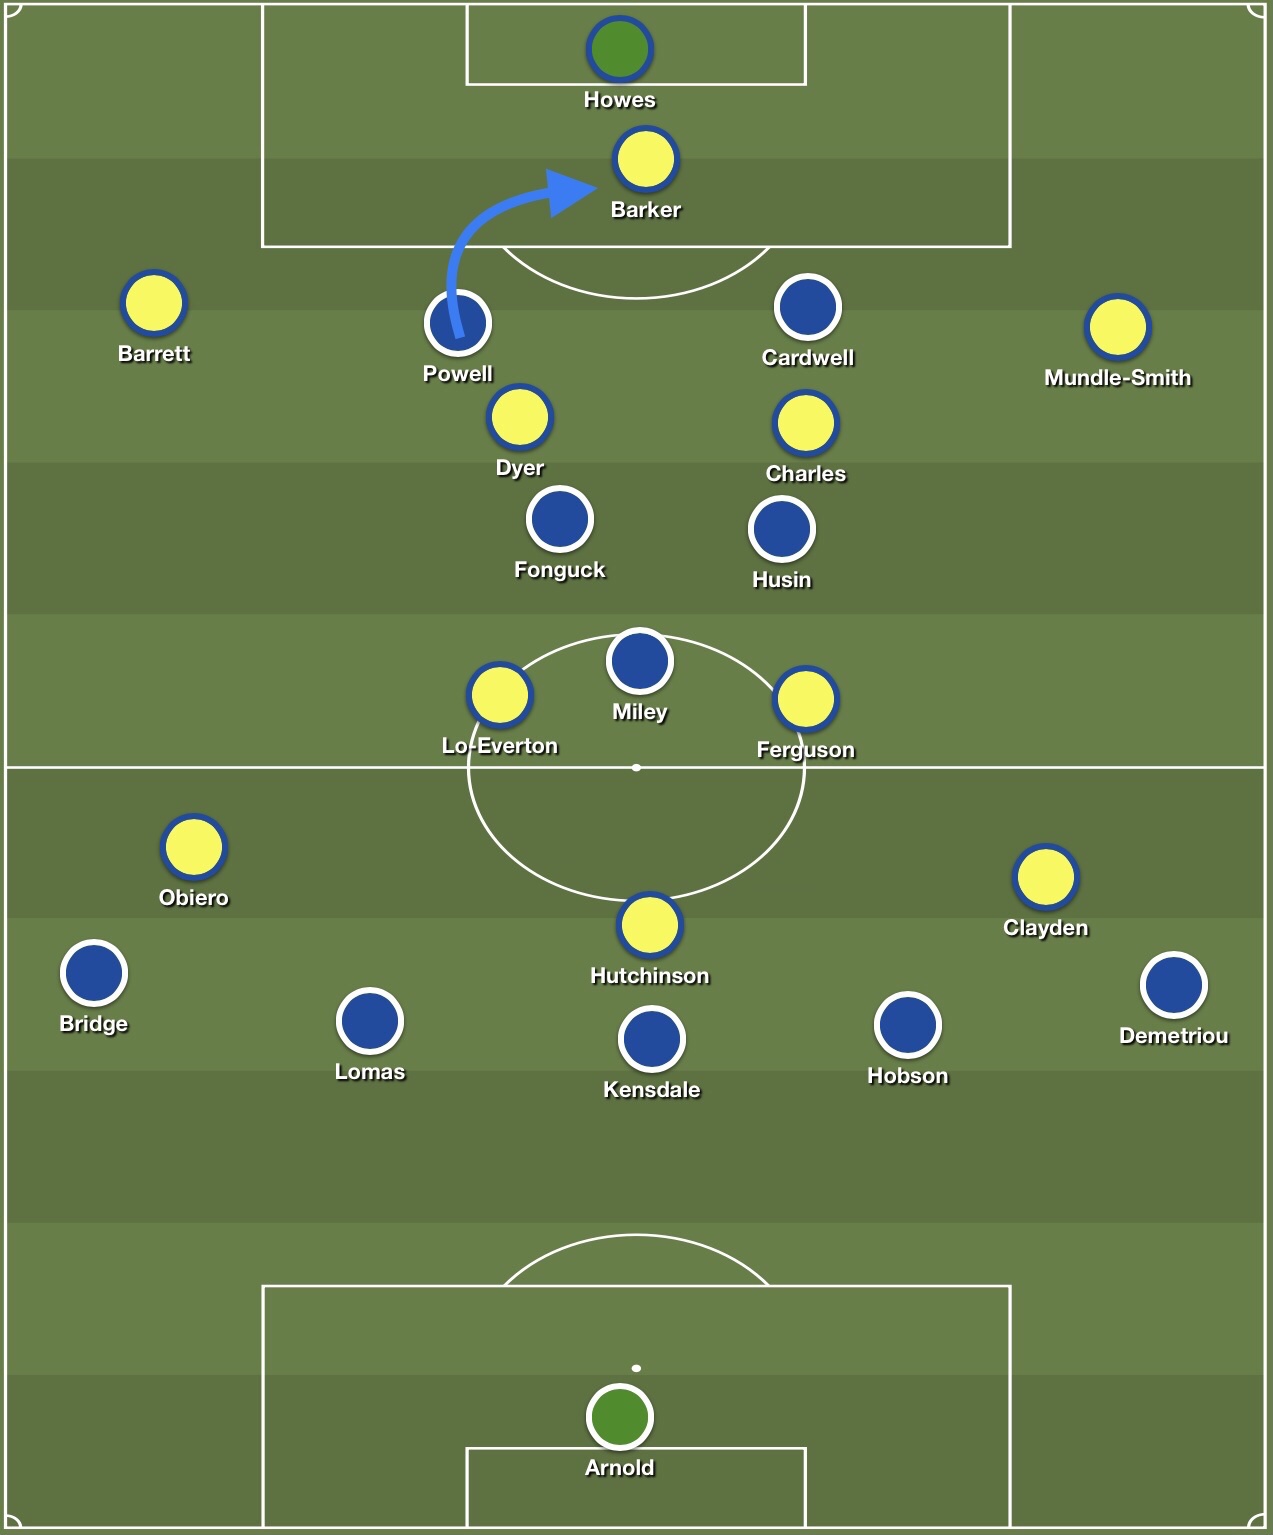
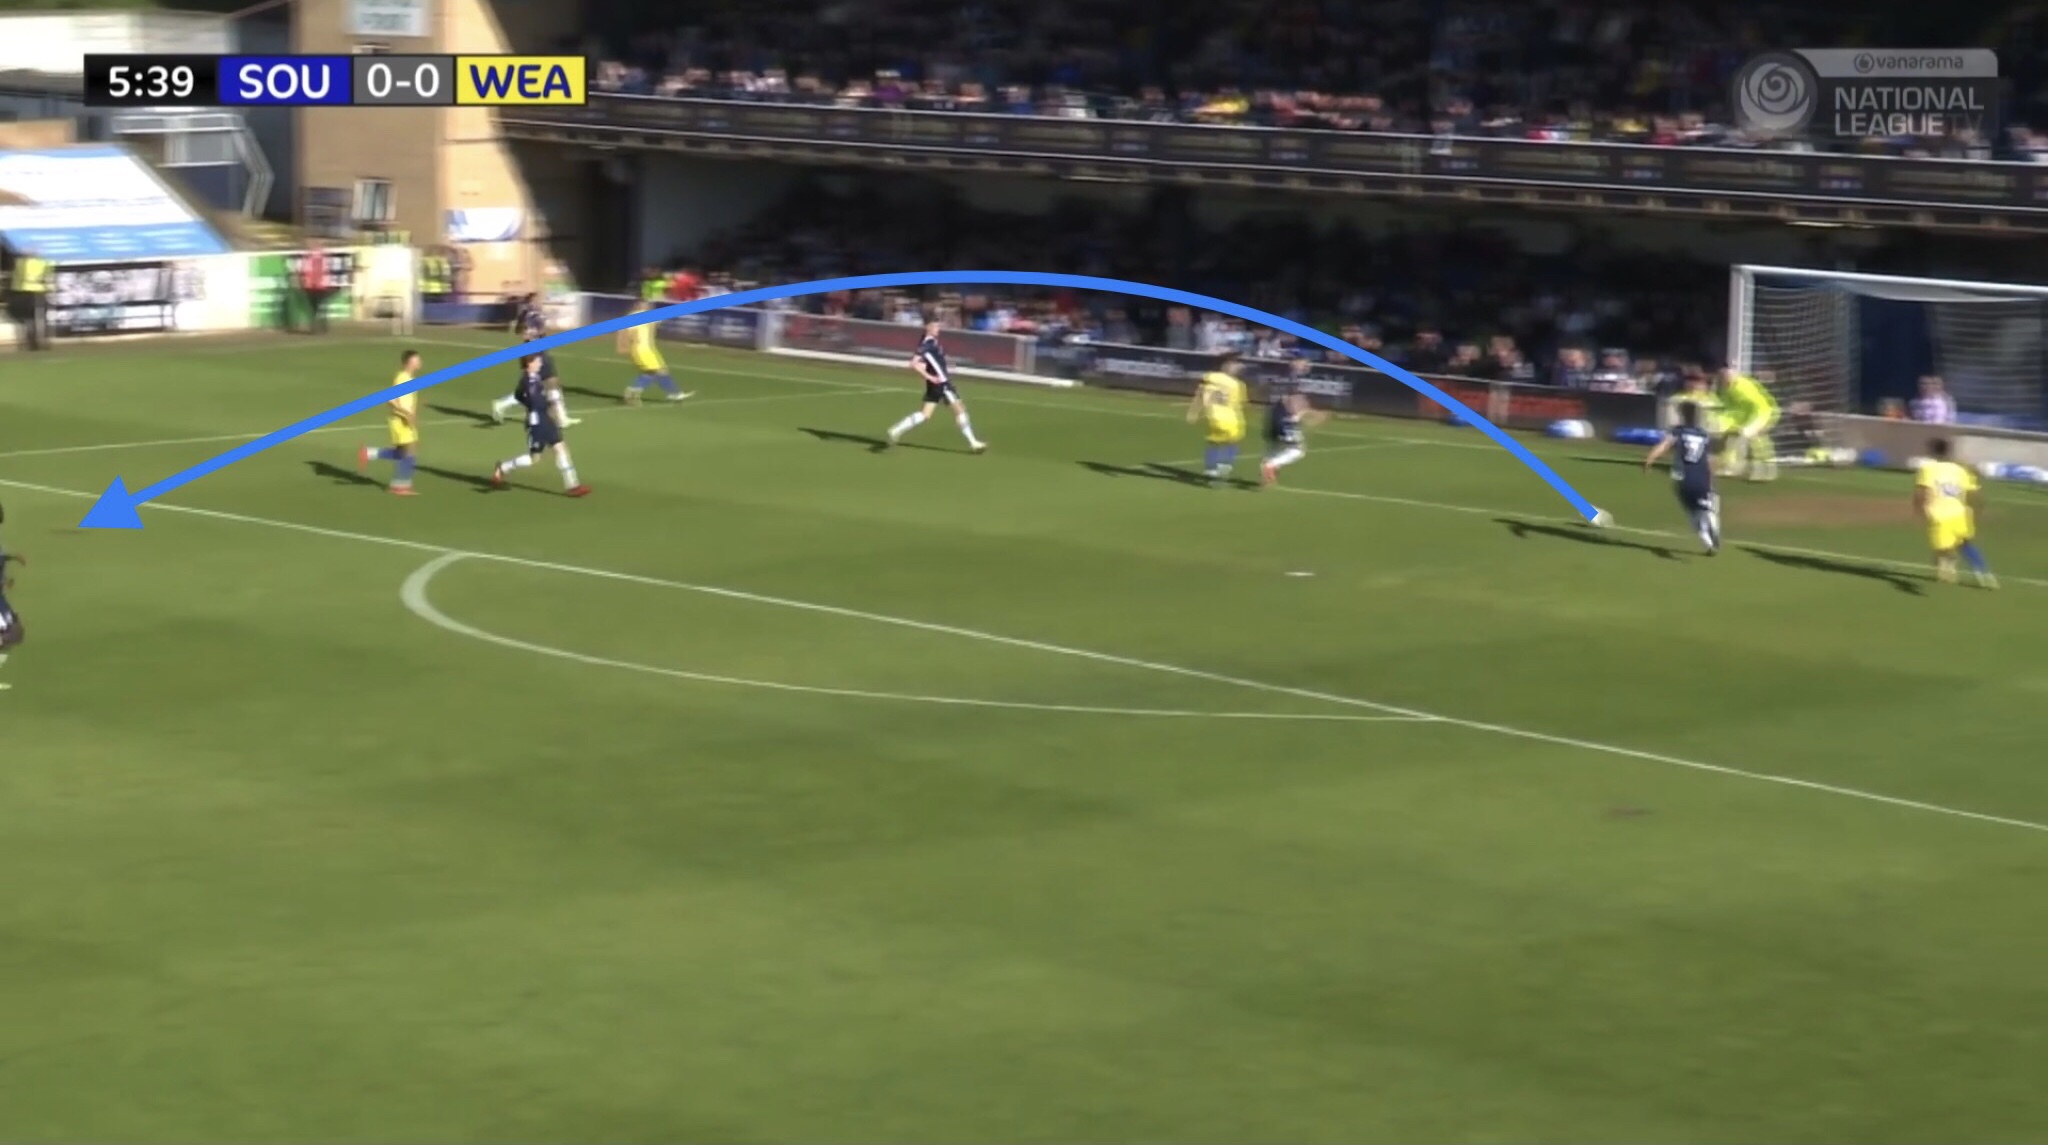
On this occasion Wealdstone’s Nathan Ferguson is able to find the spare defender, drawing Jason Demetriou out in the process. The ball is then returned to Ferguson and Wealdstone have a 4v3 down their left.
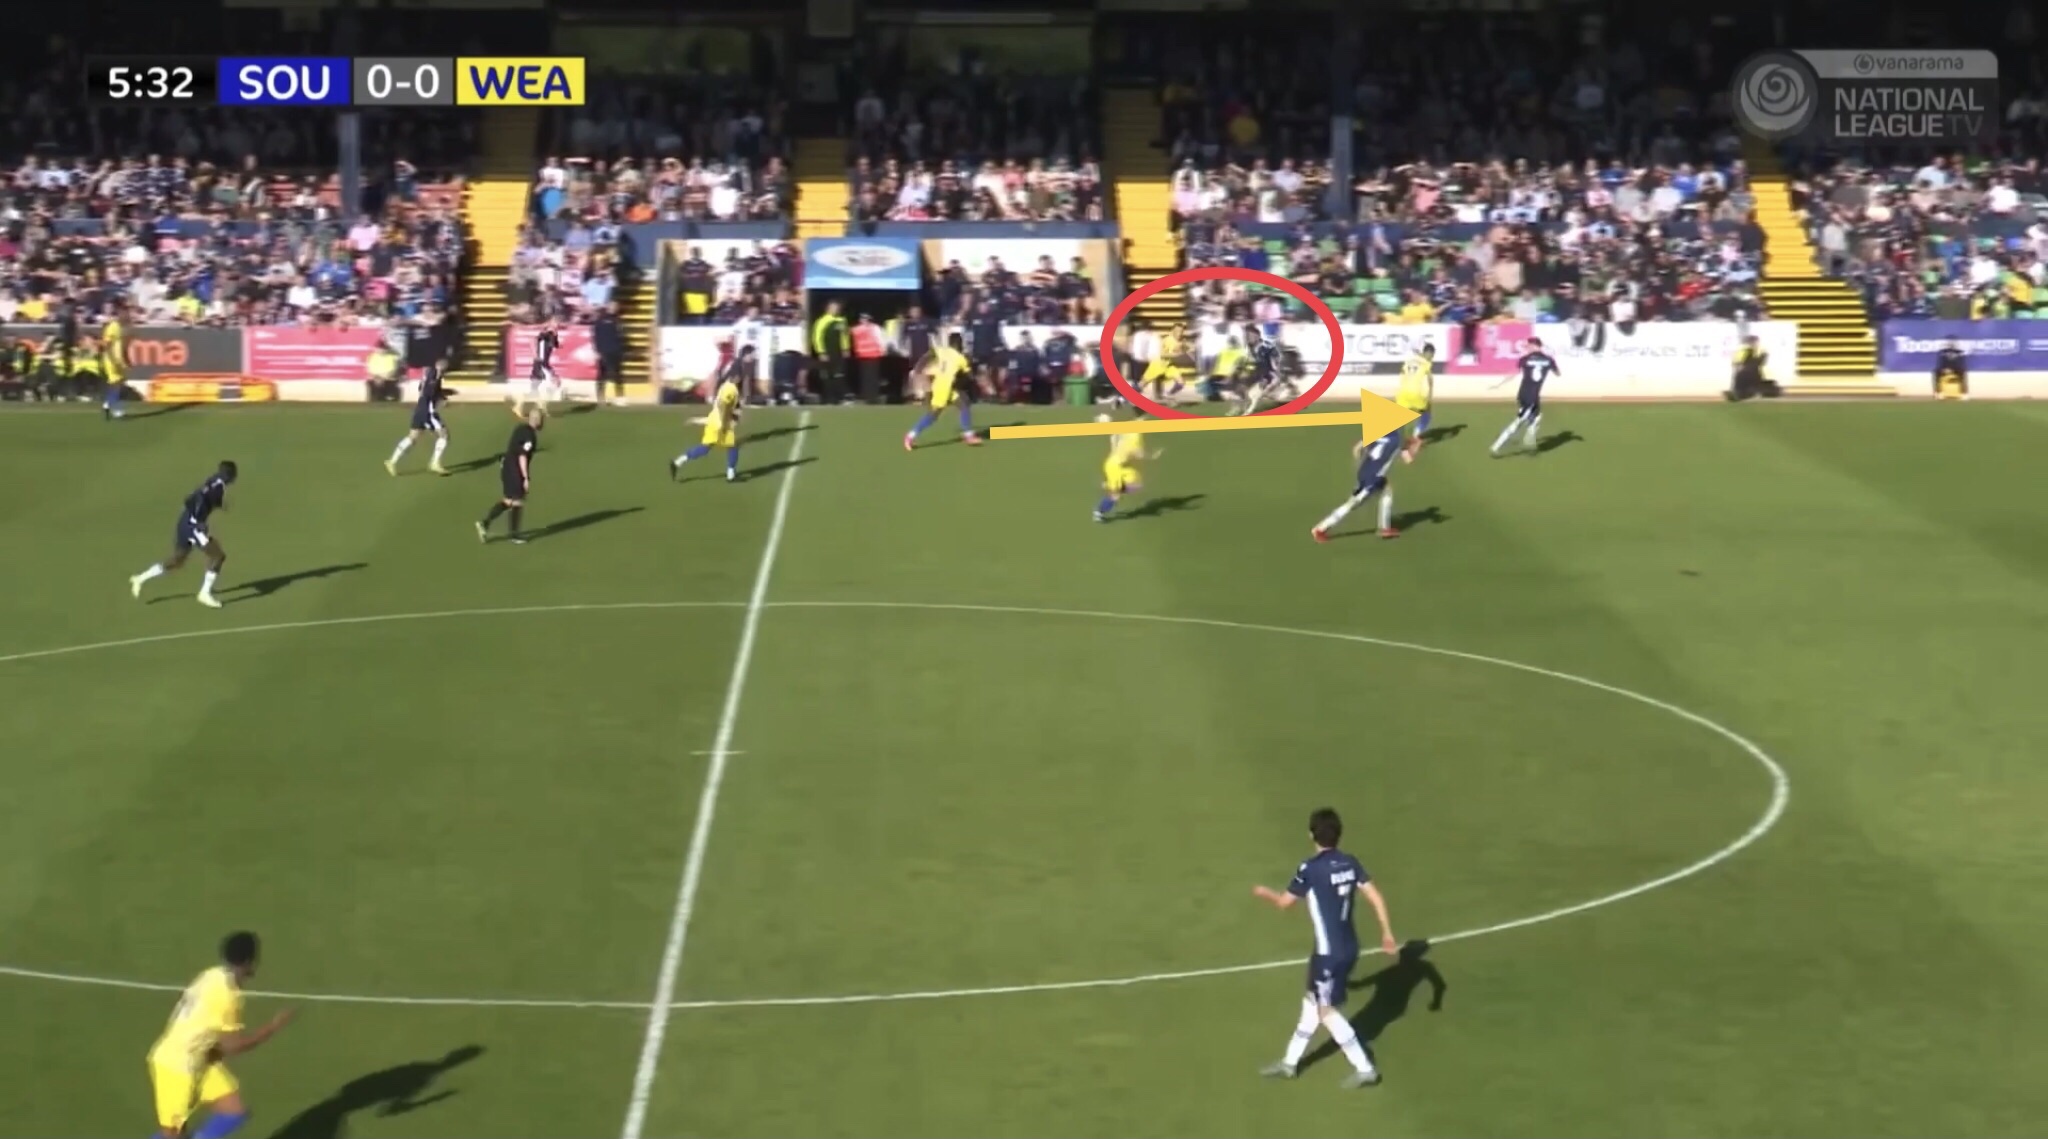
Wealdstone are then able to put in a dangerous cross which is fortunately cleared by Jack Bridge.
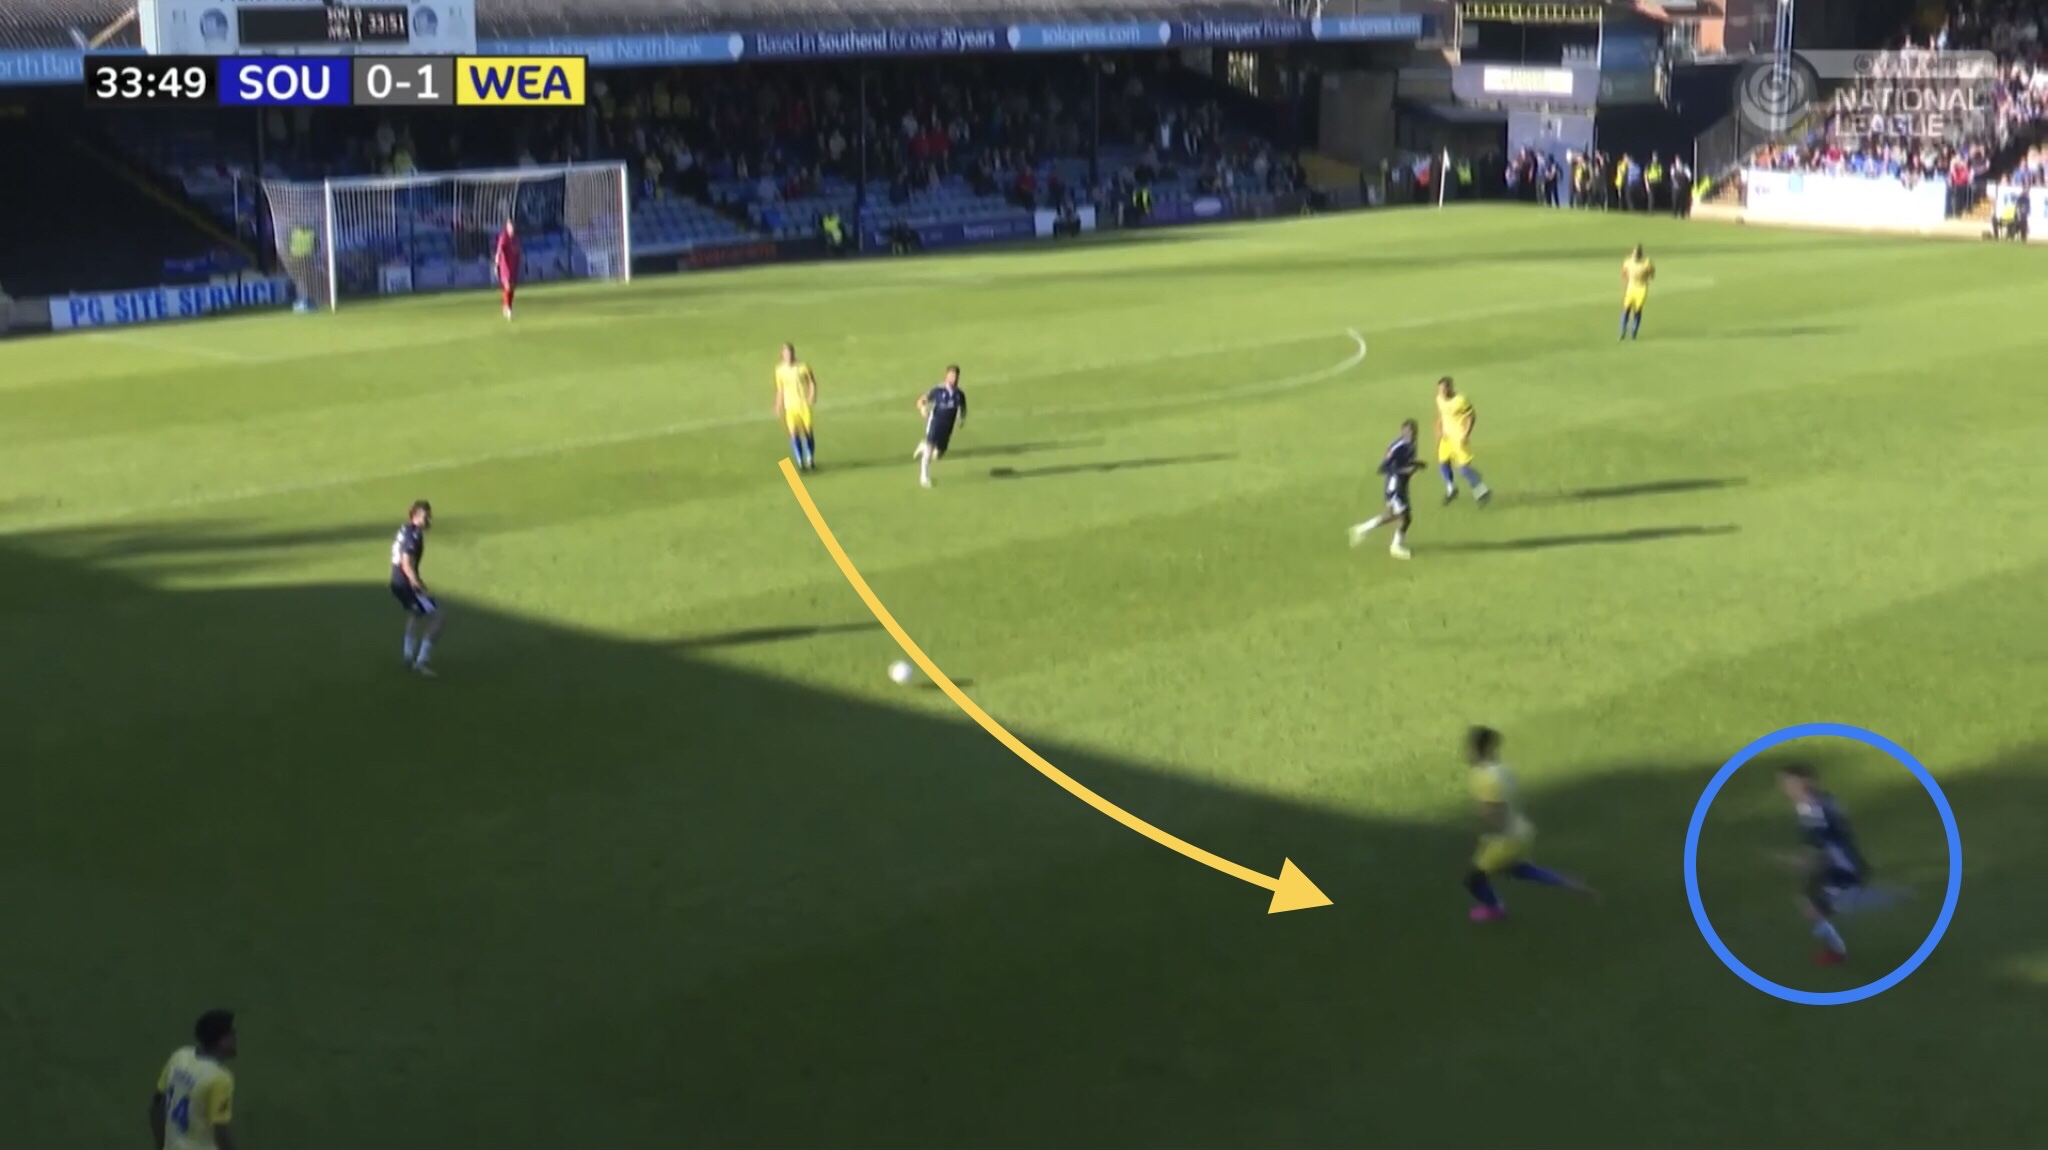
In this next example, it’s Noor Husin who is pressing from the front. Husin isn’t quite able to block the passing lane into one of Wealdstone’s midfielders, causing Cav Miley to vacate his deeper position to press.
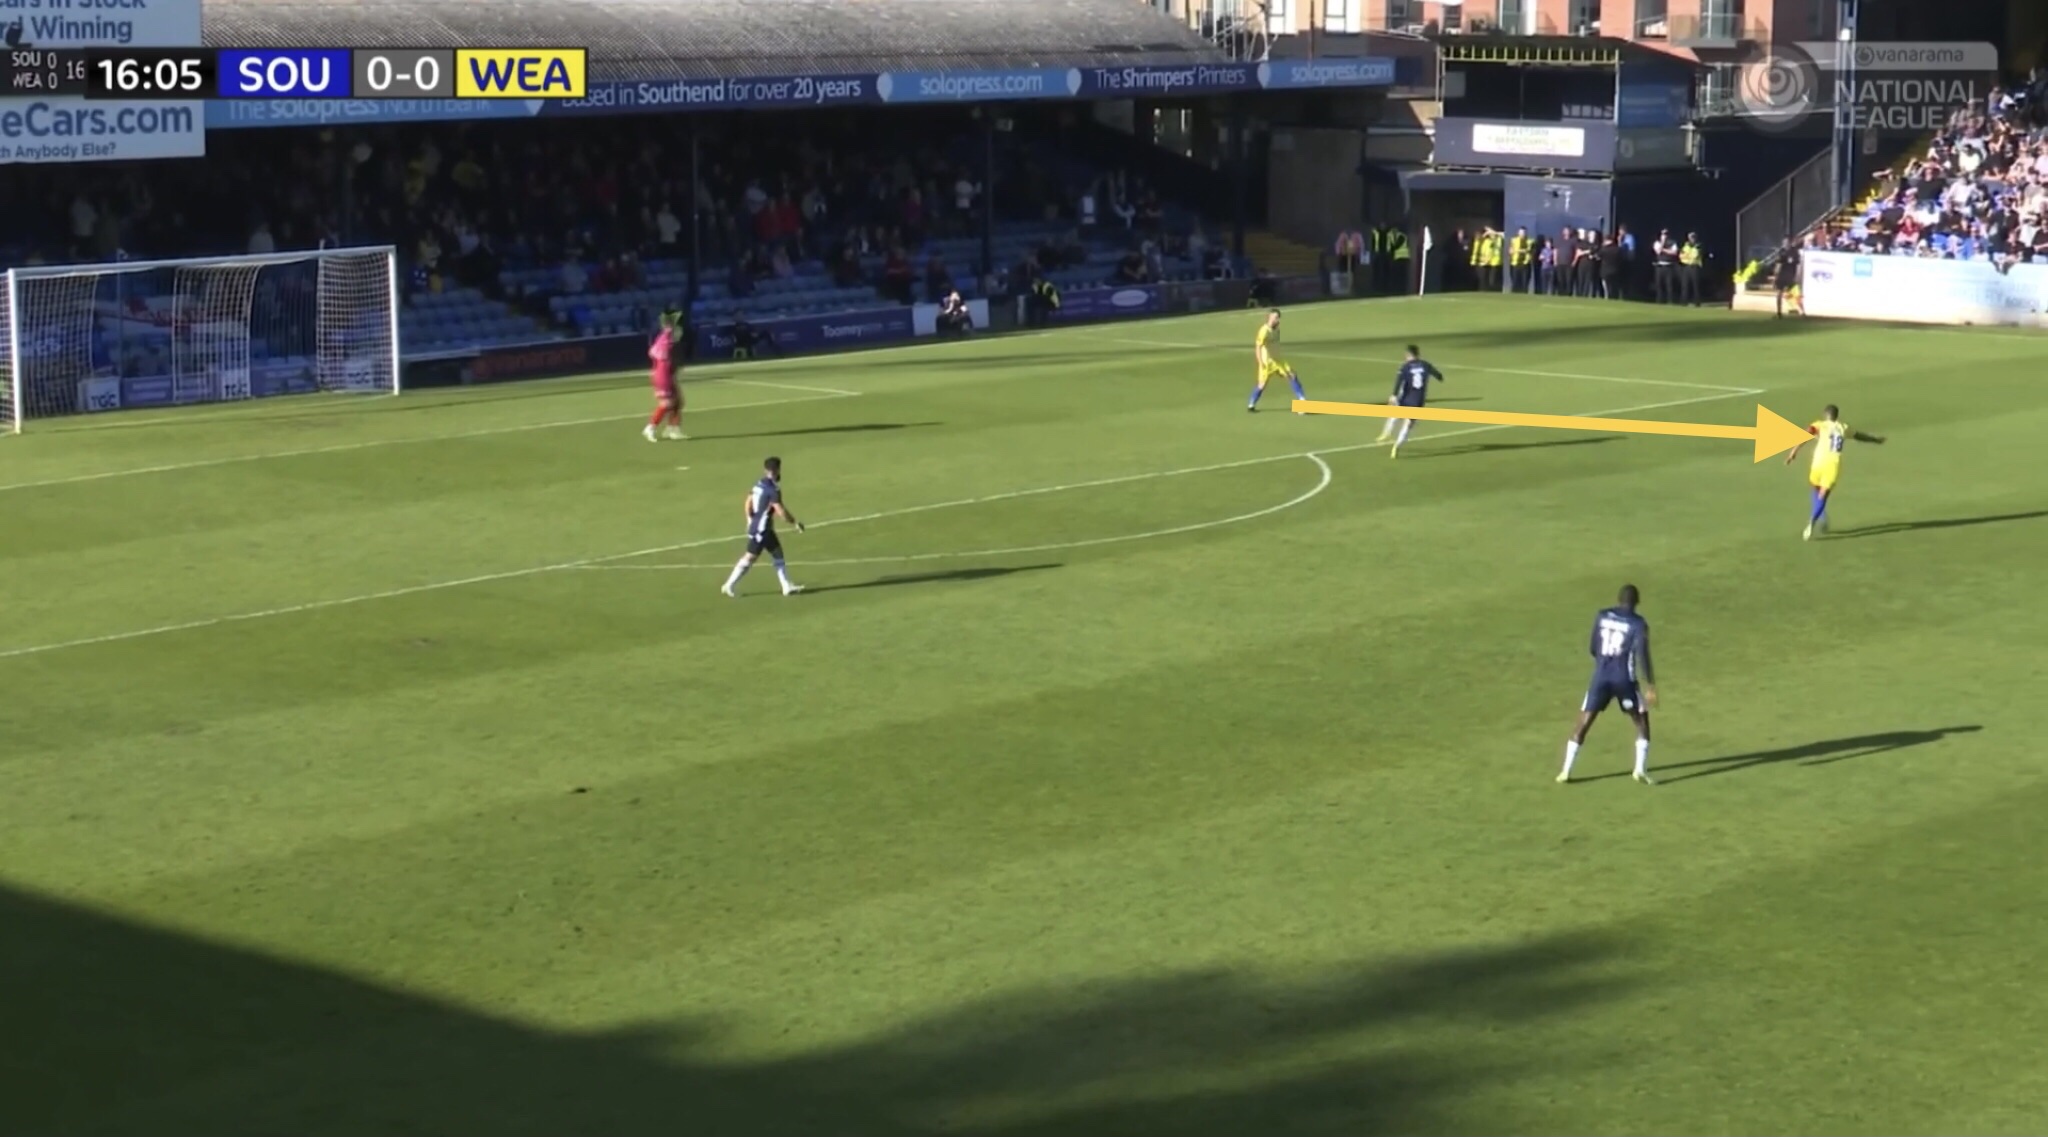
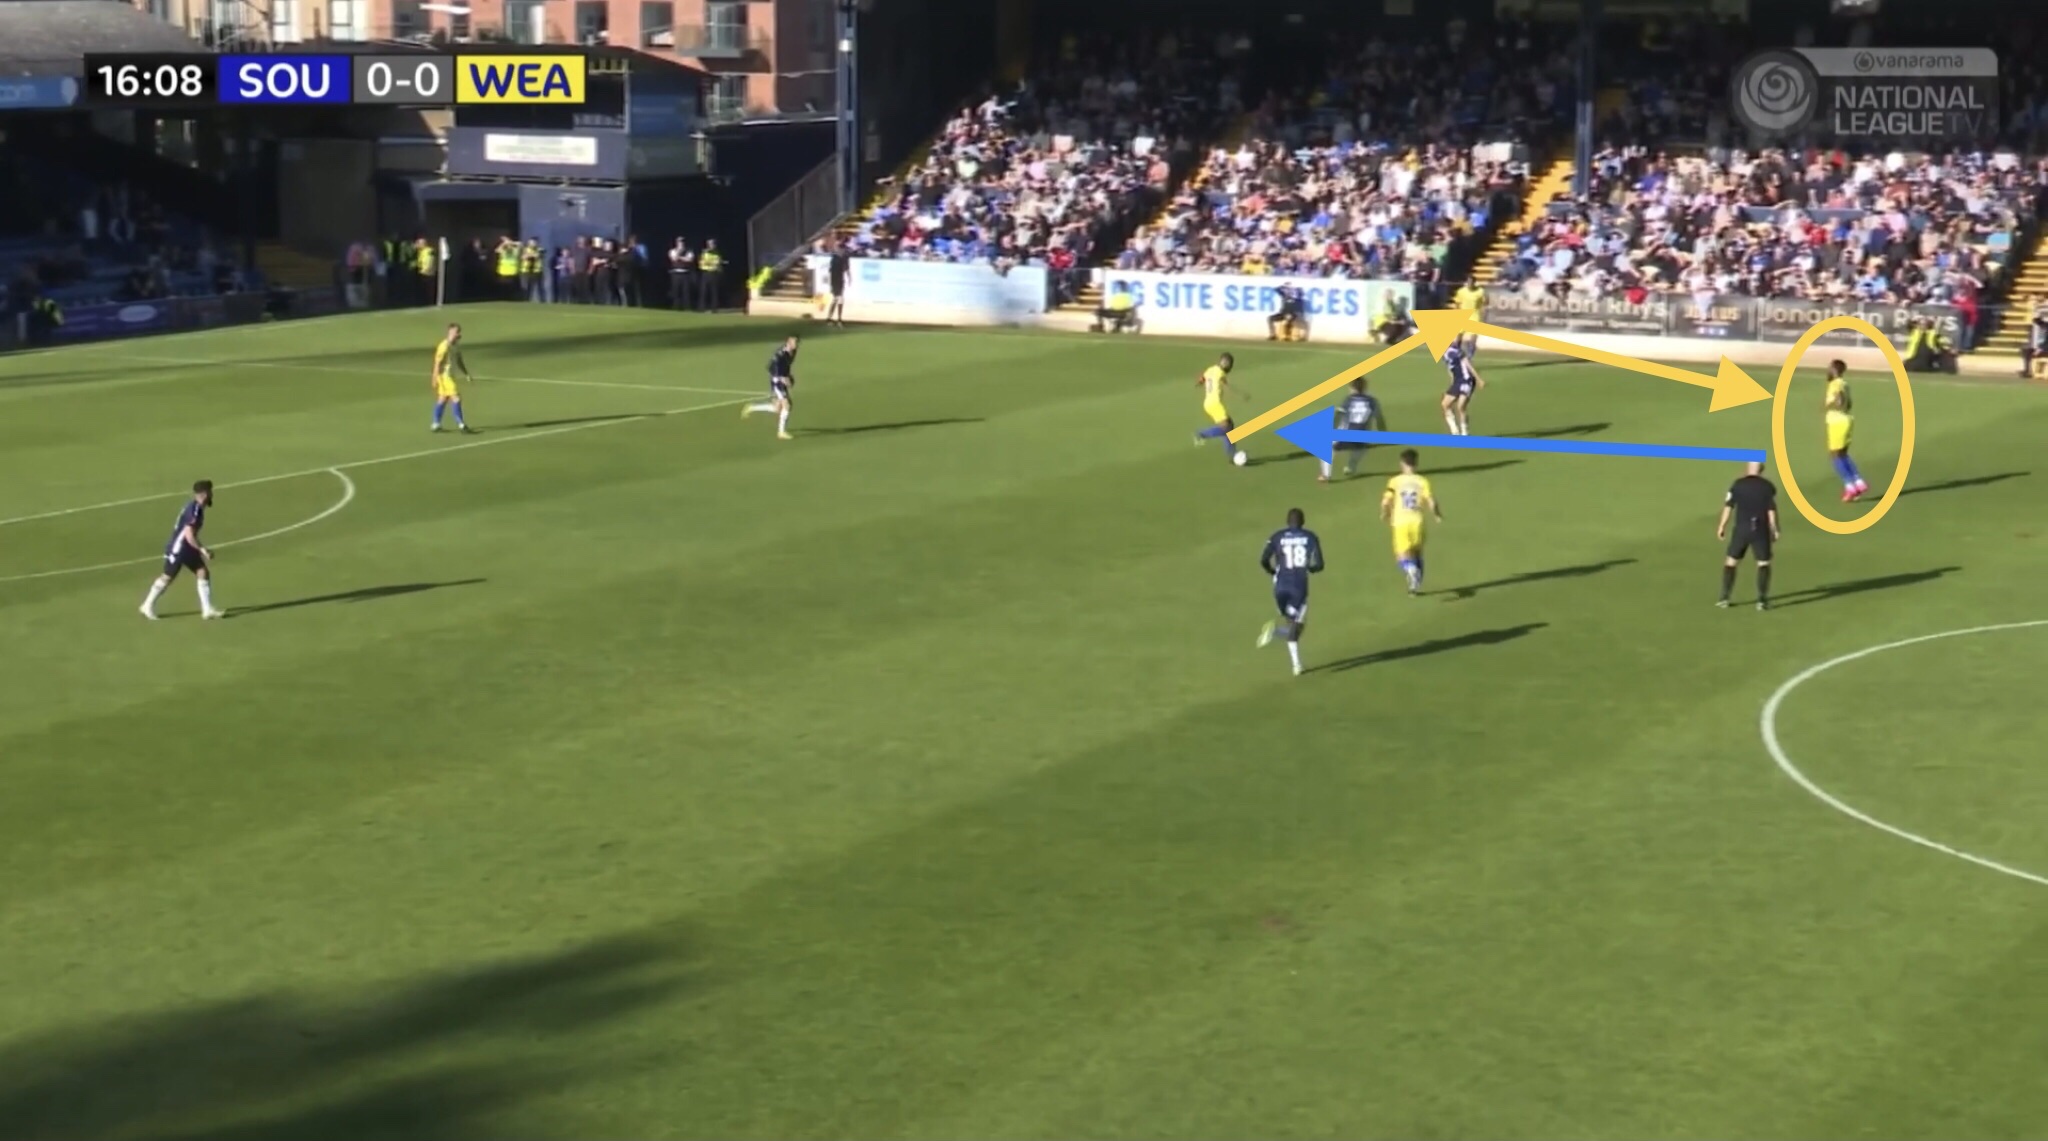
Once receiving the pass from the defender, the Wealdstone midfielder passes out to the spare defender who quickly passes forwards to Ferguson who is now in space. He then drives forwards towards the Southend goal.
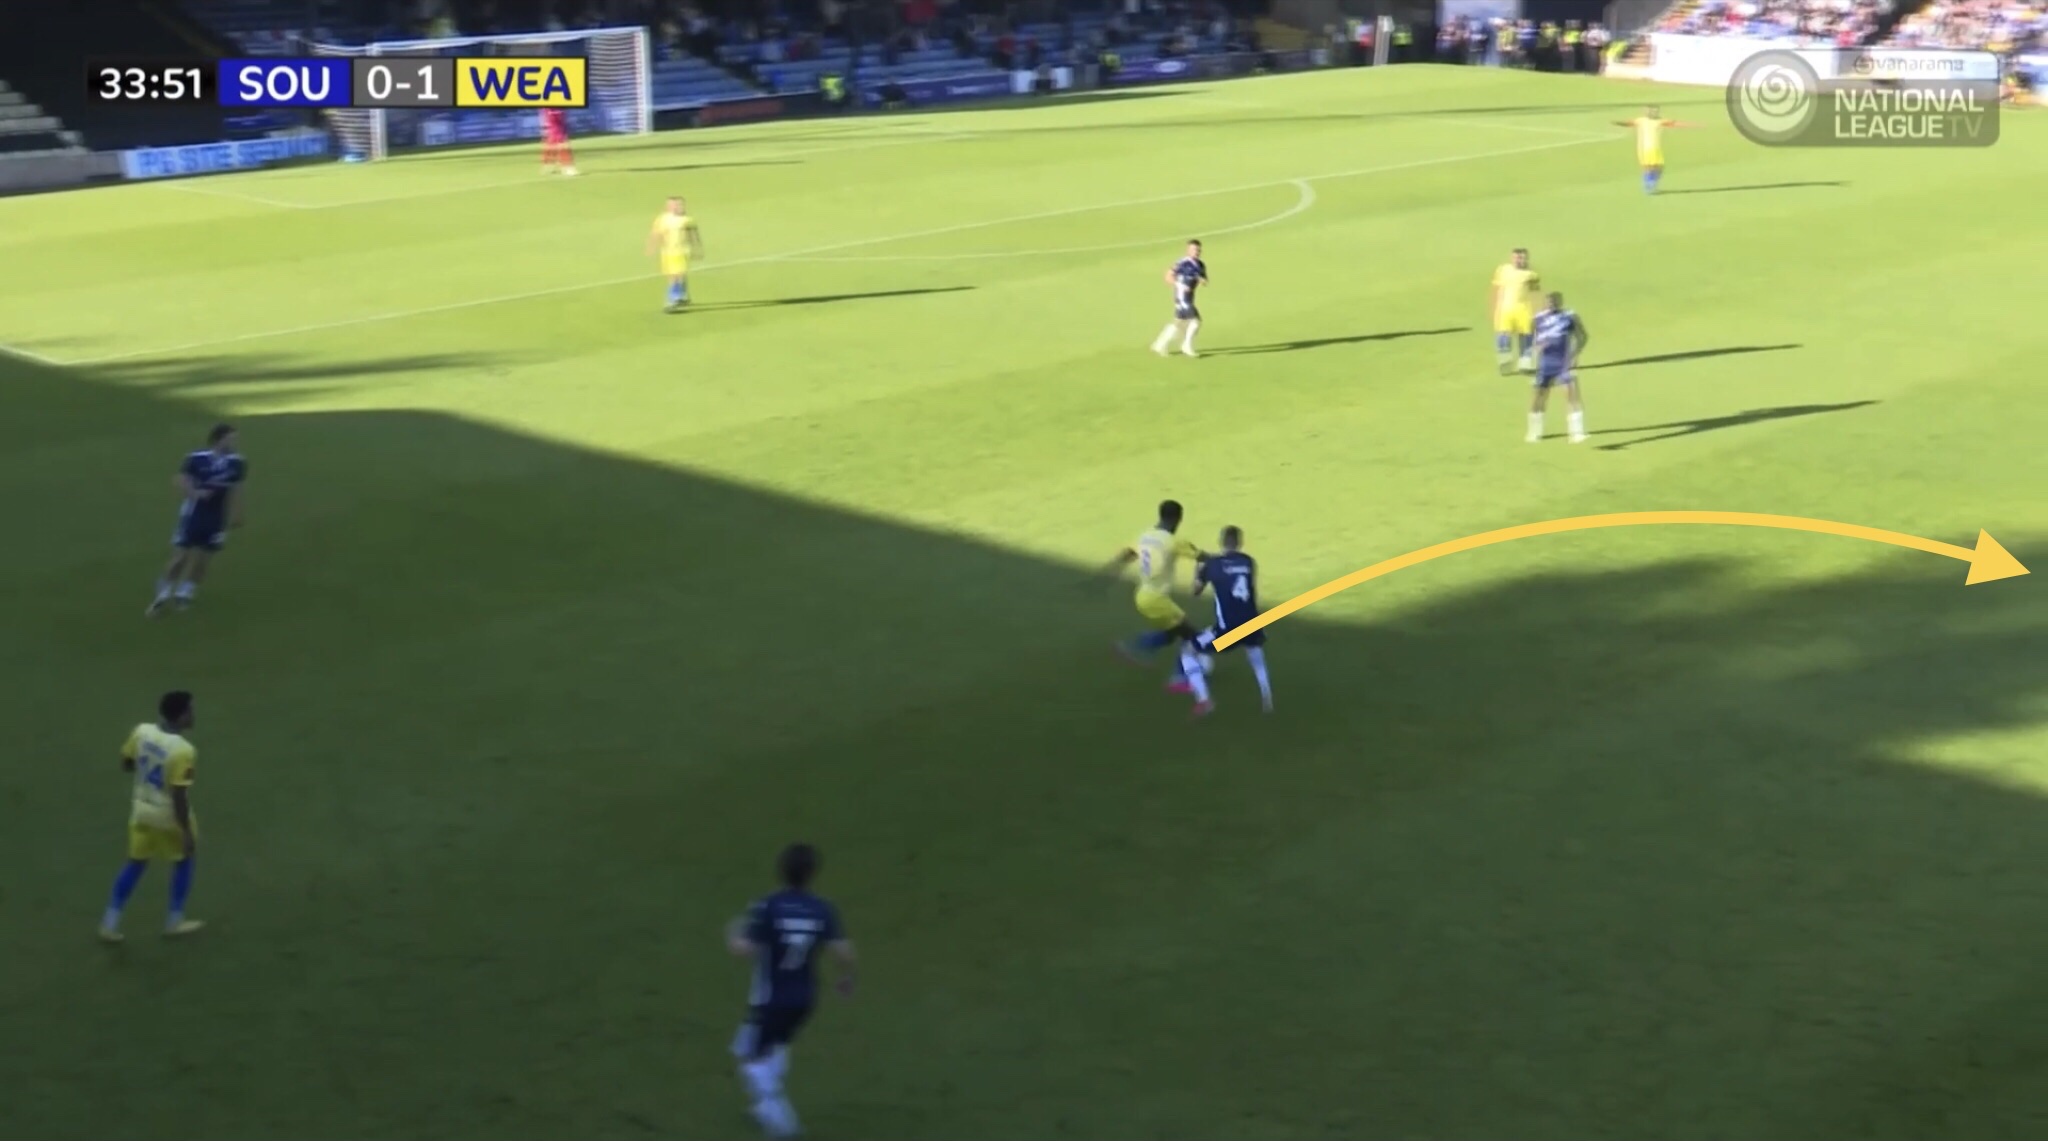
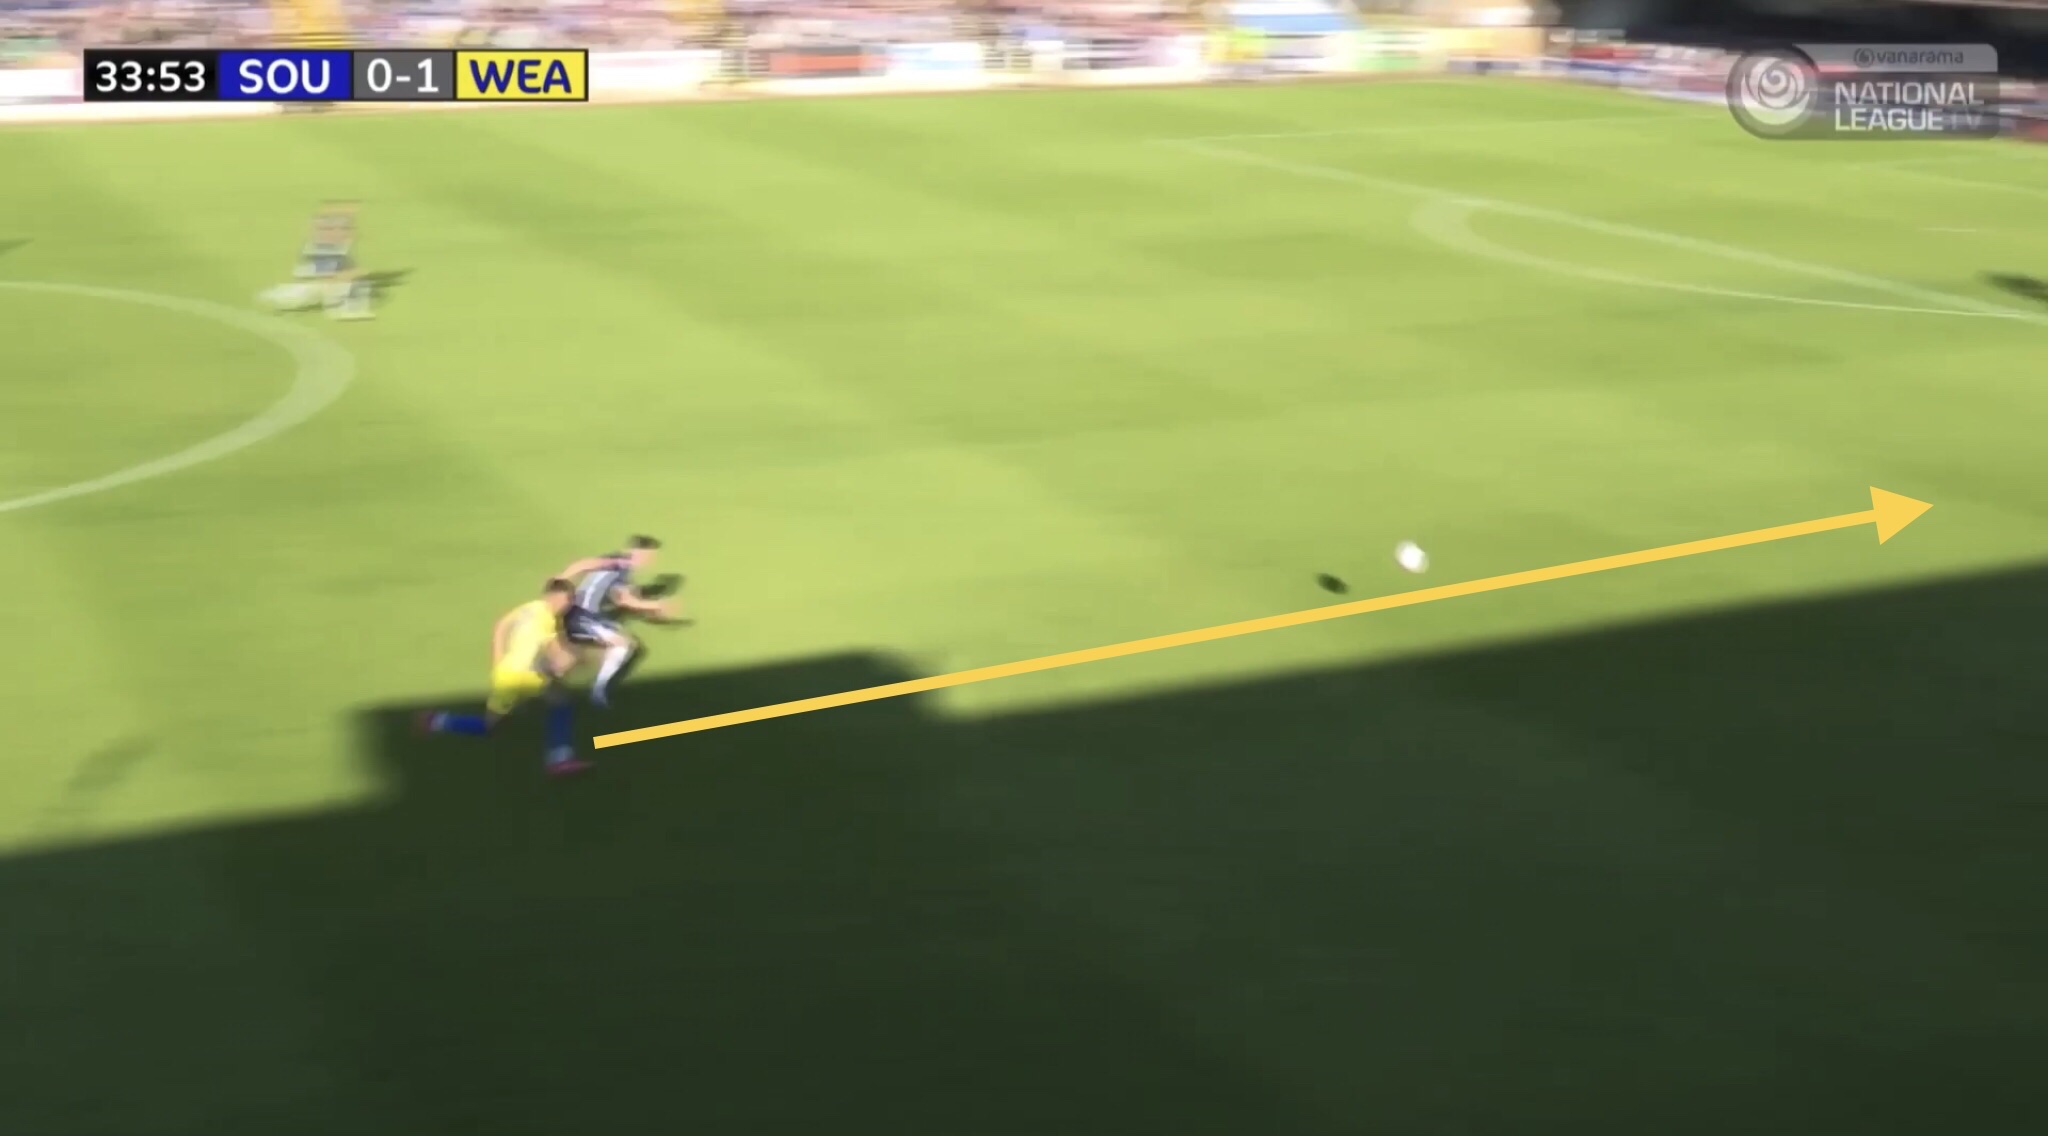
Sometimes it wasn’t Miley’s responsibility to press both of Wealdstone’s advanced midfielders. On occasion, Ferguson would drop deeper to receive the ball from his defenders, and it was up to one of our centre backs to follow him into midfield.
In this example it’s Louis Lomas who presses Ferguson. Ferguson is able to receive the ball in space, turn Lomas and play a through ball. On this occasion the resulting shot was was saved by Steve Arnold.
Southend’s 3-1-6 Formation
Southend equalised early in the second half thanks to an excellent strike from Wes Fonguck from the edge of the penalty area. Shortly after, Wealdstone were reduced to 10 men after former Shrimper Nathan Ferguson was shown a straight red card for a foul on Cav Miley.
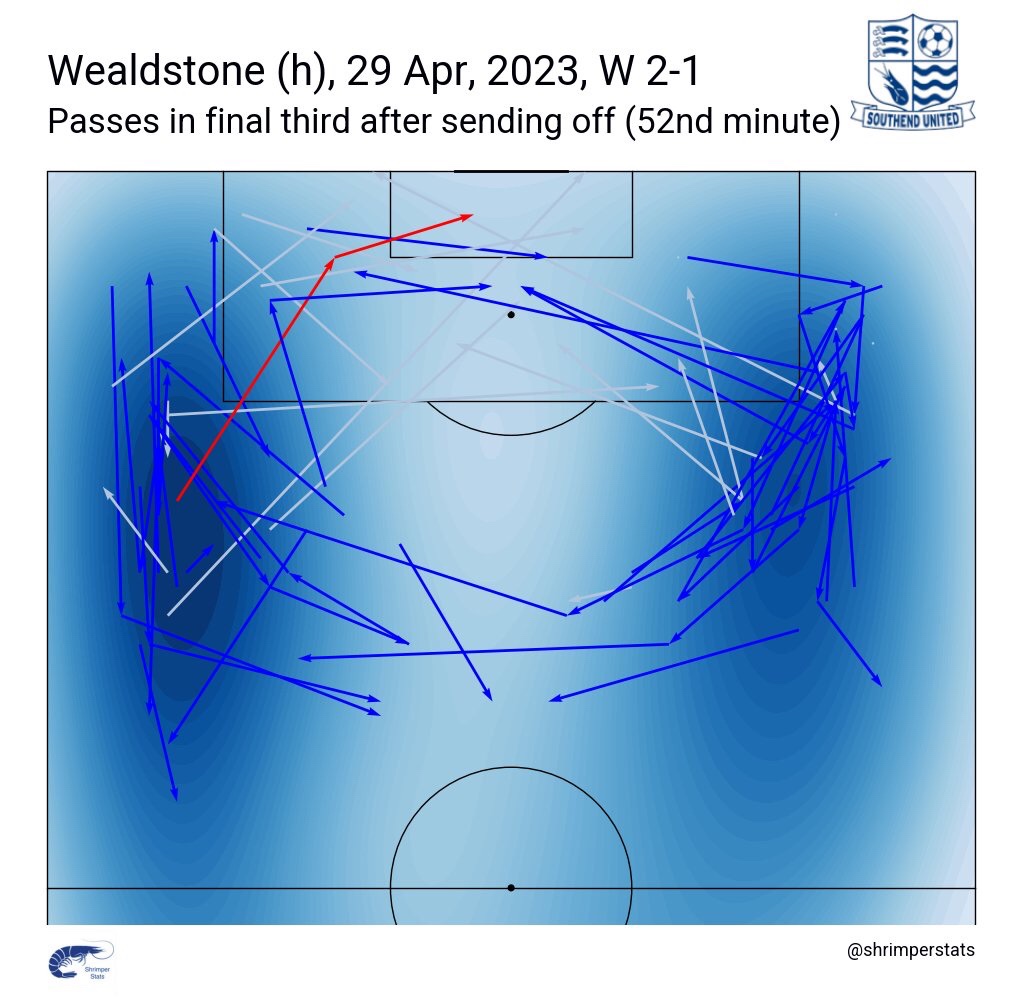
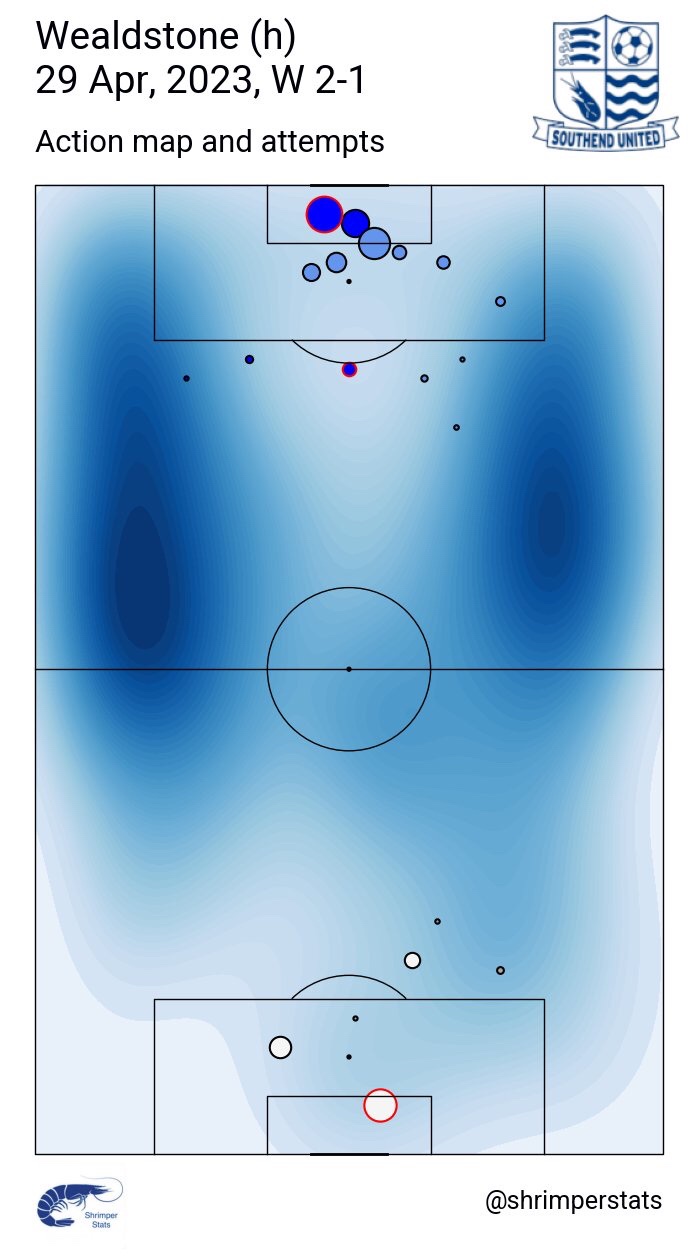
At this point, Wealdstone decided to sit deep in a 5-3-1 low-block, looking to hit Southend on the counter-attack when opportunities to do so arose. As you can see from the below visualisation, Wealdstone’s 5-3-1 looked to force us out wide by preventing us from playing through the middle of the pitch.
Southend have struggled quite a bit this season to break these sides down, and the man advantage didn’t necessarily make the victory a forgone conclusion. However, a couple of tactical adjustments made by Head Coach Kevin Maher gave us the best chance of taking the lead, as I will now explain.
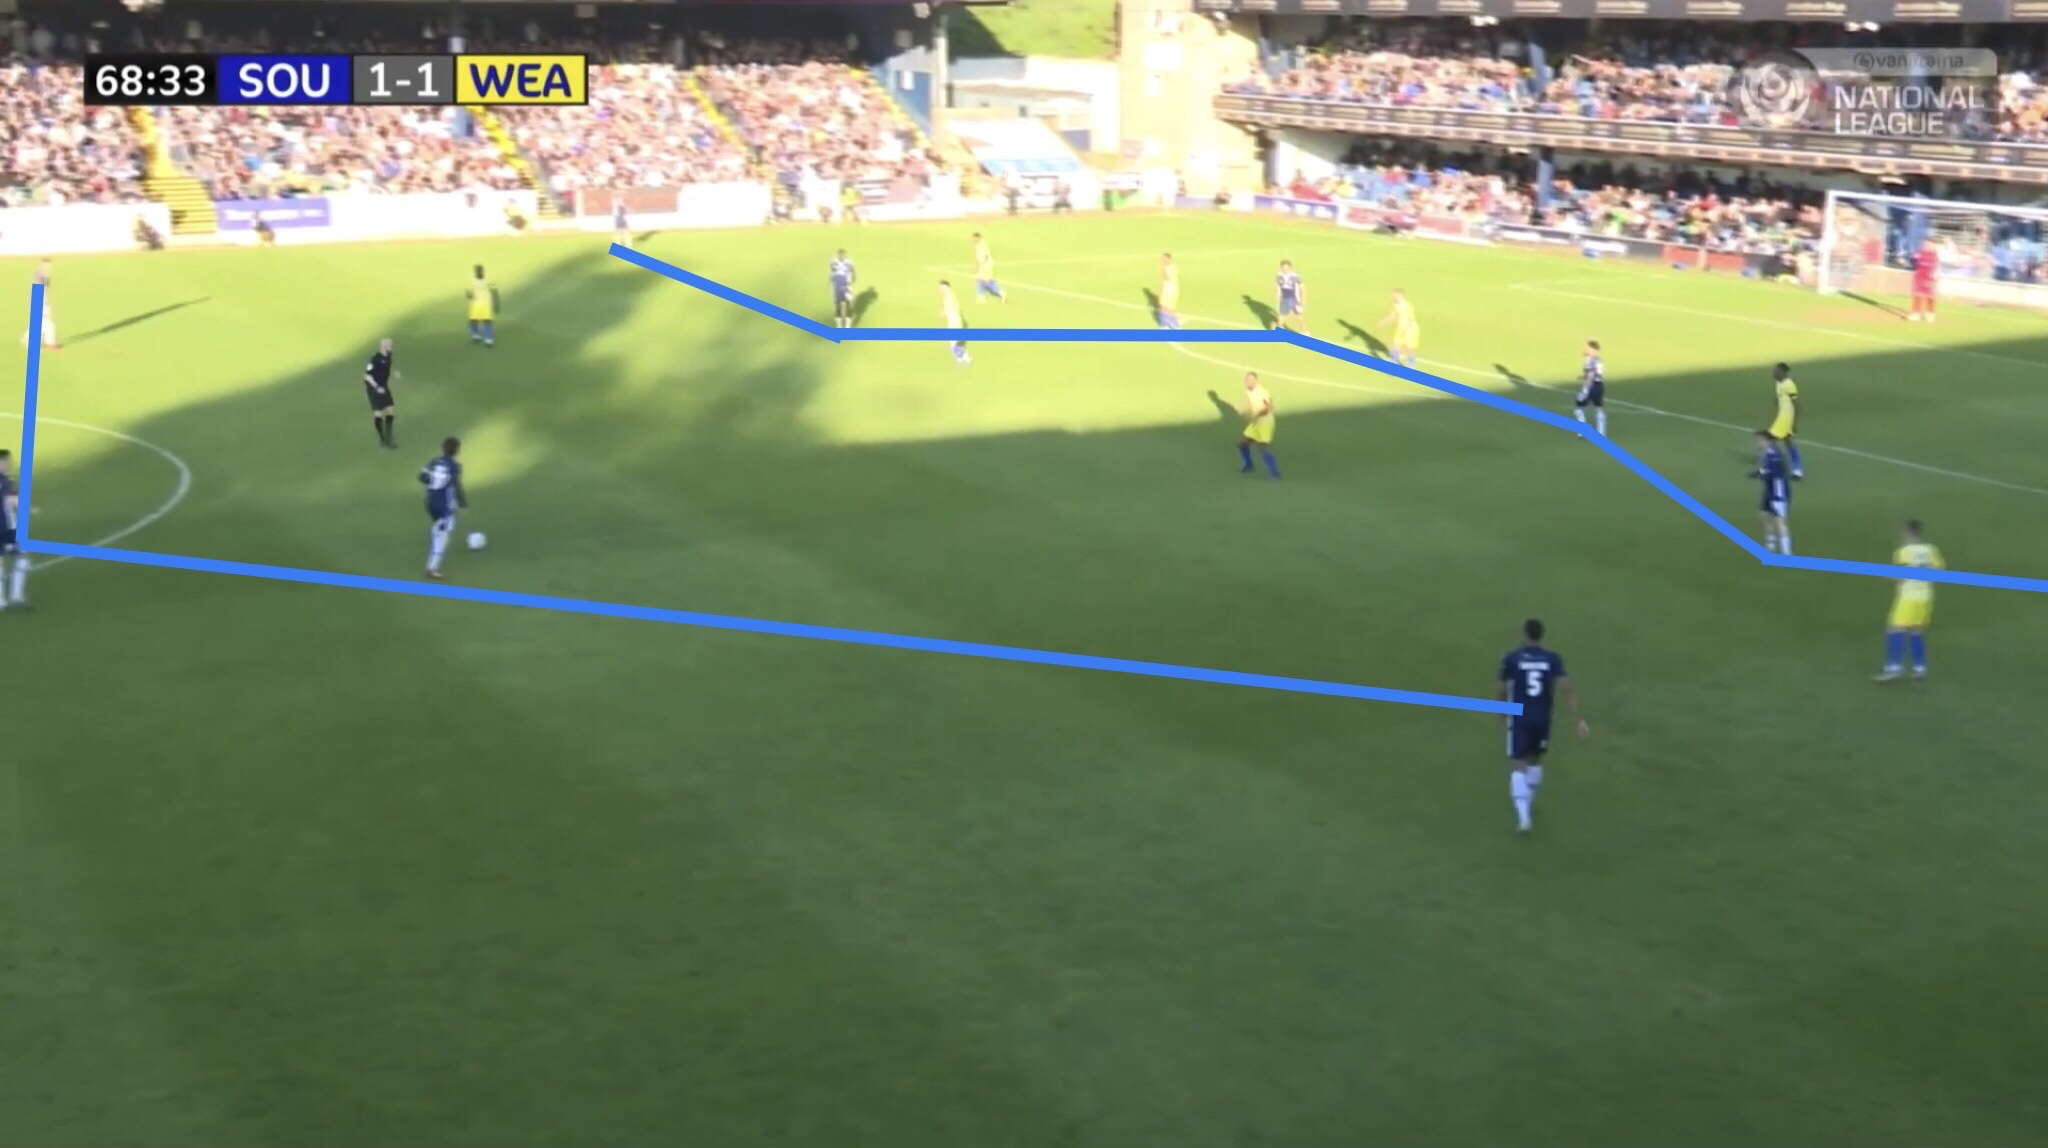
Against Wealdstone’s 5-3-1, Southend pushed both Husin and Fonguck further forwards to create more of a 3-1-6 formation. This meant that we had a numerical advantage (6v5) in the last line of attack, and to prevent an easy pass into one of our front six, Wealdstone reduced the distance between their defence and midfield, forcing them deeper in the process.
With Wealdstone playing very deep, and our 3-1 rest defence against Wealdstone’s one striker giving us greater ability to mitigate turnovers of possession, we had total control for large parts of the second half.
After our victory against Scunthorpe United, I wrote about how pushing Wes Fonguck forwards into a front five helped us (link below). The same principle applies here too.
Scunthorpe Utd vs. Southend Utd Analysis (Wes Fonguck)
Shortly after the red card, Maher brought Dan Mooney on for Jason Demetriou. This gave us much better 1v1 ability on the right, and meant that we now had real threat from both sides of the pitch (as you can see from the below visualisation).
From the below average positions visualisation, we can see that after the red card, and once Mooney (#10) had replaced Demetriou (#24), it’s a very clear 3-1-6 shape for Southend.
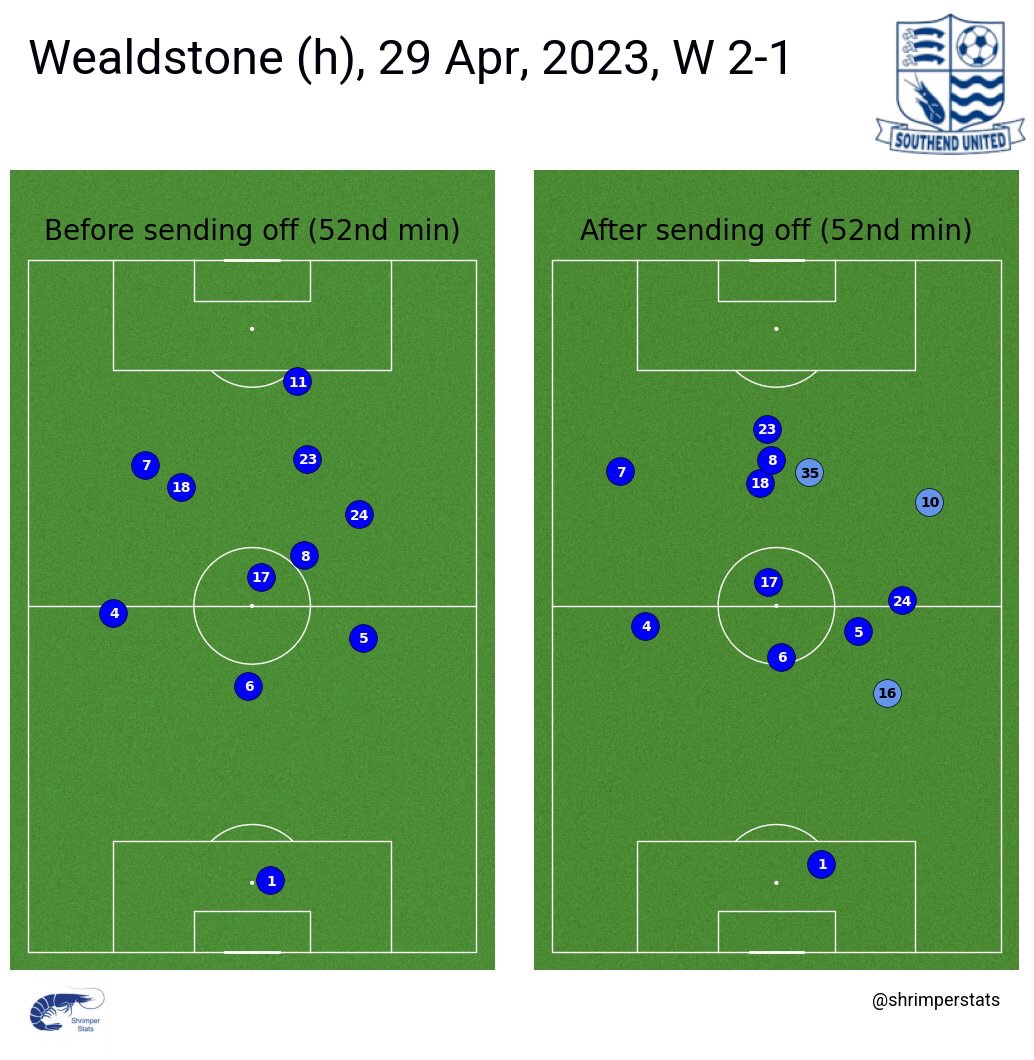
One of the reasons Mooney gives us greater threat from the right compared to Demetriou or Gus Scott-Morriss is because, as well as being a natural attacker, he’s able to cut inside onto his stronger foot.
It’s much easier to receive the ball as a wide player if you’re facing inside the pitch, which means you’re already setting yourself up to cut inside once you have the ball. If you’re right footed and playing on the right side for example, you don’t always have the time to receive the pass, control, and take a touch to get the ball onto you’re stronger right foot before being closed down. Inevitably the ball will often end up being played back inside the pitch.
This is one of the reasons Jack Bridge has excelled for us on the left this season, but he doesn’t always have the same impact on the right side. He gains an extra level of unpredictability when he’s playing on his ‘opposite’ side.
In fact, with Mooney on the right side, our shape looked similar to something that I suggested a few weeks ago:
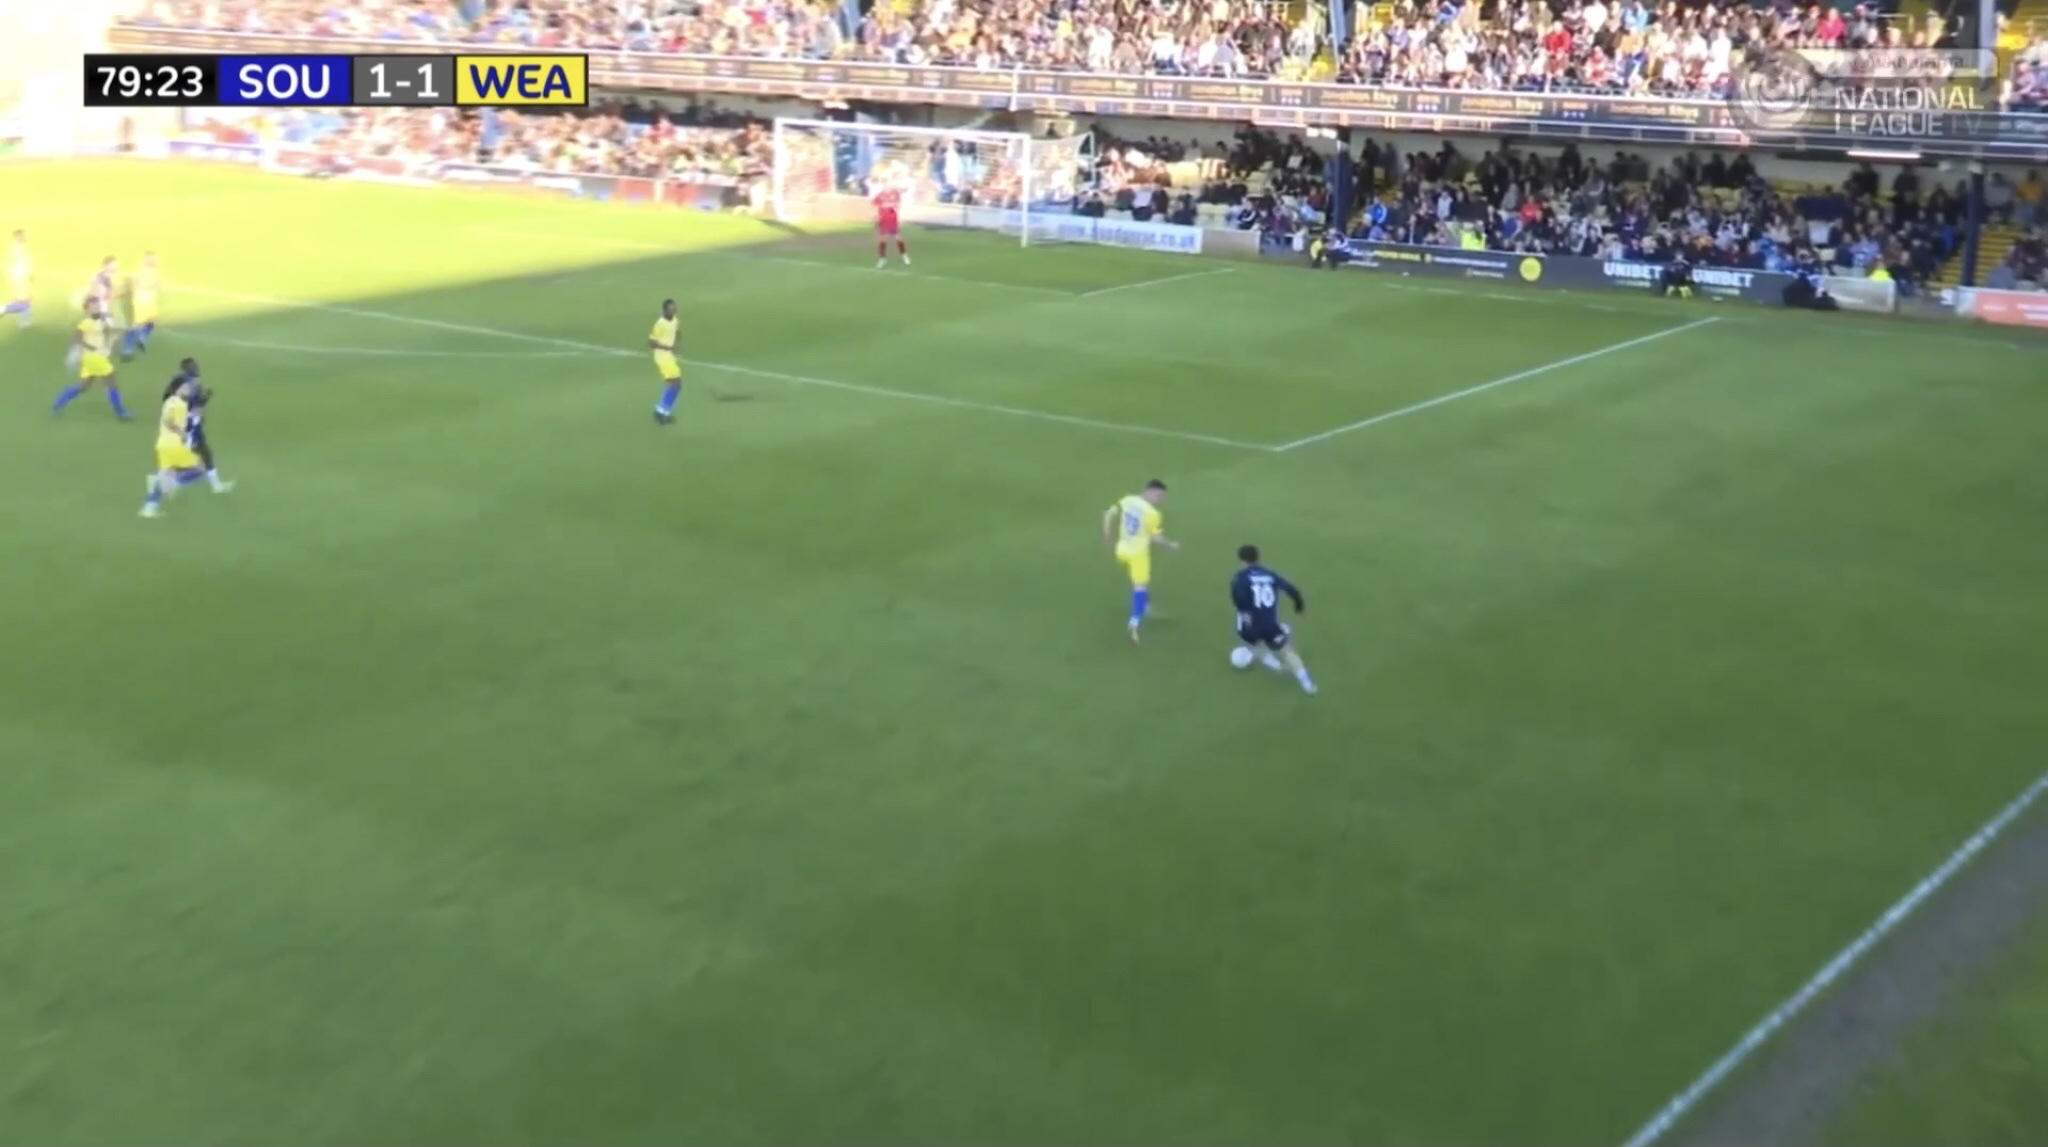
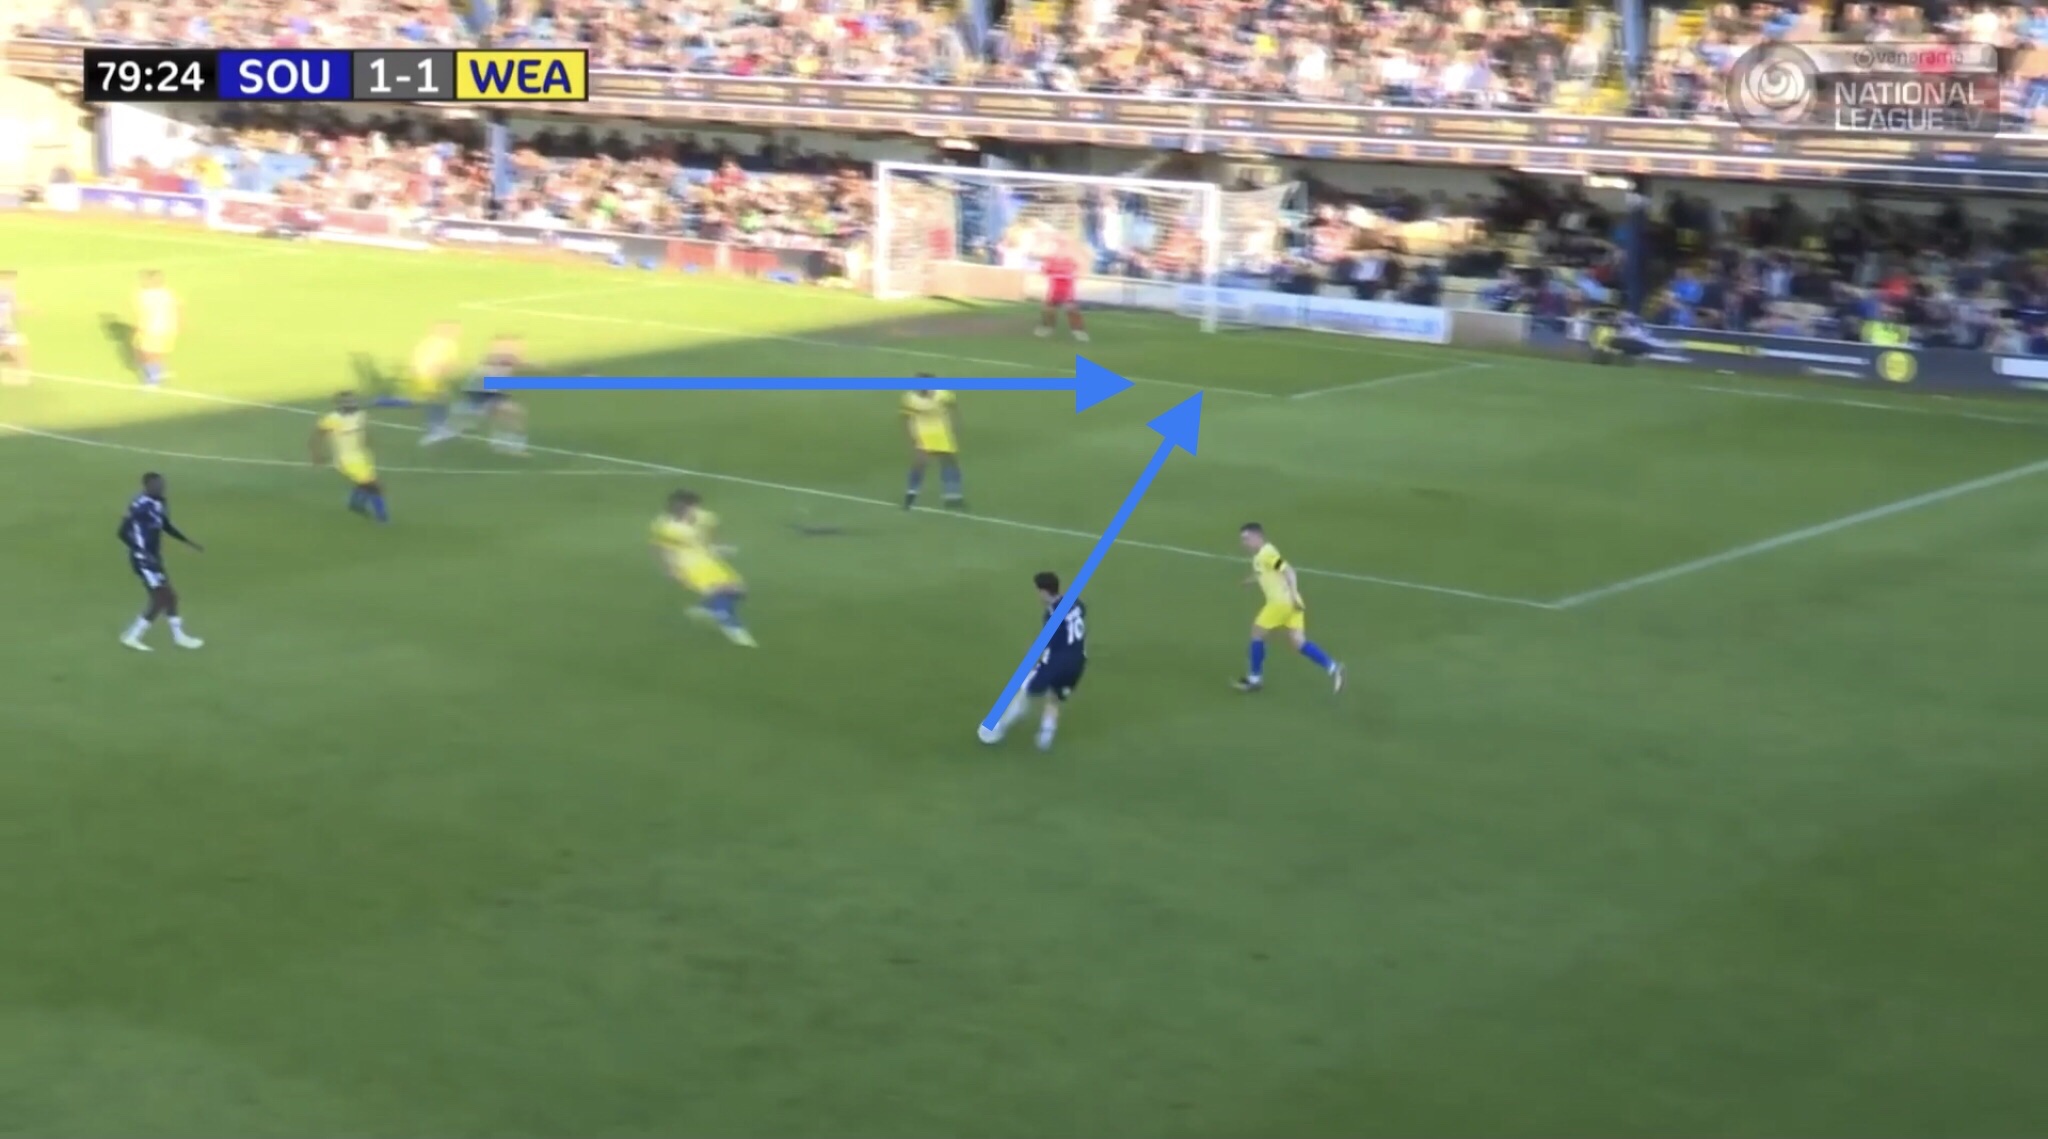
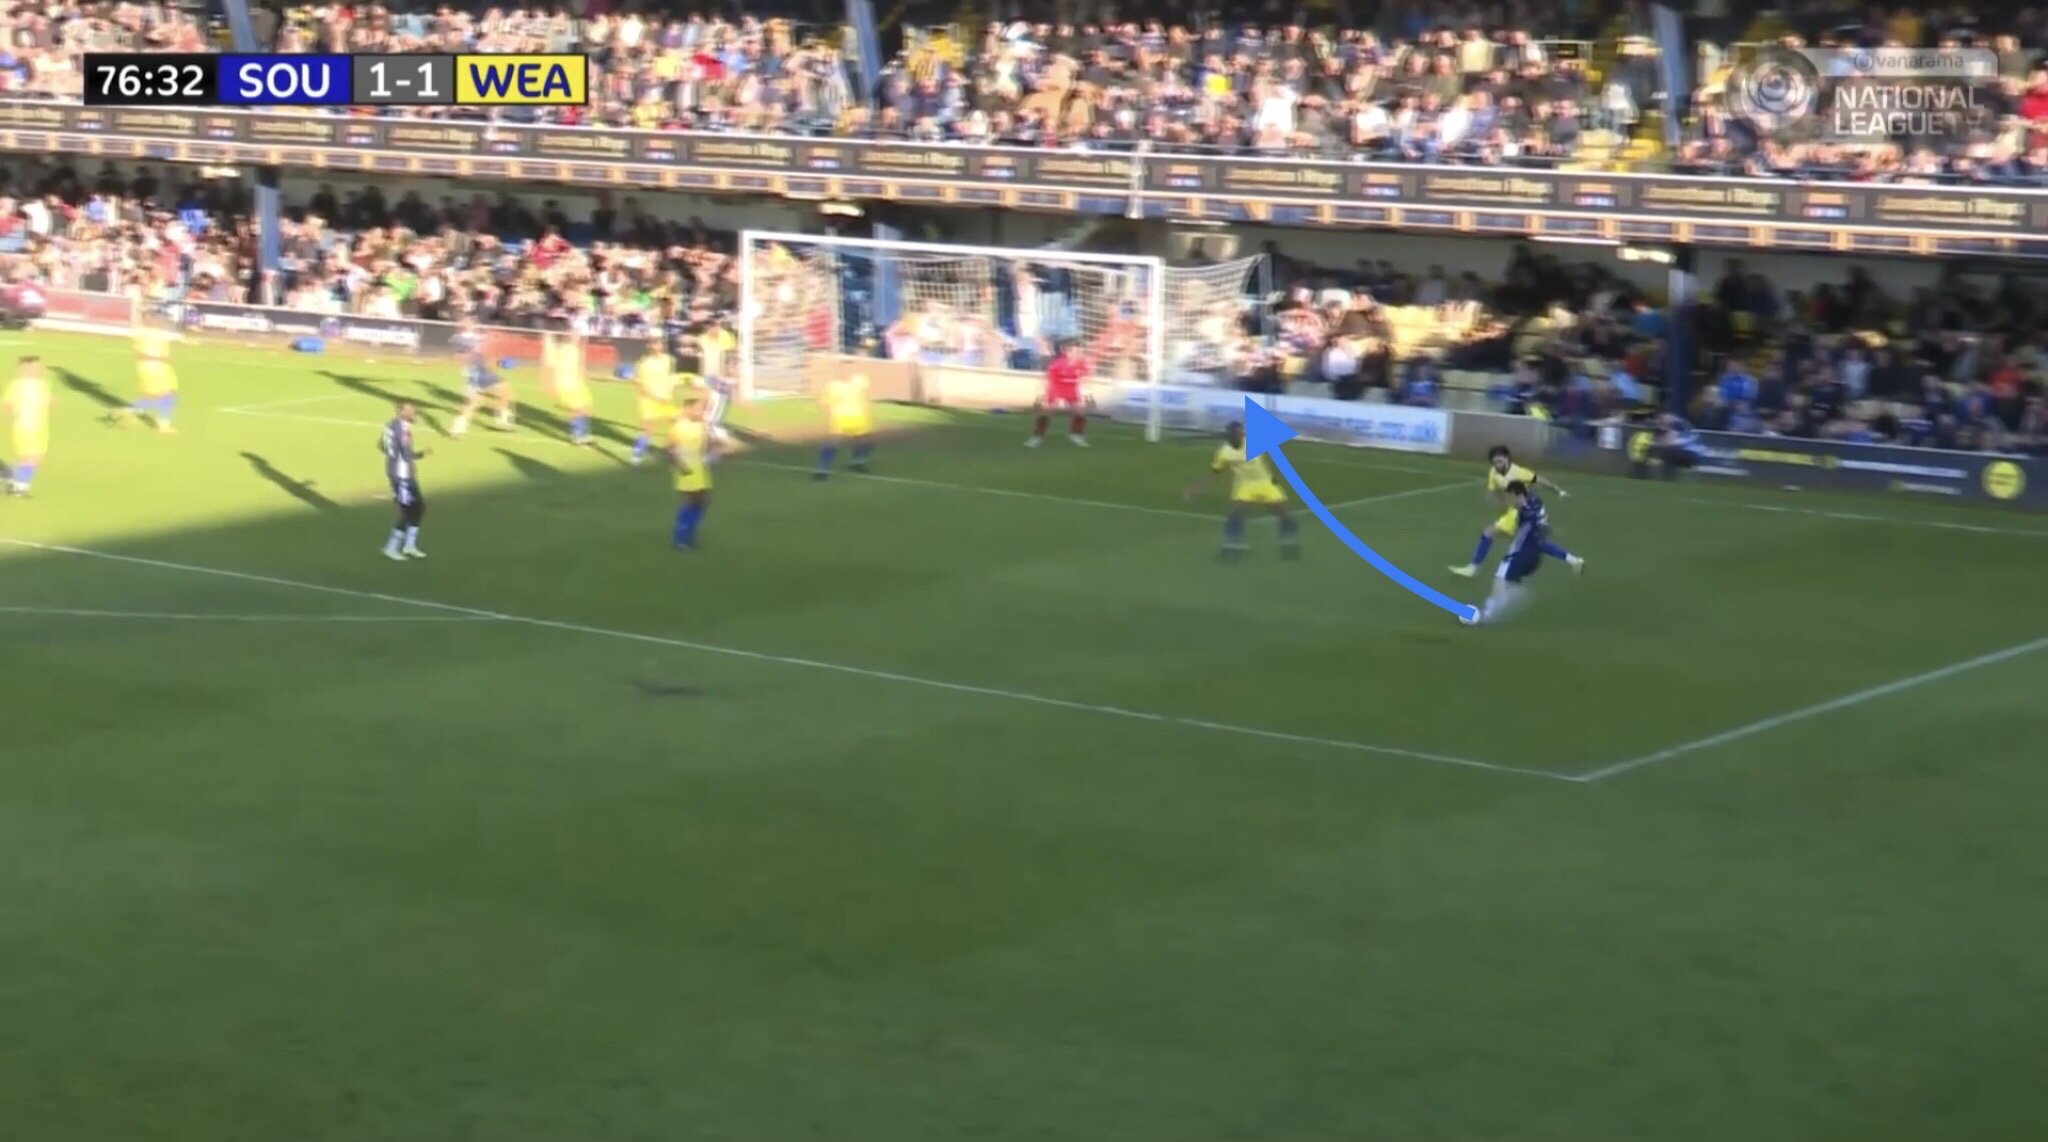
With Mooney holding the width on the right, he was able to constantly find himself in space and able to control the ball before he was closed down. In this example, he takes on an opponent before cutting inside and playing a nice through ball towards Harry Cardwell. Cardwell’s shot was blocked and resulted in a Southend corner.
In this next example, Mooney again receives the ball in space before cutting inside. On this occasion he manages to shoot, but his shot is wide of the post.
Of course, game state has to be considered, and Mooney won’t be able to play in that position instead of Demetriou or Scott-Morriss from the start of a match.
He only played there for about half an hour on the final day of the season against 10 men who were sitting very deep, in a potentially must-win match.
However, if we can get Mooney into these sorts of areas more regularly, and continue to be adventurous and push players into the last line of attack as we have done in the last couple of matches, this could go a long way to finally solving the issues we’ve had at breaking down low-blocks.

You must be logged in to post a comment.