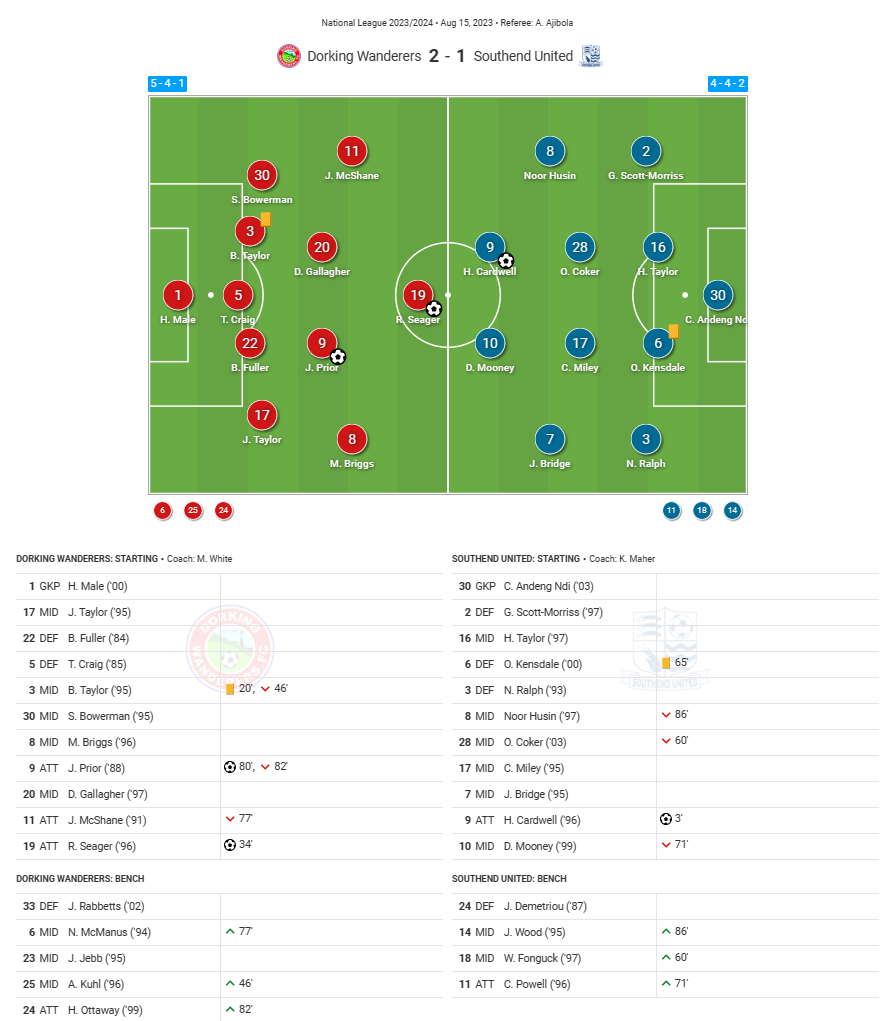
Southend United suffered their first defeat of the 2023/24 National League season on Tuesday night away to Dorking Wanderers.
Goals from Ryan Seager and Jason Prior gave the home side victory, after Harry Cardwell had put Southend ahead early on.
In this article I will explain how Southend attempted to beat Dorking’s pressing structure, and why we failed to have the same level of control in the second half as we did in the first.
Southend’s build-up vs. Dorking’s press
Southend built play in a 3-4-3 ‘diamond’ shape, with Cav Miley sitting ahead of our back three as the #6, Noor Husin and Oli Coker on either side of the ‘diamond’ as our #8’s, and Dan Mooney as the #10.
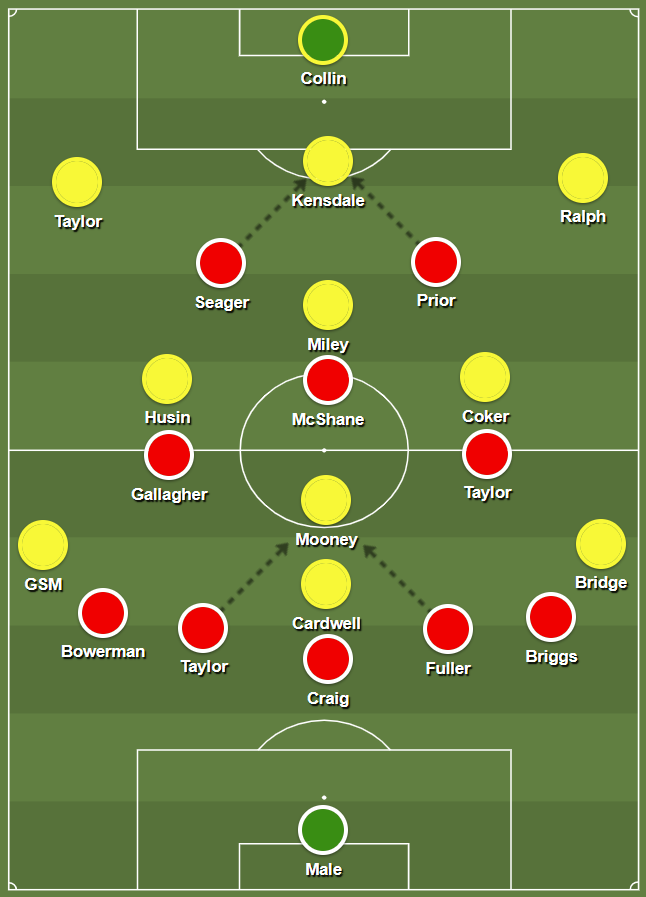
Dorking used a man-to-man pressing system whilst making sure they had a spare player in defence, taking this spare player from the first line of their press. Because Southend had a numerical superiority in the first phase (three defenders against Dorking’s two strikers), Dorking’s forwards gave Ollie Kensdale or goalkeeper Collin Andeng Ndi time on the ball, whilst trying to force him to pass to either Harry Taylor or Nathan Ralph by blocking the central passing options to our midfielders, who were being man-marked by Dorking’s midfield trio.
If the pass went out to Taylor or Ralph, Dorking’s near-side striker would press him, and the far-side striker would mark Kensdale to prevent a return pass. This would leave our spare players as either Taylor or Ralph (whoever didn’t have the ball) who were on the opposite side of the pitch, therefore making a switch pass difficult, or Andeng Ndi, which would force us backwards.
It was difficult for our forward players to find space due to Dorking’s man-marking system, and it required quick passing and intelligent movement to manipulate Dorking’s shape. Alternatively, Mooney (who was playing as the #10) was able to drop into the midfield to offer a passing option. It was the responsibility of one of Dorking’s wide centre backs in their back three to follow Mooney into the midfield, as all three of their midfielders were already occupying our midfield trio.
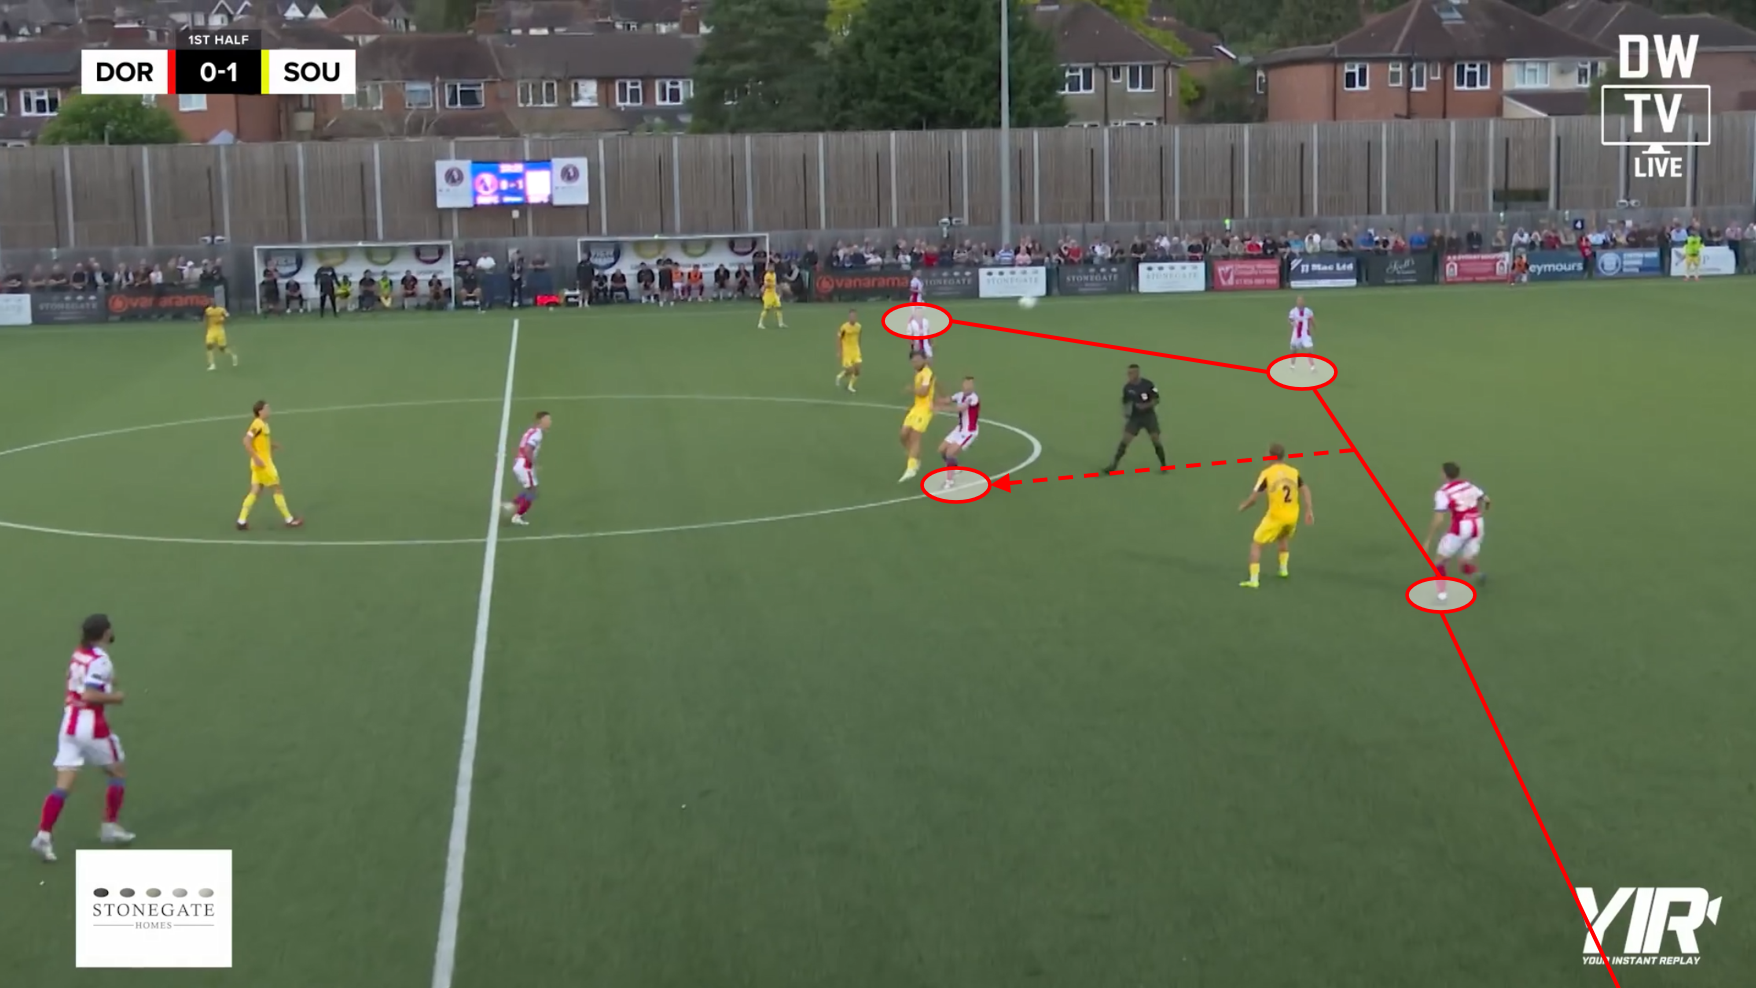
In the below image we can see how one of Dorking’s strikers is pressing Taylor (who has the ball), whilst the other has moved across to mark Kensdale to prevent the return pass – as detailed above. Our spare man is now Ralph, who is at the top of the picture, but the switch pass out to him is too risky.
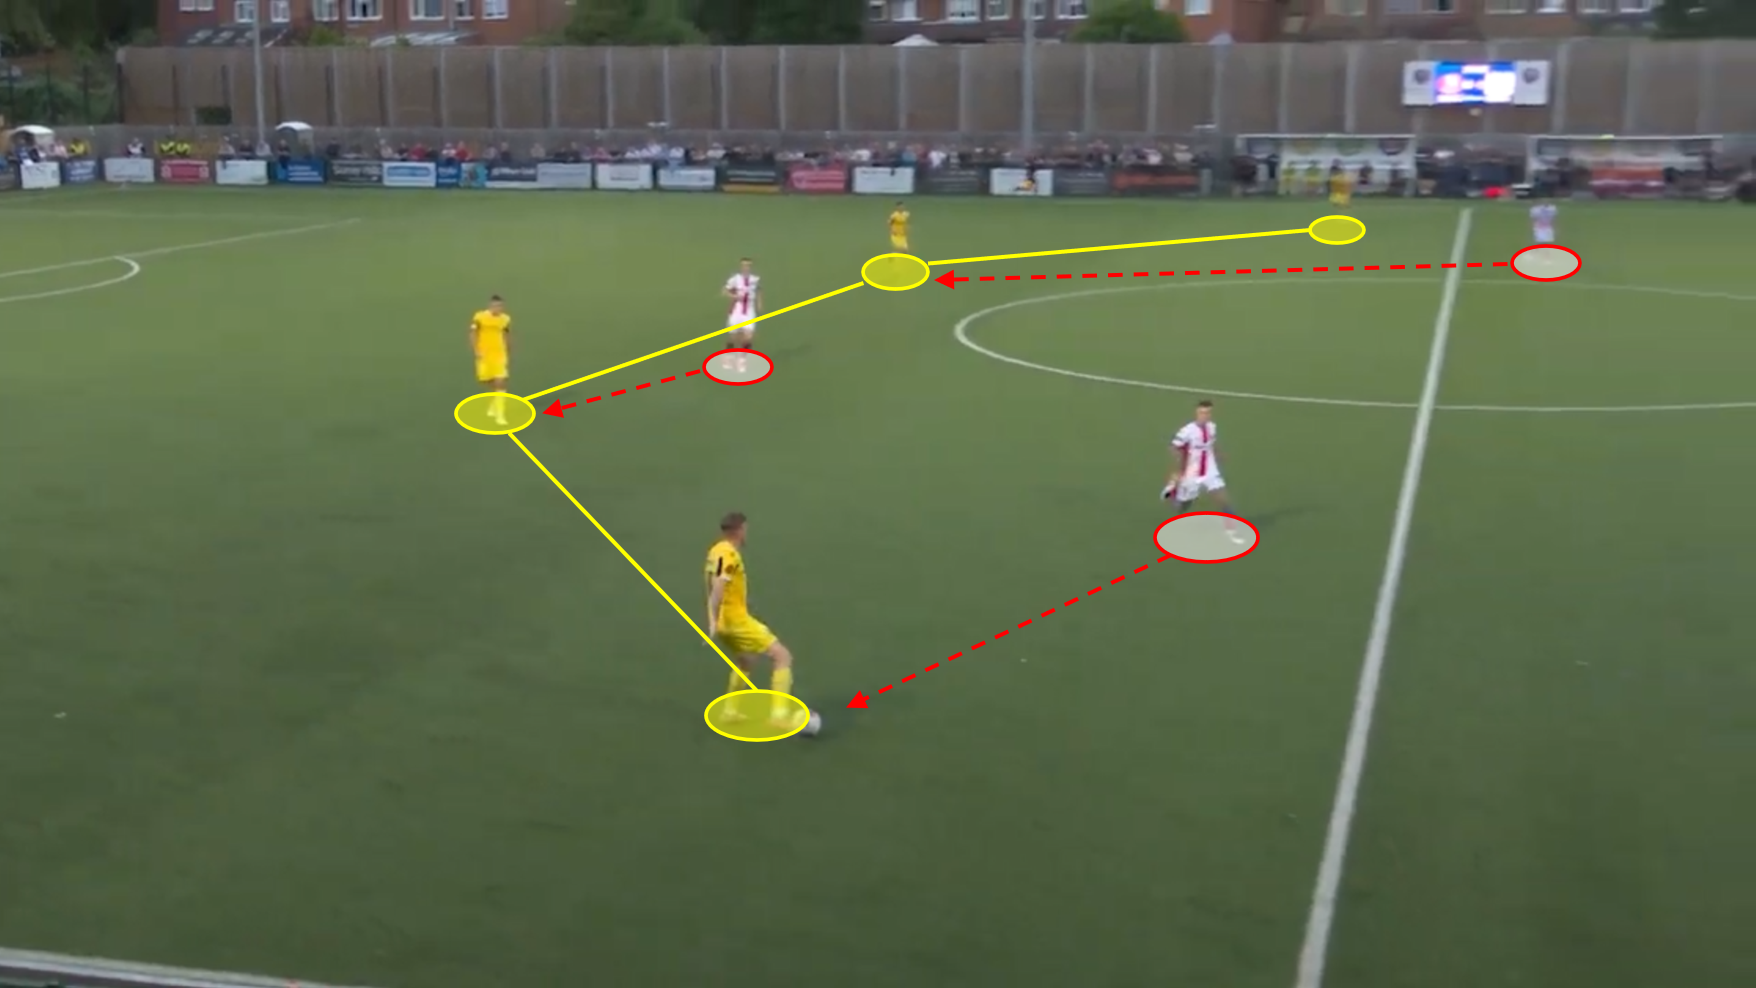
We can also see from the above image how Miley has dropped deeper to form a back four to try and give us an extra player in the first phase of build-up, as well as create different passing angles. However due to Dorking’s man-marking system, all this did was attract one of their midfielders to the high press, meaning they can still go man-to-man against our other midfielders whilst keeping the spare man in defence.
On this occasion we used Harry Cardwell’s speed to play over Dorking’s press. However the ball didn’t quite fall for him quickly enough and his shot was saved. Although in this instance he didn’t score, Cardwell is a very important player to enable us to play over a man-to-man press. By nature, these structures are difficult to play against as all of your players are within close proximity of opponents and they don’t have much time on the ball. Cardwell gives us the option to not only go long for him to challenge for aerial duels where he can win flick-ons, but he’s also quick enough to be able to run onto through passes like in this example.
Here’s a clearer example of one of our midfielders dropping deeper to form a back four during build-up. Here, Husin has dropped into the right back area, but this attracts one of Dorking’s midfielders to the press, whilst their two strikers are marking Taylor and Kensdale. Ralph is the spare man on the opposite side of the pitch, out of picture.
We go long to Cardwell who has dropped slightly deeper, taking one of Dorking’s defenders with him which creates space in their defensive line. He wins the flick-on which falls to Mooney, who has rotated with Gus Scott-Morriss to take up the wide space, to confuse Dorking’s man-marking system. Mooney wins a second header which plays Scott-Morriss in, but he’s too far from goal to be able to trouble the goalkeeper.
Of course, we didn’t just go long to Cardwell and skip the build-up. Particularly in the first 30 minutes of the match we constantly found Mooney in space. As it was the duty of one of Dorking’s centre backs to follow him into midfield, Mooney often had a head start due to his positioning. It was often the responsibility of Barry Fuller – a thirty-eight-year-old centre back, or Bobby-Joe Taylor – a natural left back, to follow Mooney into the midfield. As neither possess both the agility and positional awareness to jump into the midfield effectively, Mooney was often able to find a bit of space and turn his marker or pass onto a teammate before he was dispossessed.
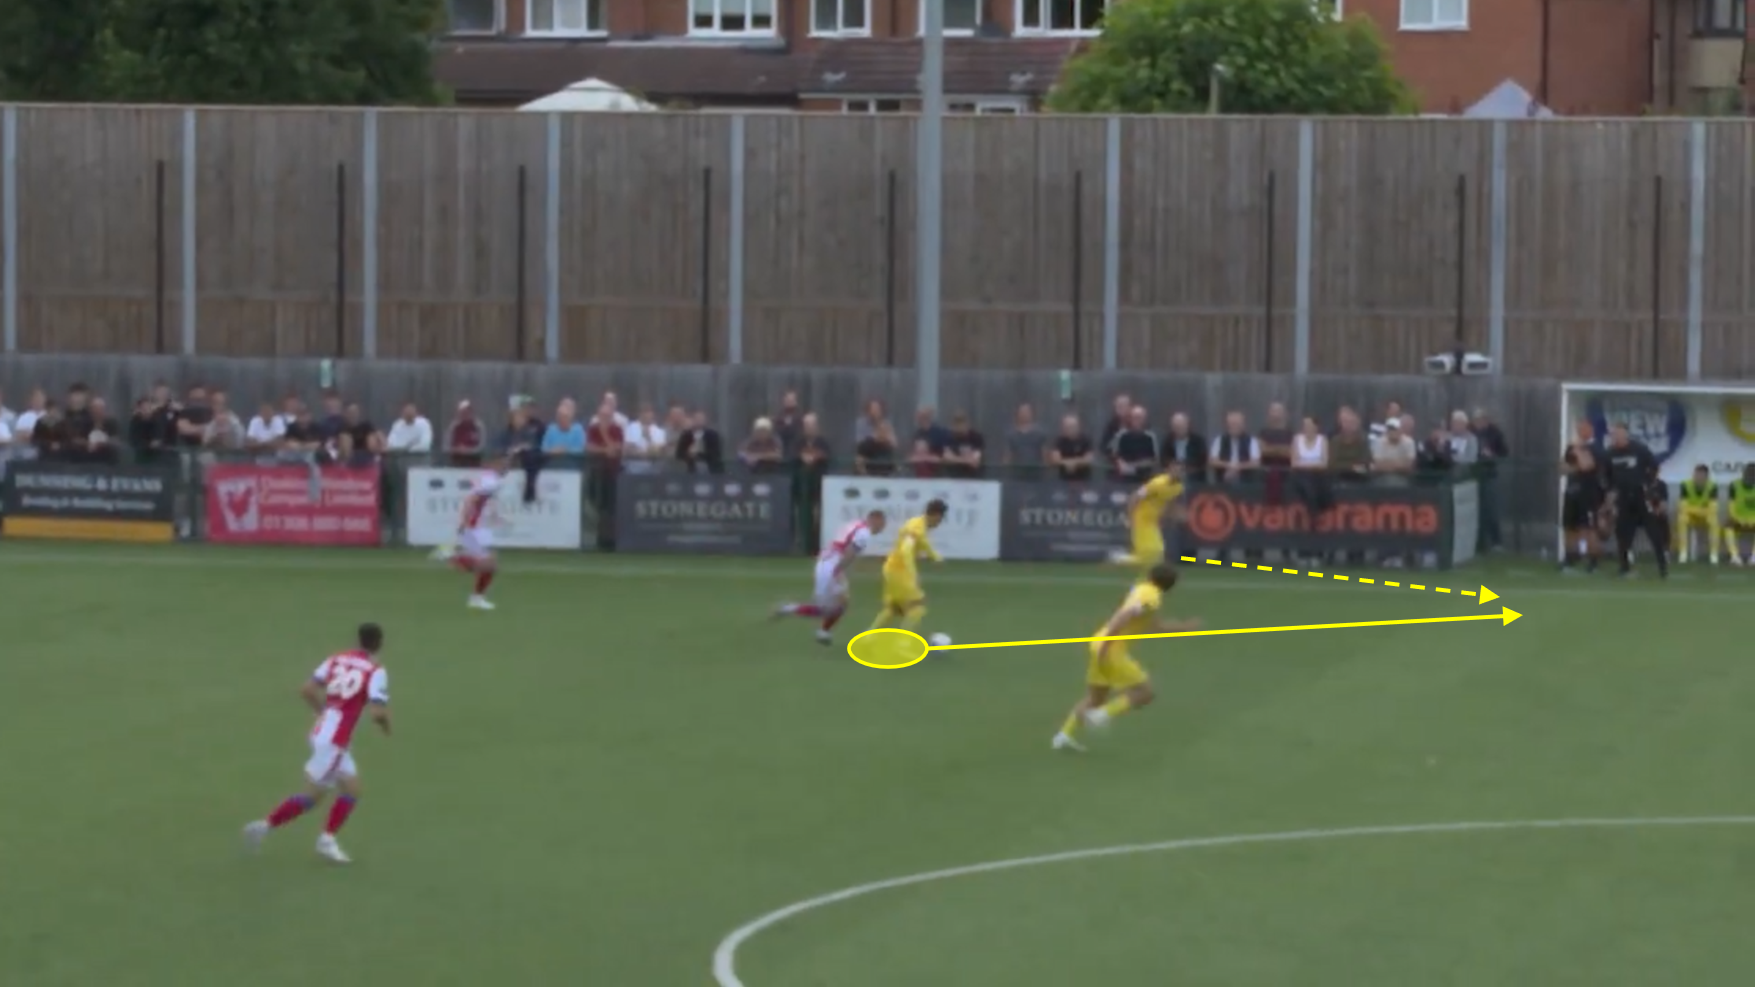
This is how we scored our goal. Early in the match with Dorking losing possession high up the pitch on their right, they had committed their right wing back to the attack, and he was now attempting to counter-press, leaving Jack Bridge in space. We managed to play through Dorking’s counter-press rather than go long, and found Mooney. He turned his marker (one of Dorking’s centre backs) and passed to Bridge, who was in space. Bridge then carried the ball forwards and crossed to Cardwell to score, who had a bit more space as Dorking had one less centre back defending.
Notice in the below image how all of Dorking’s players are marking a Southend player, with an extra centre back next to Cardwell. We can also see how Dorking’s left-sided centre back has stepped up from defence slightly and is ready to press Mooney, who himself has switched to the right-sided #8 in our ‘diamond’ from the #10 position, again to cause confusion.
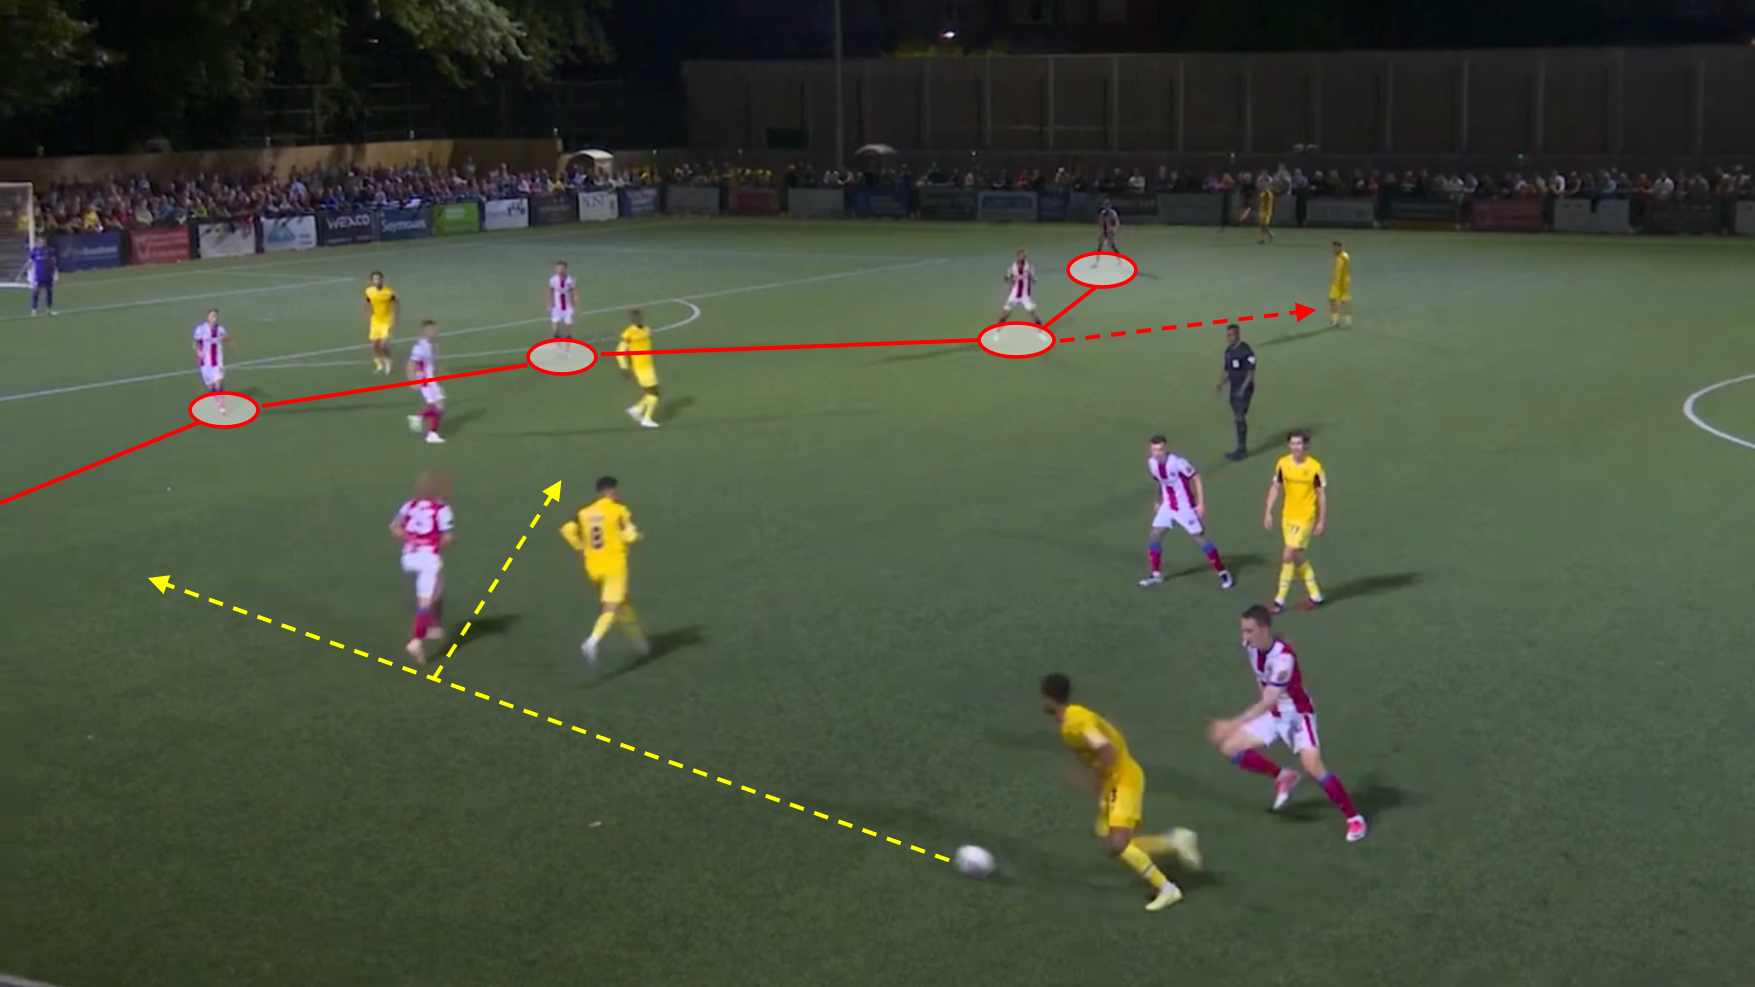
As earlier mentioned, intelligent movement is often required to beat a man-marking system. In the above example we can see how Ralph has possession with Dorking’s near-side striker pressing him (as we learnt earlier). We can also see Husin making a run inside the pitch, which in turn removes a Dorking midfielder from the space just ahead of Ralph. This allows Ralph to carry the ball forwards into the space that has been vacated by the Dorking midfielder. Ralph crosses towards Cardwell, but he’s not quite able to connect with the cross properly and his shot goes wide of the target.
Dorking’s half-time substitution
As earlier explained, Dorking marked Southend man-to-man almost all across the pitch. This meant there were 1v1 duels almost everywhere, and a lot of the time we needed to win these duels to beat Dorking’s press and create space further up the pitch. One way we managed to exploit Dorking’s press was to find Money who more often than not had the beating of Fuller or Taylor (whoever jumped from defence to press him).
To illustrate just how dominant our first half performance was compared to the second, I’m going to mention some stats. In the first half we generated an expected goals (xG) value of 1.65 compared to 0.54 in the second half, by taking nine shots in the first half compared to four after half-time. Our possession share dropped from 53.07% in the first half to 49.97% in the second, and we had 17 touches in Dorking’s penalty area in the first half compared to 10 in the second. Finally our forward pass completion rate dropped from 79.49% to 58.33%, and the percentage of our passes which were long rose from 12.89% to 16.18%.
From these above stats we can see that, after half-time more of our passes were long (which are riskier in nature), and this consequently reduced the successfulness of our forward passes and made it more difficult for us to control the match through possession. This ultimately made it more difficult for us to trouble Dorking’s goalkeeper as much as in the first half.
So why exactly was there a difference in style from us?
Of course you have to consider the fact that we’ve got a small squad who had a disrupted pre-season, so will potentially still be getting up to full fitness. Two matches in four days will also require a big physical output, and we don’t have the luxury of rotating our team too much.
However I also feel that Dorking’s half-time substitution made a difference. Dorking took off Taylor and moved midfielder Dan Gallagher to the left-sided centre back role. Midfielder Aaron Kuhl came on in Taylor’s place. This meant that it was now Gallagher’s responsibility to man-mark Mooney, rather than Fuller or Taylor. Being a natural midfield player, Gallagher possesses both the physical and tactical attributes to deal with Mooney more effectively than Fuller or Taylor could. He’s mobile enough to be able to jump into midfield quickly, and as he’s used to playing centrally, he can win duels in the middle of the pitch effectively. Mooney won six of his 12 offensive duels in the first half, compared to just one out of four in the second.
Now that we couldn’t find Mooney as effectively, in addition to our difficulty in playing through Dorking’s man-to-man press, the second half became much more even. In the second half we accumulated 0.54 xG from four shots, whereas Dorking accumulated 0.68 xG from seven shots. We still did a good job at preventing Dorking from creating too many clear goalscoring opportunities, with their two biggest chances coming from both goals.
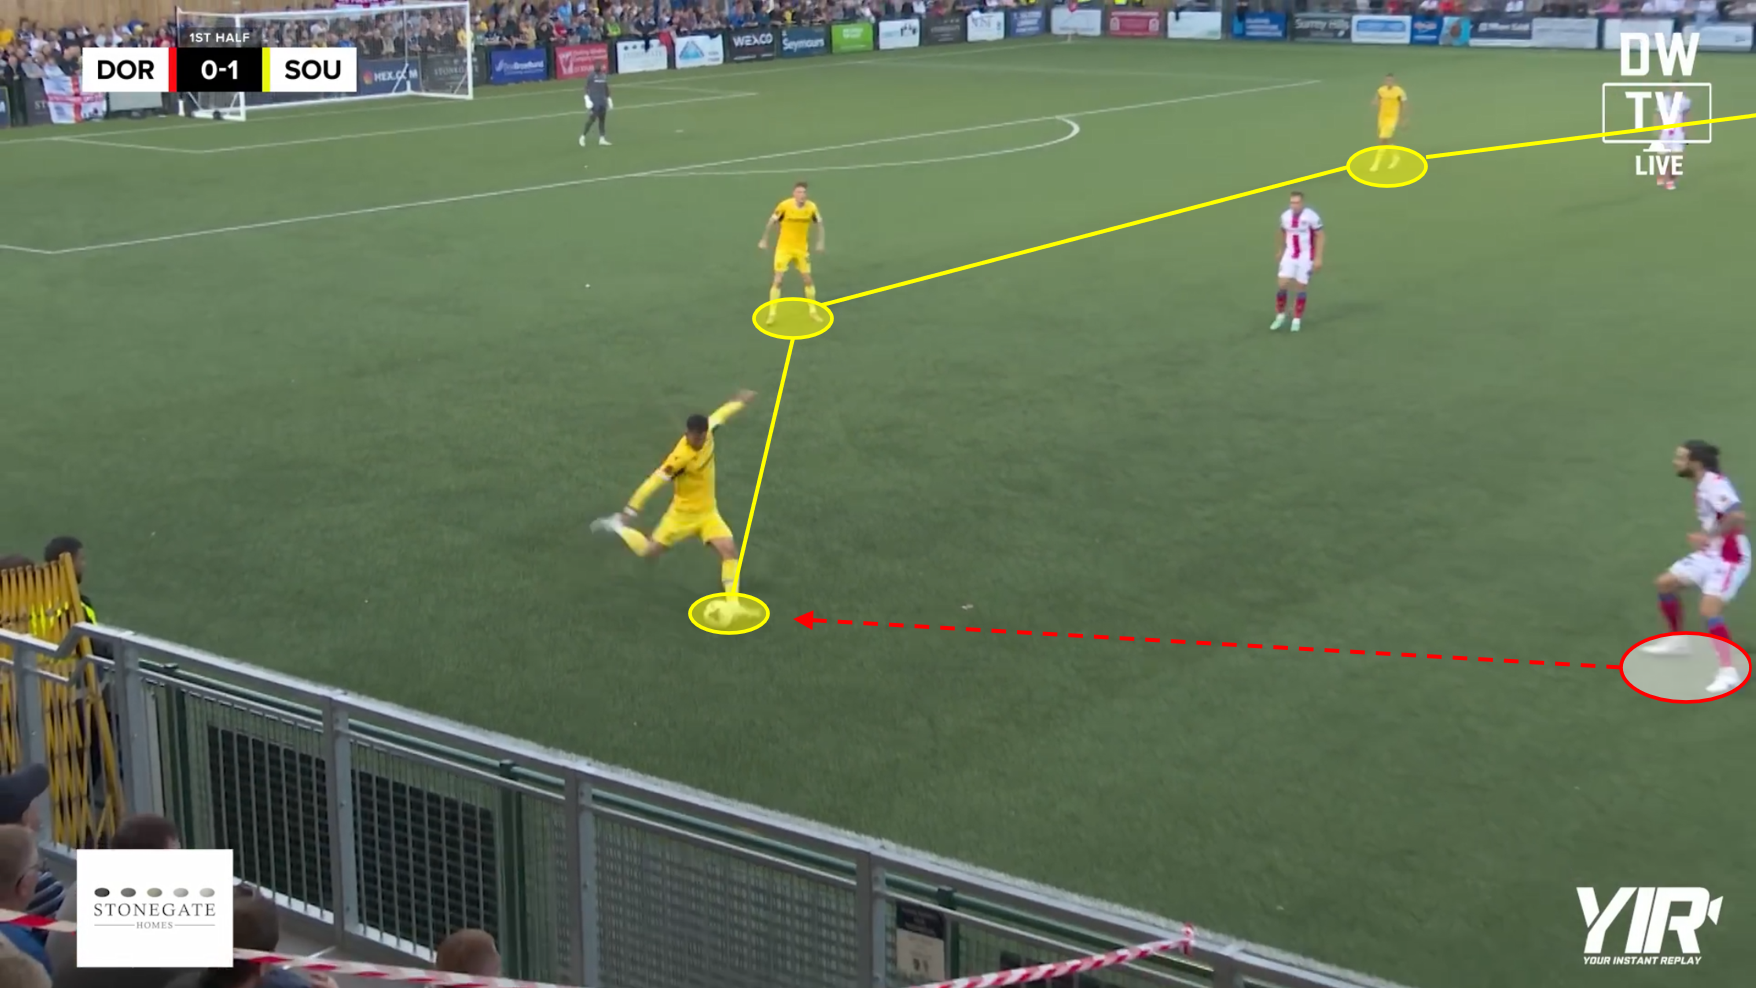
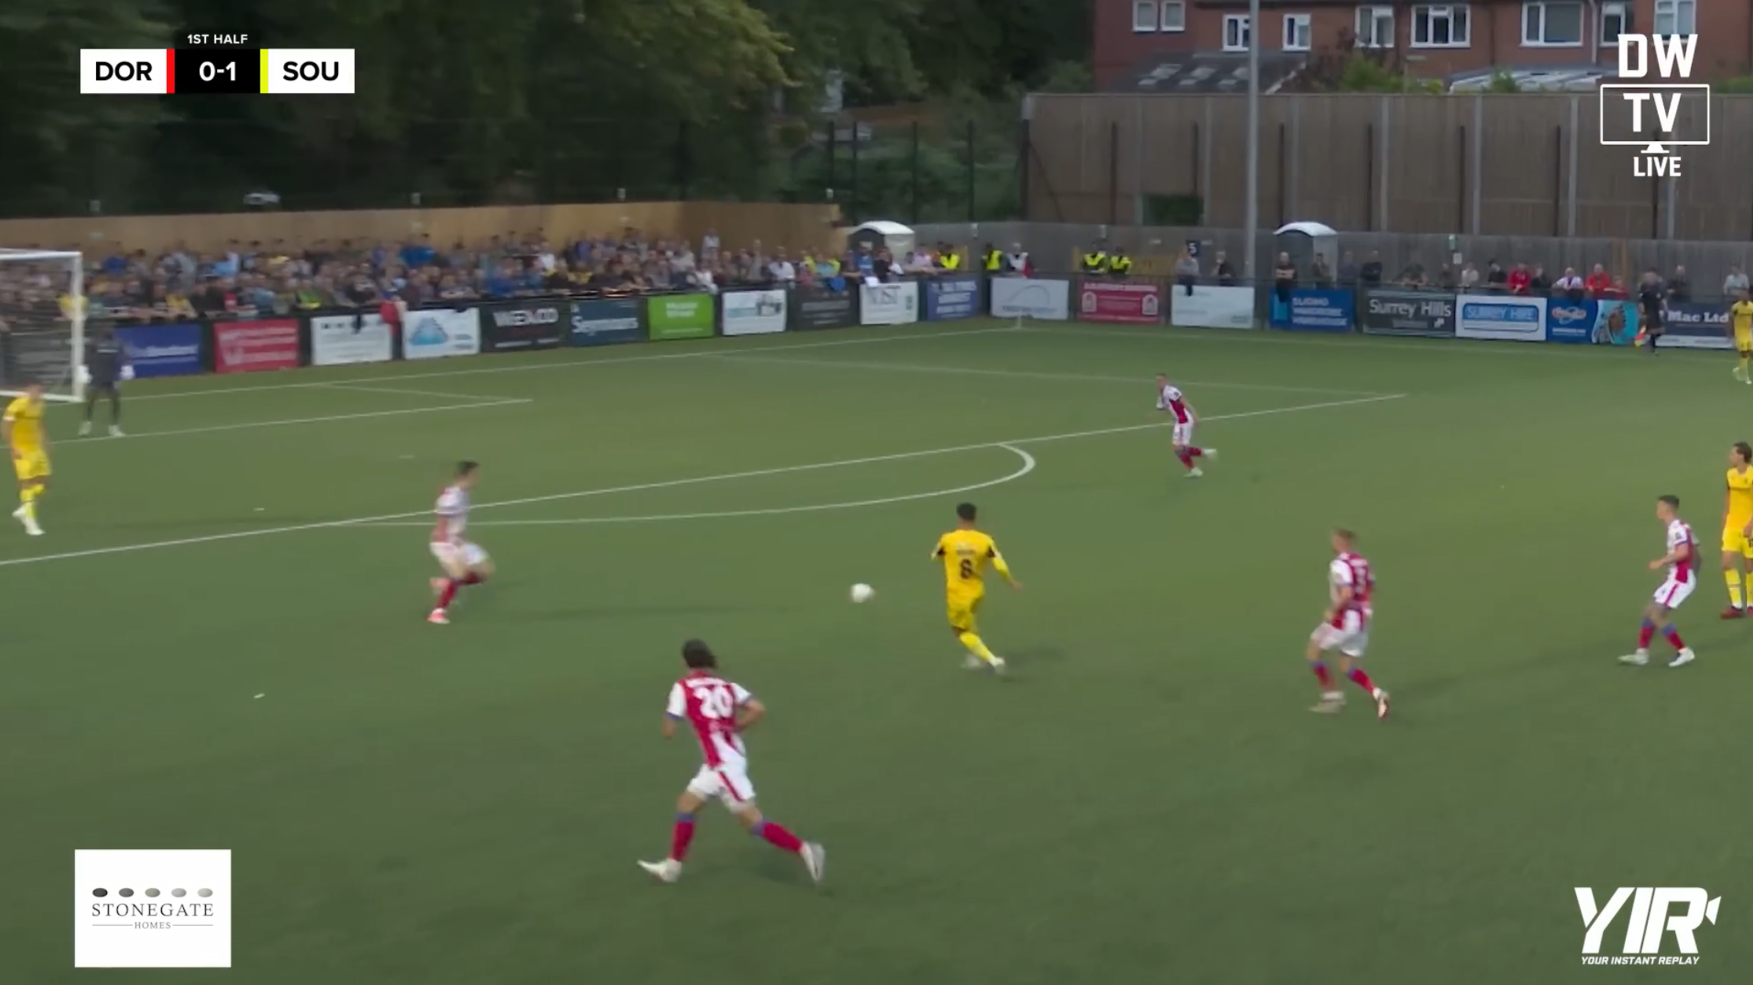
Their goal in the first half came when Husin attempted to pass back to Andeng Ndi. A straight pass into midfield against a man-to-man press is very risky because, as we can see below, there aren’t many passing options available for the midfielder. If Husin passed to Taylor (who is out of picture on our right), a Dorking midfielder is already preparing to press him, and the pass back to Kensdale has been blocked by a striker. As Husin is right-footed, it’s difficult for him to switch the play to Ralph as he’s under pressure from his marker. He doesn’t have time to turn to face Ralph as he’ll be dispossessed, and the pass out to Ralph with his weak foot is too risky with the other Dorking striker in prime position to intercept. His only real option here was to pass back to Andeng Ndi, but obviously the pass didn’t have enough power on it and it was intercepted.
Dorking’s second goal came late on in the second half from a set-piece, and looks similar to goals we’ve conceded previously to Torquay United and Halifax Town at home last season.
Conclusion
Despite this second half, and whether or not Dorking’s substitution may or may not have made a difference, we still created enough chances to win the match – particularly in the first half – and conceded a very poor first goal. You have to take your chances when you’re on top in matches, as we were for the majority of the first half. We created four big chances: one through manipulating Dorking’s man-marking system, one through playing over Dorking’s press, one from a set-piece, and one from a counter-attack which resulted in our only goal of the match, which could easily have been enough to pick up three points instead of zero.

You must be logged in to post a comment.