Since Jack Wood’s goal and assist versus Aldershot Town at the end of February, there has been a lot of discussion around why he hasn’t been given more game-time for Southend United.
In this article I will explain why this may be the case, assess where he currently fits into our side, and offer a suggestion as to how he may be used going forwards.
Southend’s current system
First of all, we must consider how our usual formation works. Southend usually line-up in a 3-5-2 formation, with three centre-backs, wing-backs, two #8’s either side of a single #6 in midfield, and two #9’s in attack. In-possession, our wing-backs push forwards into the last line of attack, and when we defend deep on the edge of our own penalty area we form a 5-3-2 shape (once we’ve had time to bring our wing-backs back into the last line of defence). Our front-two can also consist of a #10 playing behind one #9, instead. Our usual formation doesn’t, therefore, cater for a #10 who plays behind the two #9’s.
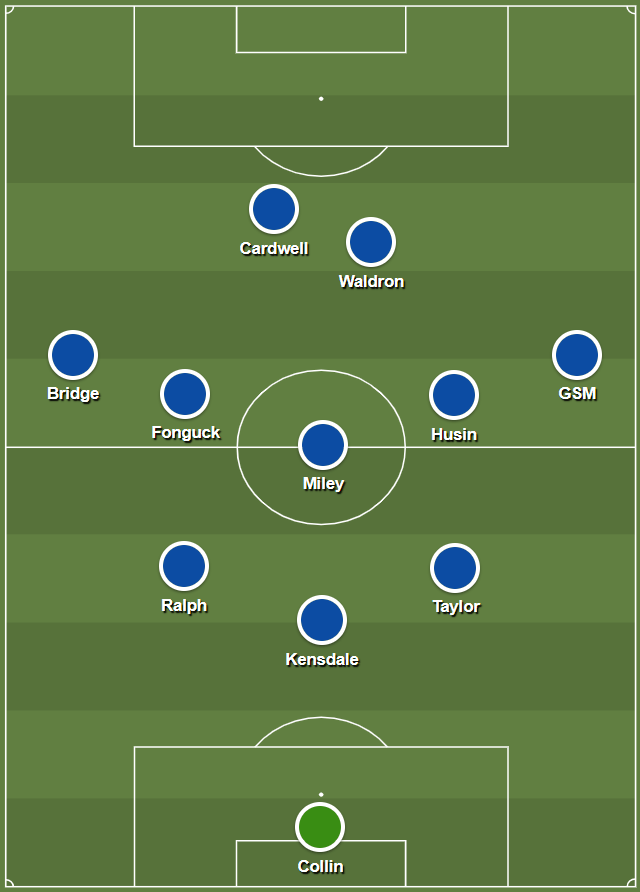
In a recent match versus Dorking Wanderers at Roots Hall, Southend did, however, start the match with a #10 playing behind a strike partnership. Noor Husin was playing behind the front-two, and ahead of a double-pivot of Cav Miley and James Morton. However, this is very different from starting the match with a true #10 profile in the mould of Wood, Dan Mooney or Zak Brunt, for instance. This is because Husin was still required to defend as the right-sided #8 in our 5-3-2 shape when we were out-of-possession, and he possesses the physicality needed to effectively defend as a central-midfielder, unlike the aforementioned trio.
This may seem like a cautious approach: not starting the match with an out-and-out #10 and two #9’s. Clearly, if we set-up with a true #10 as well as two #9’s, we would likely be more of a threat in the final-third in the medium-term. However, we would also be more likely to concede.
If we switched formations slightly to more of a 5-2-1-2, and left both #9’s and our #10 forwards when we were defending deep, we would have one player fewer in midfield. And if we tried to use this #10 within our midfield-three, we wouldn’t be able to replicate the physicality that our current midfield-three offers. That’s not to say that we could never go with a proper #10 and two #9’s, it’s just that we’d be unlikely to start a match like this. This means that we’ll likely only ever have a #10 and two #9’s on the pitch together in certain game-states, where the need for an extra attacker outweighs the need for an extra midfielder. For example, if we were behind in a match late-on, or were against 10 men.
It makes much more sense to continue with our current system where we have three central-midfielders on the pitch from the start of the match, and can hopefully take our chances as and when they come, rather than risking conceding first in the hope that we can create more chances. Especially so, when we consider that Southend have accumulated the third-highest expected goals (xG) figure in the National League so far this season (77.30 xG) – only behind Gateshead and already title-winners Chesterfield. This illustrates that with better finishing we would have scored more goals, even without creating more chances.
Talk of us deviating away from our 5-3-2 out-of-possession shape is pointless. It simply won’t happen, and nor should it. We’ve had one of the best defences in the division in each of the past two seasons, and the 5-3-2 is a huge part of that. Southend have allowed an incredibly low expected goals against (xGA) figure of 87.02 in our last 88 league matches across the past two seasons. The principles behind our 5-3-2 out-of-possession shape are also so well-coached into our entire squad. Everyone knows their role in our system, and it would send a poor message to our players if we suddenly switched from what we’ve built our play around during the past two seasons, especially when we’re so close to being a successful side.
How Jack Wood fits into our current system
As has been previously mentioned, Wood doesn’t possess the physicality required to defend as part of a midfield-three. When we look at some of Wood’s defensive statistics, we can see that he makes significantly fewer ball-recoveries and interceptions than any of our other #8 options.
Additionally, Wood has just a 14.3% loose-ball duel success rate – again, much lower than any of our other #8’s. This is significant as, when sides skip the first-phase of build-up by attempting long passes from defence, it’s important to be able to win these loose-ball duels that occur after the initial aerial duel, in order to regain possession of the ball to initiate an attack. If you lose these loose-ball duels, your opponent can start an attack of their own, consequently forcing you to defend.
But it’s not just the out-of-possession phase that makes it difficult for Wood to be used in central-midfield. This season on average, Wood has only received 11.38 passes per 90 minutes, and has only attempted 15.00 passes per 90 with a 74.7% accuracy. For comparison, on average, Husin receives 32.33 passes per 90 and attempts 48.84 per 90 (82.7% accuracy), and Morton receives 33.46 passes per 90 and attempts 50.26 per 90 (82.3% accuracy).
It is, therefore, clear that Wood doesn’t complete the pass volume which is required from our #8’s in order to help us control matches through possession with regularity. Even when we compare this to Wes Fonguck, who typically positions himself further forwards than our other #8’s would do, therefore offering less of a second-phase presence because he’s further away from our defenders to receive passes, he still attempts over twice as many passes per 90 minutes than Wood does (but still not as many as Husin or Morton), with a far better accuracy.
Therefore, even if we ignored the fact that Wood isn’t as effective out-of-possession as our other #8’s, he would have to be partnered in midfield with either Husin or Morton. Otherwise it would place too much build-up responsibility on our single #6 (Miley) to receive the ball from our defence. Limiting the passing options in build-up isn’t conducive to a possession-orientated approach.
We also have to consider that Wood is potentially competing against four other #8’s in our squad for a regular place in our midfield; these being Husin, Morton, Fonguck and Oli Coker, all of whom have much more experience than Wood at playing in central-midfield. Also, if we were to play Wood as the right-sided #8, considering that he’d have to be partnered with either Husin or Morton, it would mean that we’d have to drop Fonguck, who links very well with Bridge on our left-side.
I have now explained why it’s important to keep our current formation the same, and have ruled out Wood playing in a #8 role from the start of the match. Therefore, the only position in our XI that is left for Wood to occupy is in our front-two.
Wood has predominantly been used as a #10 within our front-two when selected from the start of a match. However, with top-goalscorer Harry Cardwell clearly our first-choice #9, it leaves one space up for grabs. Wood, Danny Waldron, Marcus Dackers and Henry Sandat are our options to partner Cardwell in attack. They all offer something different, and can therefore be rotated depending on their form, and the strengths and weaknesses of our opponents. With the sheer amount of options we have in attack going for one spot in our XI, it’s really no surprise that Wood hasn’t been able to nail down a regular place in our front-two.
Wood is a fairly similar profile to Sandat, in the sense that they are both able to drop deeper and receive passes between-the-lines, although Sandat has demonstrated that he is able to do this far more successfully, so far. As we’ve already established, Wood isn’t particularly useful at winning loose-ball duels that occur after an aerial duel. Again, this is significant as, when we attempt a long pass towards Cardwell, Wood may not be able to effectively regain possession to help us initiate an attack. Instead, we’d likely lose possession after going long towards Cardwell, and would have to defend, instead.
How to get the best out of Jack Wood
Wood isn’t really a true #10, anyway. He’s a very similar profile to Mooney who, before he returned to Altrincham, was used as a #10 in our front-two this season. Mooney, not dissimilar to Wood, likes to play as a winger before being given the freedom to drift inside the pitch to find pockets of space, where he can create chances or attempt a shot at goal.
One of the reasons that it didn’t work out for Mooney (as I wrote about previously) is because, by playing centrally in our front-two, he wasn’t able to receive the ball in his favoured area of the pitch regularly enough. Even though we tried to rotate him with our right wing-back Gus Scott-Morriss (so that Mooney was holding the width on the right-side, with Scott-Morriss inverting), we could only do this once we had the time to rotate them during settled attacks, rather than in transition.
Additionally, with Mooney playing in our front-two, it often left Cardwell as the sole target to aim for from crosses in our opponent’s penalty area. Mooney was, therefore, only really able to contribute in a goalscoring sense whilst playing in our front-two either in transition (when there’s more space to exploit), or by dropping deeper against a low-block to attempt a shot at goal from the edge of the penalty area. Wood is met with similar problems in our system.
This begs the question: ‘how to get the best out of Jack Wood’.
Initially, I thought about whether a change of deep build-up shape against certain opposition into a 4-2-4 would work; Scott-Morriss could drop deeper to form a back-four, and Wood could occupy the right-side in the last line of attack. Then, once we’ve progressed higher, Scott-Morriss and our left-sided #8 would move forwards into the half-spaces, forming our usual 3-1-6 shape.
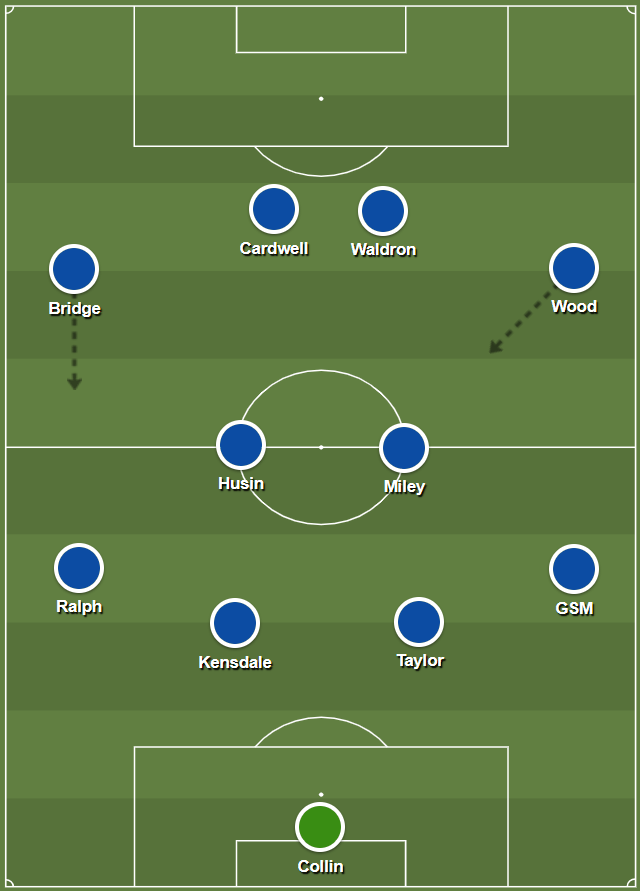
However, even if we ignore the fact that this new build-up shape would have to be coached (which takes time), it would still require Wood to defend as part of our midfield-three. Wood would also have a large distance to cover in defensive transition; going from being positioned high and wide on the right-side, to having to drop deeper into central-midfield. Additionally, this would only allow us to find Wood on the right-side if we progressed safely from the first-phase of build-up into the final-third. If, for instance, we were defending in our 5-3-2 shape and then had an opportunity to attack in transition, Scott-Morriss would be the one on the right-side, with Wood tucked inside in his #8 position.
Taking into consideration all of the above, I think that the best way to use Jack Wood is as an impact player off of the bench. This way, he wouldn’t be asked to play in a position that doesn’t totally suit him, and he wouldn’t weaken our out-of-possession phase by being asked to defend in central-midfield.
Instead, he’d be able to come off of the bench late-on in a match if we needed to break down an opponent who are sitting deep in a low-block. If against a low-block, our ability to create frequent settled attacks and have subsequent control would be inherent. As a result, Wood would be able to play as the right-sided #8 in our side, as he’d have less defending to do, and we’d have more time to rotate Wood and Scott-Morriss so that he was out on the right-side, with Scott-Morriss inverting.
It’s no secret that our right-side lacks the same threat against low-blocks as we possess down our left-side. Although Scott-Morriss still attempts 5.00 crosses per 90 minutes compared to Jack Bridge’s attempted 5.17 crosses per 90, Scott-Morriss is only successful with 27.50% of his crosses, whereas Bridge is successful with 41.52% of his.
Scott-Morriss is also unable to consistently create separation from his marker to the same level as Bridge is, which makes it more difficult for him to create clear crossing opportunities. One way to create this separation is through dribbling against your marker, but Scott-Morriss attempts just 1.95 1v1 dribbles per 90 minutes, whereas Bridge attempts 5.61 1v1 dribbles per 90. Additionally, Scott-Morriss doesn’t have the quick burst of pace that may counter a lack of dribbling ability, as another way to create separation.
In addition to Wood’s superior dribbling ability (as more of a natural winger), he is left-footed but plays on the right-side, therefore allowing him to cut inside onto his stronger foot to make it easier for him to find space to deliver crosses into the penalty area. This is unlike Scott-Morriss, but similar to Bridge.
As more of a natural winger than Scott-Morriss, Wood would provide us with greater threat from the right-side against low-blocks when we’re looking to cross the ball into our opponent’s penalty area. It would also allow Scott-Morriss to invert into the midfield, where he’d have less distance to cover to get into the opposition penalty area to get on the end of crosses.
In addition to being brought off of the bench to help us break down a low-block, Wood may also be able to be used as an impact player if we were looking to change formation part-way through a match. Although I’ve already said that we shouldn’t be looking to change our formation from the start of matches, there may be matches where it has to be done. For instance, if our pressing structure wasn’t working initially, and we had to change shape to make it more effective.
This ‘impact player’ role is the role that I think Mooney should have been able to occupy for us. However, Mooney realistically could never be this player for us, as he was signed with such huge expectations, and really needed to see more regular game-time after establishing himself as a proven National League player after his last season at Altrincham. In contrast, due to Wood’s age and inability to, as of yet, feature regularly at this level, it makes much more sense to use him as an impact player, where he may not have huge game-time expectations at this point.
Conclusion
To conclude, it is not sensible to move away from our 3-5-2 formation when we consider how close we are to being a successful side at this level. That’s not to say that the moment will never come, but now’s not the right time. As a result, there isn’t a position that totally suits Jack Wood from the start of a match, although I would like to see him given an opportunity as the right-sided #8 in our side, once a top-seven finish is mathematically impossible.
Therefore, an ‘impact player’ role late-on in matches against sides who are sitting deep in a low-block is the best way to utilise Wood’s skillset. Because we could have frequent settled attacks and lots of control, it would be easier for Wood to position himself on the right-side, where he’d increase our threat from this side of the pitch. Either that, or if we wanted to switch the shape of our pressing structure, Wood could be brought on to be used on the right-side in our high-press.

You must be logged in to post a comment.